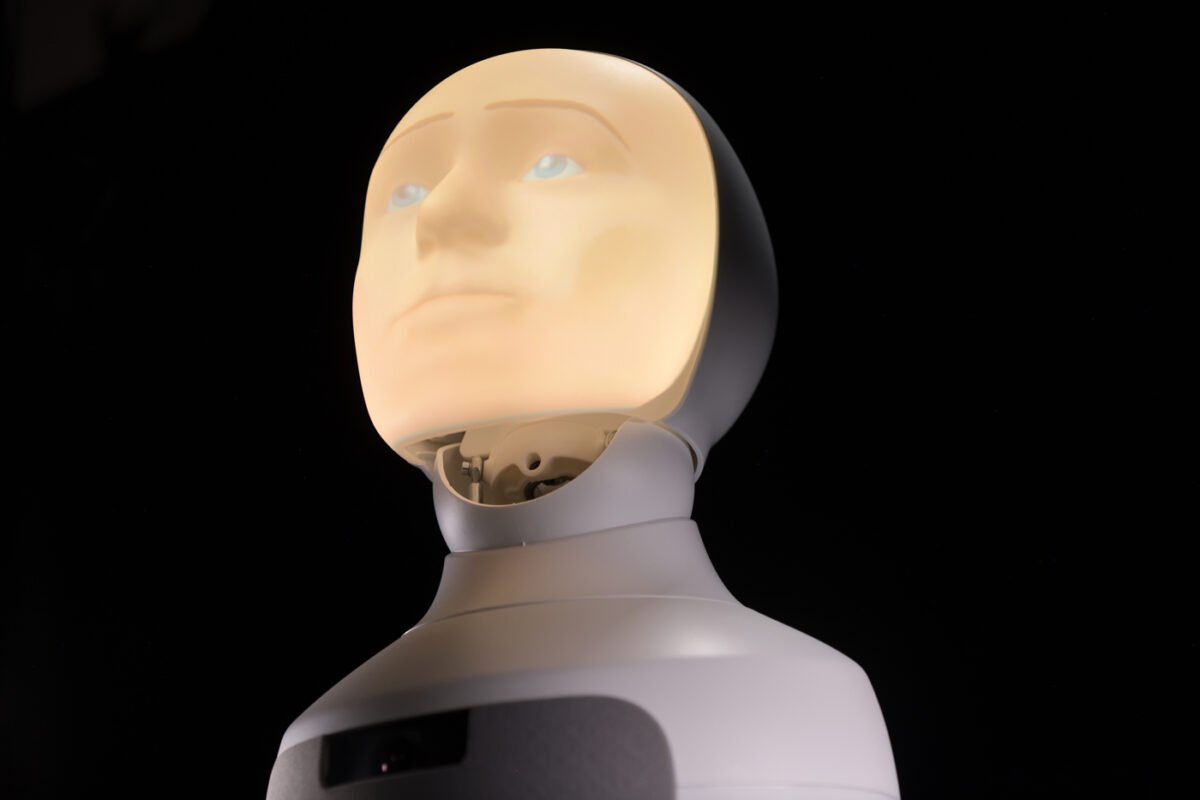
A step-by-step guide for a complete beginner: set up the physical Furhat robot and the Virtual Furhat, run your first Python scripts, and hold a real spoken conversation with ChatGPT through the robot.
Written from a real, complete setup session on October 15, 2026 in the RAP Lab, using the lab’s robot furhat-677 and a Windows laptop. Every screenshot in this guide is from that session, in the order things actually happened — including the mistakes, which are collected honestly at the end with what fixed them and what is still open.
Before you start
What you will have at the end
- The physical Furhat on the lab Wi-Fi, with its web interface open on your laptop.
- A Virtual Furhat running on the same laptop (a full software copy of the robot).
- Python installed, with three working scripts:
01_hello_world.py— connects, speaks, nods, lights its LED, listens once and repeats what you said.02_chatbot.py— a real back-and-forth spoken conversation, powered by ChatGPT (OpenAI).03_follow_me.py— the robot turns its head and gaze to follow the nearest person (written and ready; see the status note in Part F).
What you need
| Item | Notes |
|---|---|
| A Furhat robot | This guide uses the lab’s unit, named furhat-677. Your robot’s name will differ slightly (furhat-XXX) — use your own name wherever this guide says furhat-677. |
| A Windows laptop | On the same Wi-Fi as the robot. Our session used an ASUS laptop. |
| The lab Wi-Fi name and password | Ours is RAP-Lab. Any normal Wi-Fi with internet works. |
| A Furhat Developer Zone account | Free, at furhat.io — Part B shows the sign-up/login. This also gives you the Virtual Furhat. |
| An OpenAI account + about $5 of API credit | Only needed for the chatbot (Part E). The API is billed separately from a ChatGPT subscription. |
| The starter code | A folder called furhat-realtime-api-starter containing 01_hello_world.py, 02_chatbot.py, 03_follow_me.py, requirements.txt and .env.example. Ask the lab for the zip file. |
| About 60–90 minutes | Most of it is waiting for installs and downloads. |
The one idea to understand first. There are two “robots” in this guide, the physical Furhat and the Virtual Furhat on your laptop , and they run the exact same code. Only one line changes: the address the script connects to.
And the robot never talks to ChatGPT by itself. Your laptop script is the middle-man: it listens through the robot’s microphones, sends the words to OpenAI, gets a reply, and speaks it through the robot. Robot = ears, face and voice. OpenAI = the brain. Script = the wiring.
Part A — The physical robot: power, network, web interface
Goal of this part: the robot is on the lab Wi-Fi, and you can open its control panel (the “web interface”) in your laptop’s browser.
Step A1 — Power on and open the face menu
- Plug in the Furhat and switch it on. Wait for the face to appear.
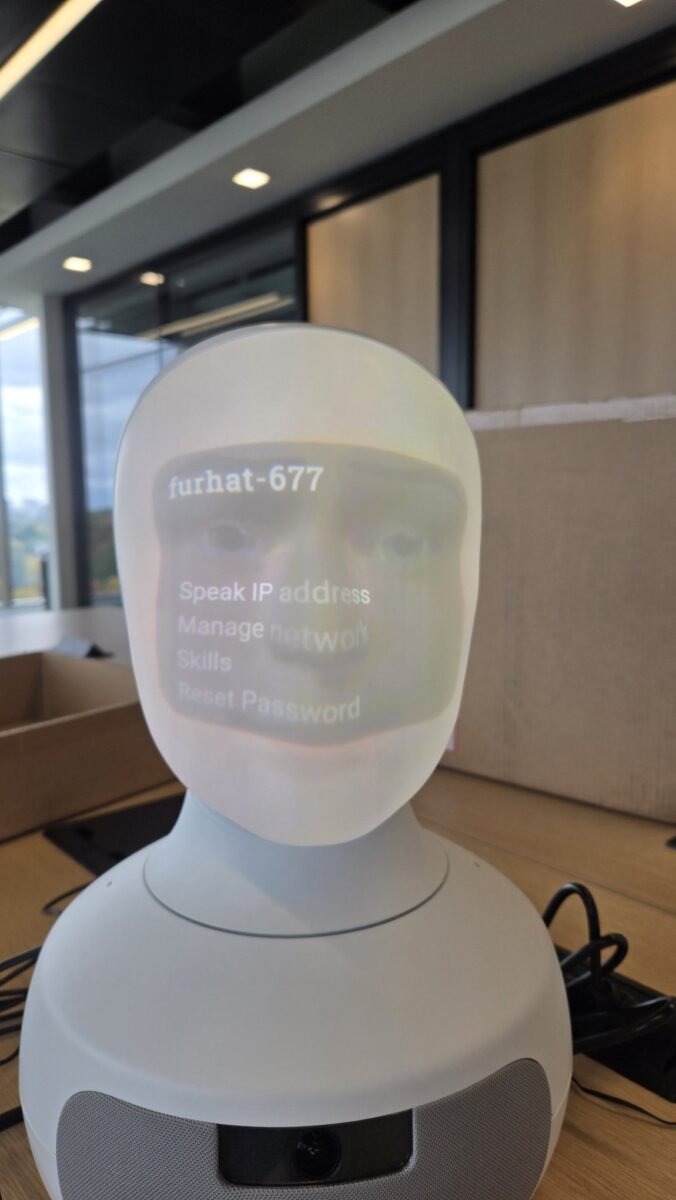
- Use the rotary button on the back of the head to open the menu shown on the face. The top line is the robot’s name — ours reads furhat-677.
Step A2 — Check the network screen
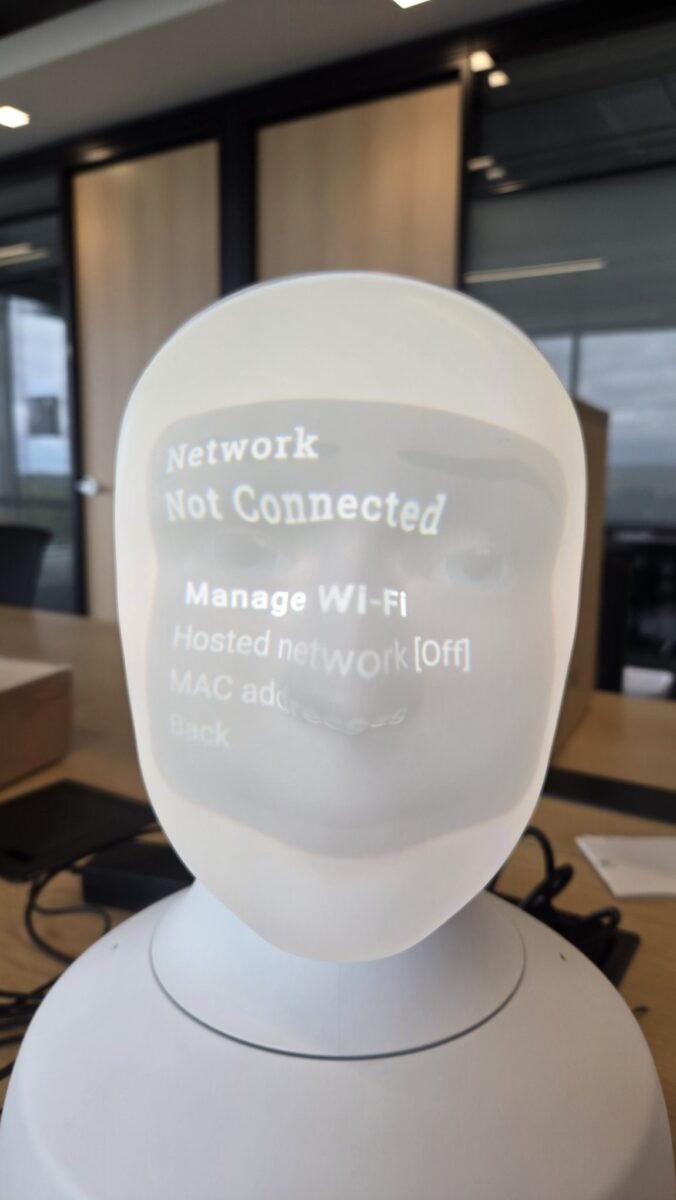
- In the face menu, choose Manage network.
- If it says Not Connected with Hosted network [Off], the robot is on no network yet and has no address (IP) — exactly what Figure 2 shows. That is normal at the start.
Step A3 — Start the robot’s own hosted network (a temporary bridge)
- On the Network screen, turn Hosted network On and start it.
- The face now shows the hosted network’s name (SSID) — the same as the robot’s name, furhat-677 — and its address: 192.168.137.1.
This makes the robot broadcast its own private Wi-Fi. It is only a bridge to reach the control panel: on this network your laptop has no internet, so do not stay here. (For safety, this guide does not print the hosted-network password screenshot — the face displays it on the robot itself, and the default is in Furhat’s documentation.)
Step A4 — Join the hosted network from your laptop
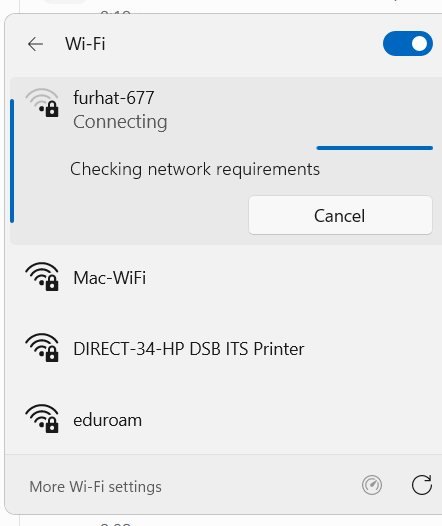
- On the laptop, open the Wi-Fi list and connect to furhat-677, using the password shown on the robot’s face.
- You should see “Checking network requirements”, then “Connected” — like Figure 3.
Step A5 — Open the web interface
- In the laptop browser, go to
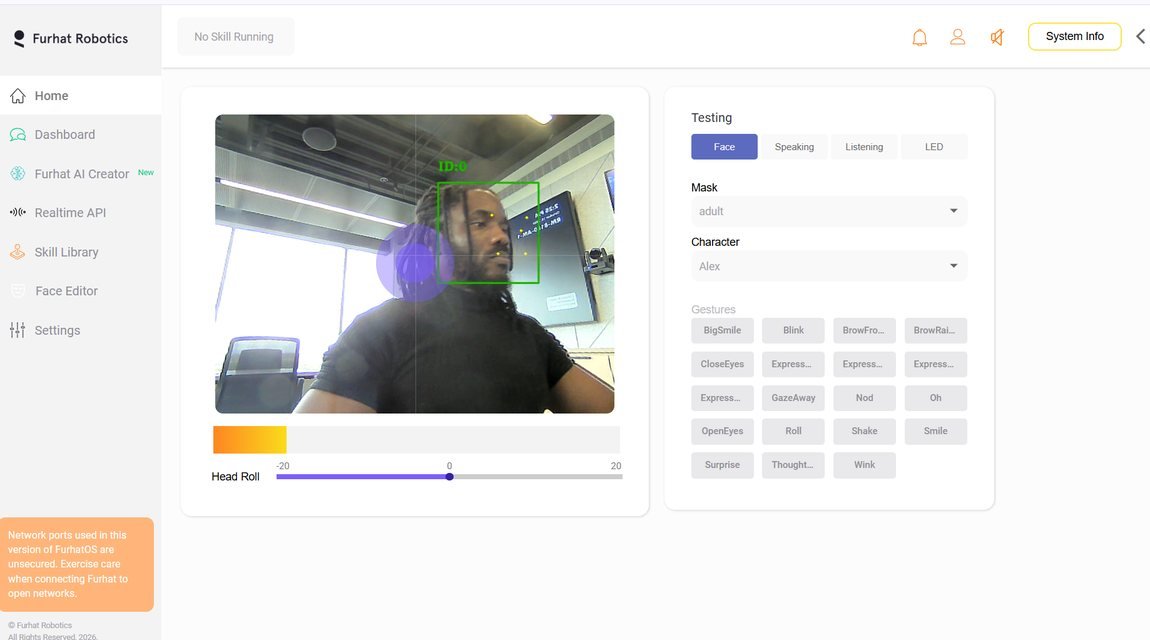
http://192.168.137.1 - The Furhat Robotics web interface loads (Figure 4). Learn your way around now:
- Left menu: Home, Dashboard, Furhat AI Creator, Realtime API, Skill Library, Face Editor, Settings.
- Top bar: “No Skill Running” means no program is controlling the robot right now. The speaker icon (top right) is the volume — hover for a slider, click to mute.
- Centre: the live camera view. The green box and dots on a face mean face tracking is working — the robot can see where you are.
- Testing panel (right): tabs for Face (gestures), Speaking, Listening and LED. Part B uses these heavily on the virtual robot; they work the same way here.
- System Info (top right) shows the robot’s software details.
Step A6 — Put the robot itself on the real Wi-Fi
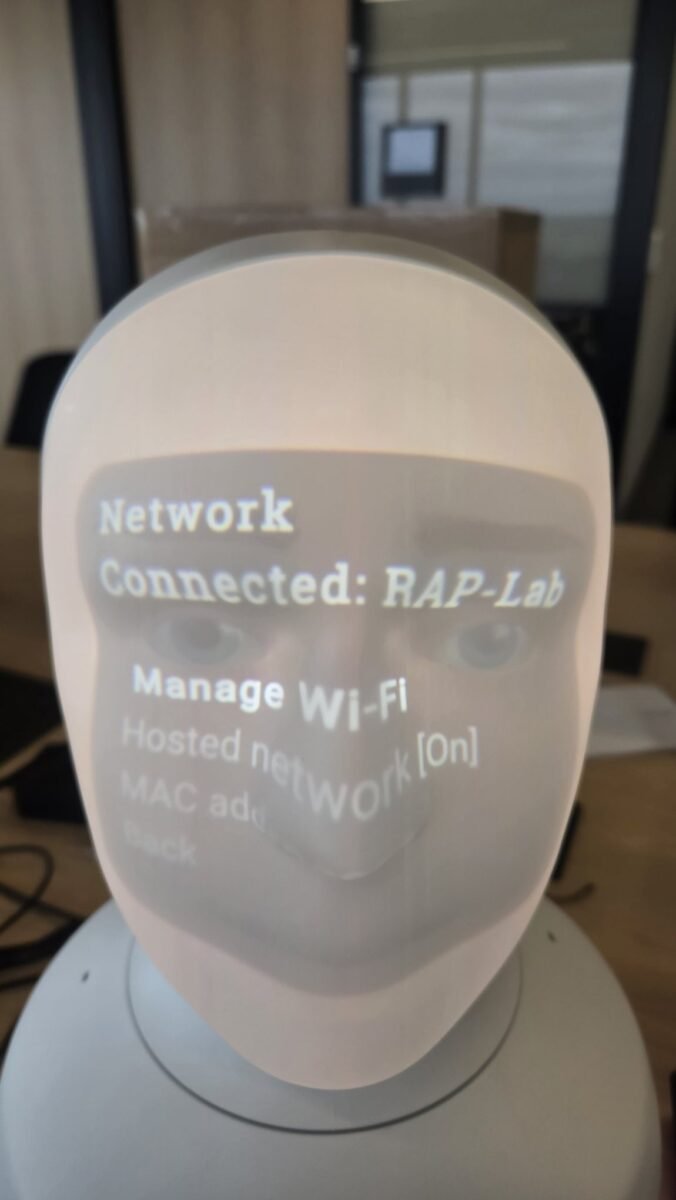
- While you still have the interface open, connect the robot to the lab Wi-Fi: use the face menu (Manage network → Manage Wi-Fi) or the interface’s network settings, choose RAP-Lab (your lab Wi-Fi), and enter its password on the robot.
- The robot’s Network screen now reads “Connected: RAP-Lab” (Figure 5).
Step A7 — Stop the hosted network and switch to the robot’s name address
- On the robot, stop the hosted network. The robot stays on RAP-Lab — stopping the hosted network does not disconnect it.
- On the laptop, join RAP-Lab as well.
- In the browser, go to
http://furhat-677.local(use your robot’s name). The.localname means you never need to hunt for the robot’s IP address. - The same web interface loads, now over the lab Wi-Fi (Figure 6). Networking is done: robot and laptop on the same network, both with internet.
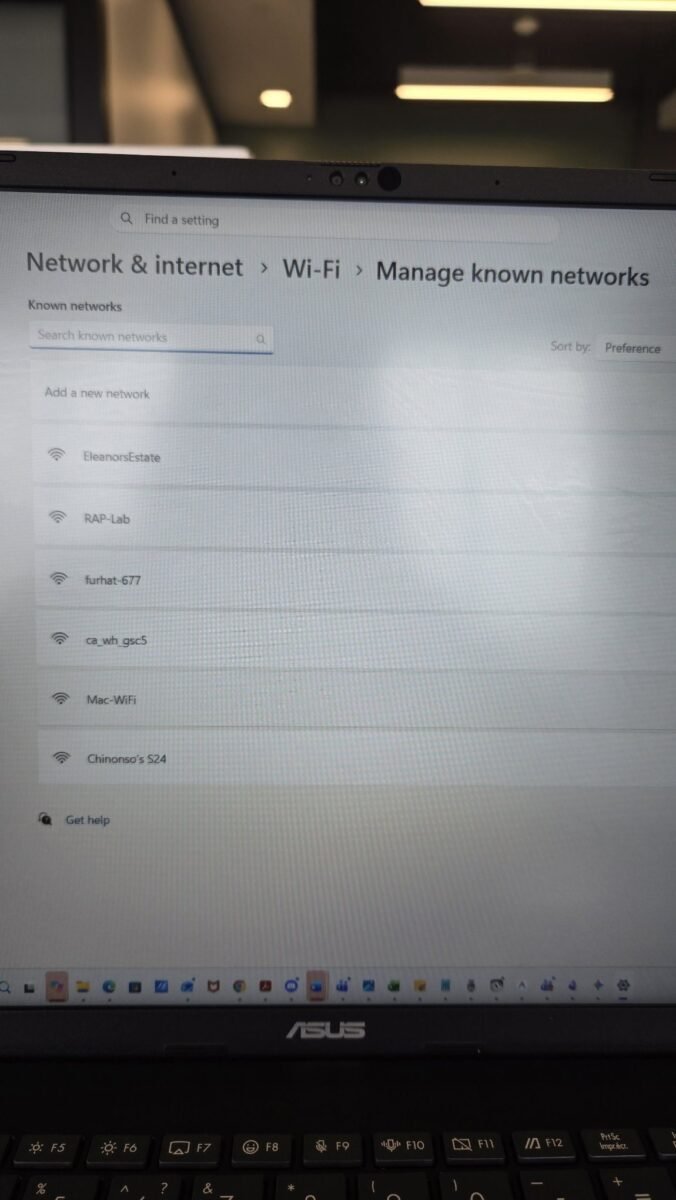
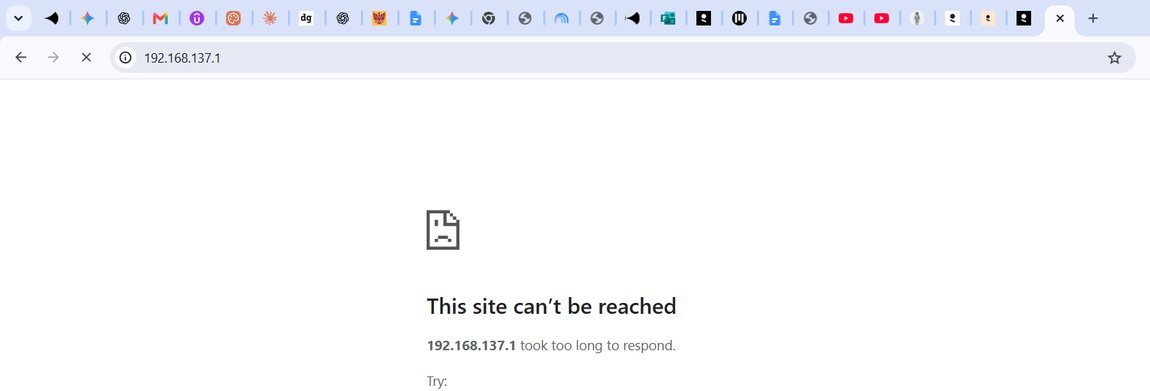
If Windows keeps switching your laptop’s Wi-Fi away from the robot (the page suddenly stops loading, or you see Figure 8): Windows prefers networks with internet and will abandon the robot’s hosted network on its own. Fix it in Settings → Network & internet → Wi-Fi → Manage known networks: open each rival network (Mac-WiFi, eduroam, your phone hotspot) and turn off “Connect automatically when in range”; keep it on for the robot’s network (Figure 7). The permanent cure is Steps A6–A7: once the robot is on the real Wi-Fi, there is nothing to fight about.
Step A8 — Meet the Skill Library (30 seconds)
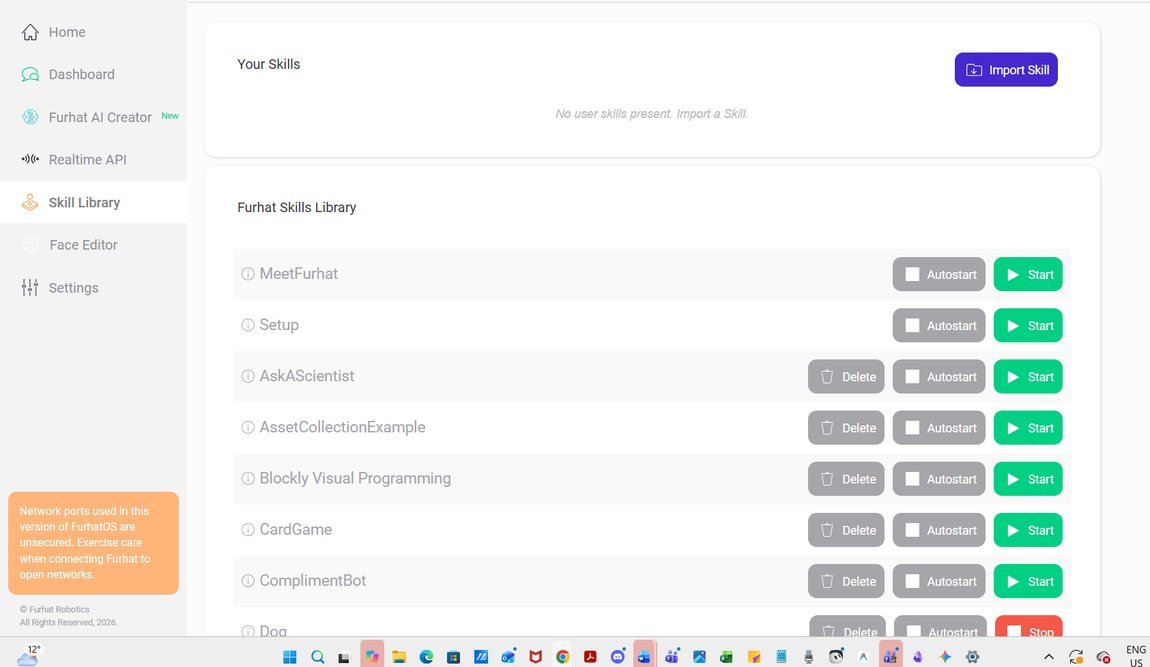
Open Skill Library in the left menu (Figure 9). Skills are ready-made programs that can run on the robot. Two things to remember: before running your own scripts, this page should show nothing running (the top bar also says “No Skill Running”); and if a skill shows a red Stop button while others show green Start, that skill is running — stop it, or it will fight your script for control of the robot. In our session a skill whose name starts with “Dog…” appeared to be running.
The physical robot is set up as far as its networking goes. Its Realtime API (the door our scripts use) has one more gate on this particular robot — that story is in the Challenges section, because you only discover it later, in Part F’s terms. Next, the virtual robot — which is where all the code in this guide was proven.
Part B — The Virtual Furhat and the SDK
The Virtual Furhat is a complete software copy of the robot that runs on your laptop: same face, same voice system, same API. It is the best place to learn and to test code, because nothing about the network or the hardware can get in your way. Everything in Parts C–E was proven on the virtual robot first.
Step B1 — Create your Developer Zone account and log in
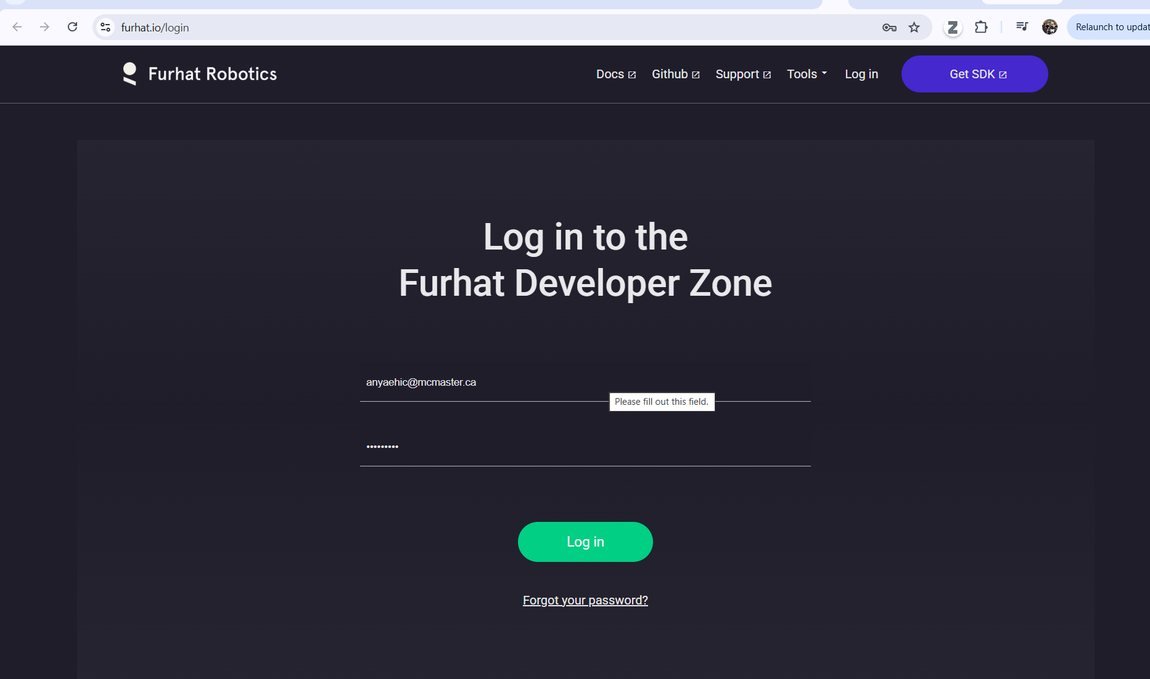
- Go to furhat.io and create an account (or request the SDK there), then log in at the Developer Zone login (Figure 10).
- You only do this once. If a past lab member already made the account, just log in — do not request the SDK a second time.
Step B2 — Find your Furhat API token (and treat it like a password)
- In the Developer Zone, open your profile page. Your Furhat API token is displayed there.
- You will paste this token into the Furhat Studio app in the next step. That is the only place it needs to go.
Security rule — no exceptions. The token is a password for your robot account. Never screenshot it, paste it into a chat, or read it aloud. This guide deliberately contains no image of the token screen. If the token is ever exposed, generate a new one on the spot (the API page’s GENERATE KEY button, Step B8) and the old one dies.
Step B3 — Install Furhat Studio and launch the Virtual Furhat
- From the Developer Zone, download the Windows launcher (
furhat-sdk-desktop-launcher-Setup.exe) and install it. If Windows SmartScreen warns you, choose More info → Run anyway — this is a known false alarm for this installer. - Open the app (it is now called Furhat Studio), sign in, and paste your API token from Step B2 when asked. Let it install or update the Virtual Furhat; if it offers to install Java/JDK components, accept.
- Launch the Virtual Furhat.
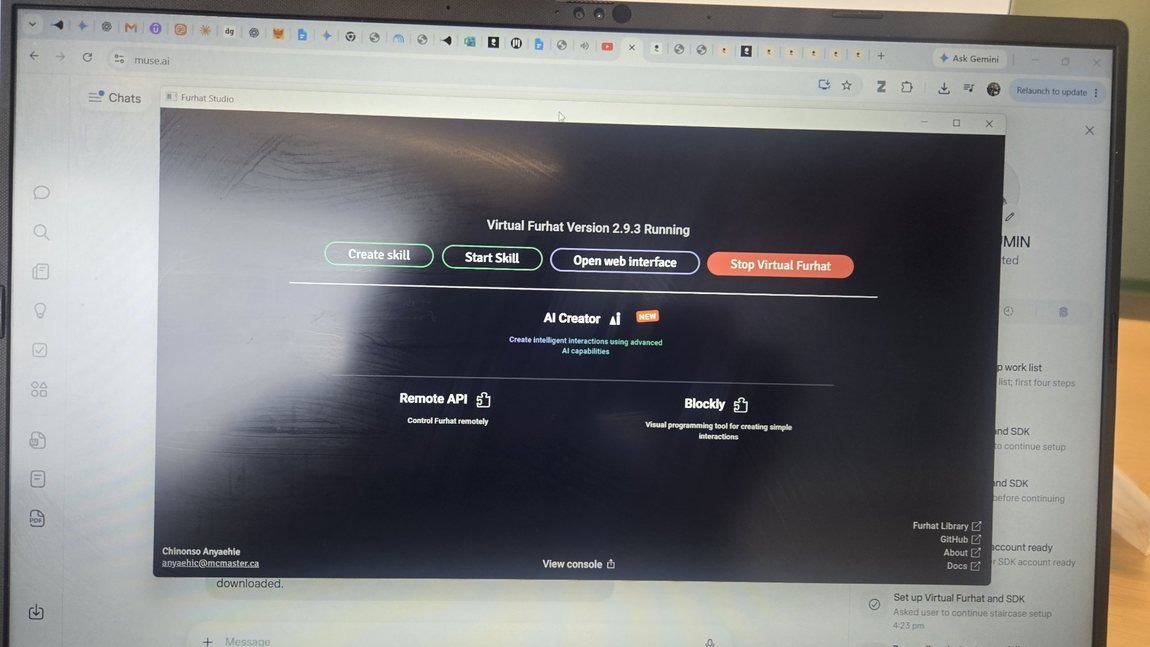
- Studio shows “Virtual Furhat Version 2.9.3 Running”, with buttons Create skill / Start Skill / Open web interface / Stop Virtual Furhat (Figure 11). You do not need IntelliJ or any other tooling for this guide — that is only for writing Kotlin skills later.
Step B4 — Open the virtual web interface — and find the face window
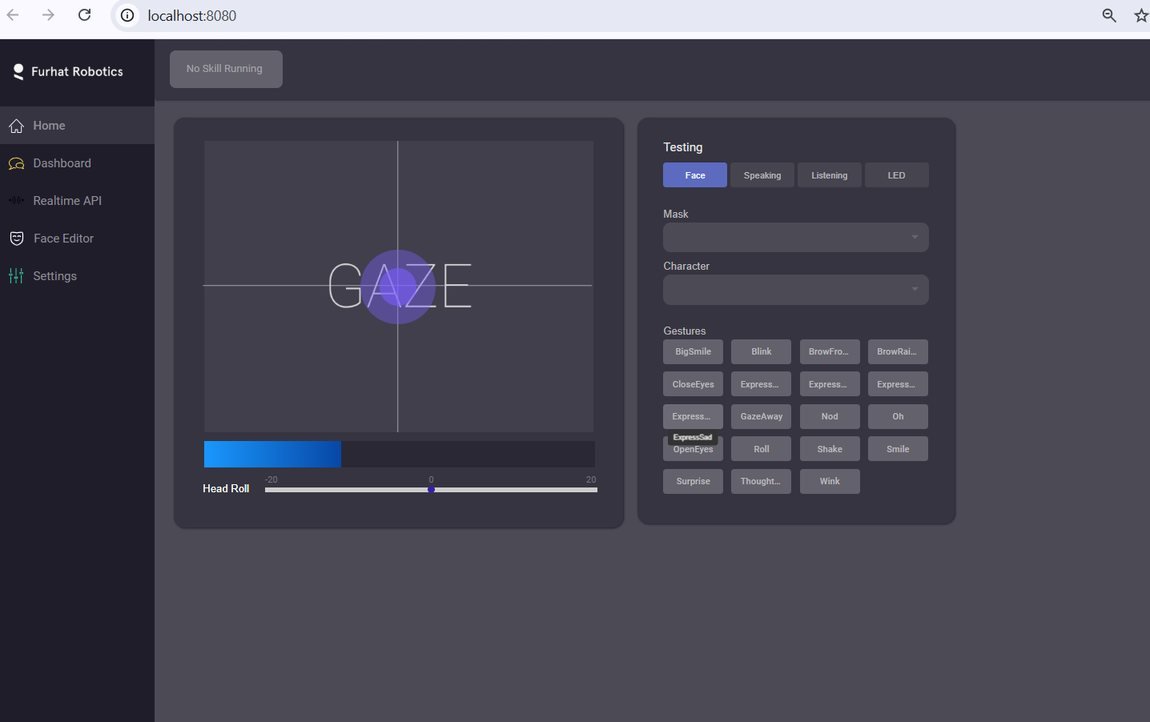
- In Furhat Studio, click Open web interface. The browser opens at
http://localhost:8080(Figure 12).
Understand what you are looking at. localhost:8080 is not a separate program you connect to the robot — it is the Virtual Furhat’s own control panel, served by the virtual robot running inside Studio. It works only while the virtual robot runs.
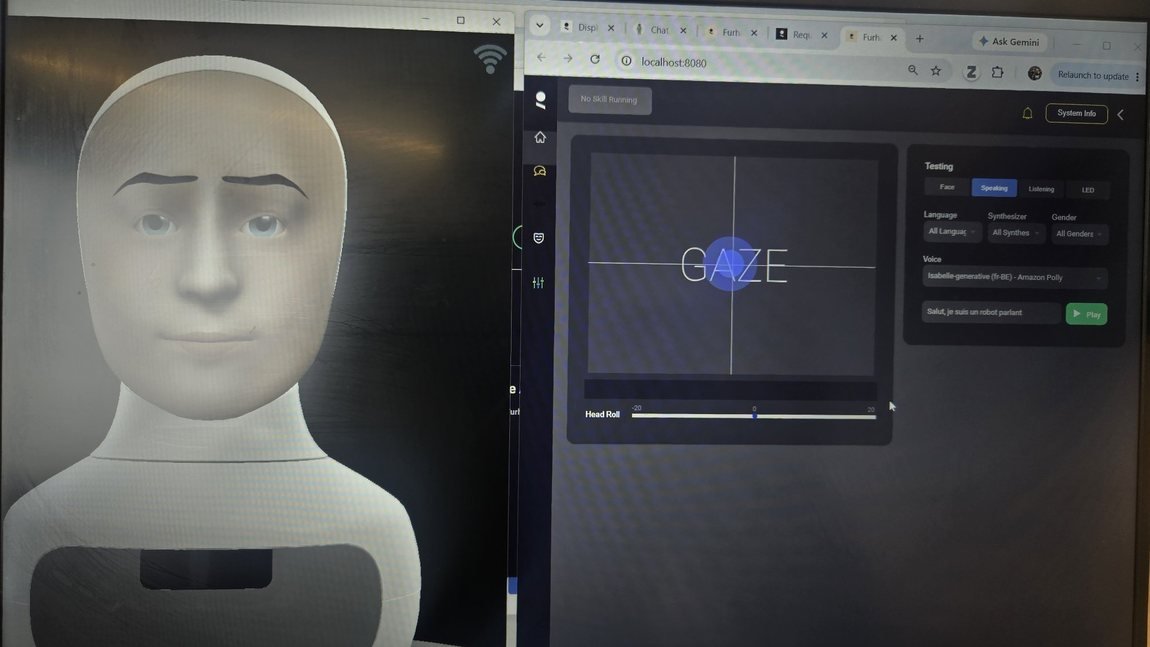
The browser page is just the remote control. The robot itself — the face that moves, blinks and talks — lives in a separate 3D face window that Studio opened. If that window is hidden behind the browser, everything you click will seem to “do nothing”. Keep the face window visible beside the browser (Figure 13). This was the single most confusing moment of our session; now you know.
Step B5 — Face tab: let it finish loading, then try a gesture
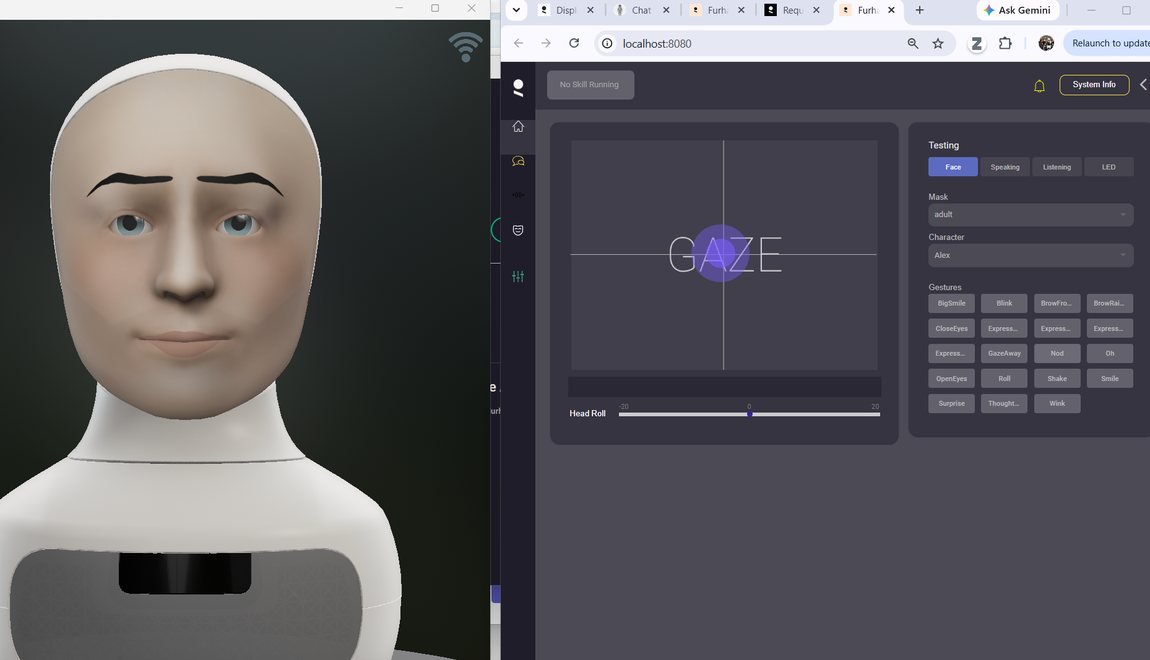
- Open the Face tab in the Testing panel. Give the page a few seconds: the Mask and Character dropdowns can look empty while they are still loading. Wait until they read Mask = adult and Character = Alex (Figure 14).
- Click Nod (or BigSmile, Wink, Surprise…) and watch the face window — not the browser.
- The face performs the gesture. The face also blinks and breathes on its own — that idle animation is normal and means it is alive.
Step B6 — Speaking tab: the language rule
- Open the Speaking tab. Choose a Language first, then a Voice, type a line, and press the green Play button.
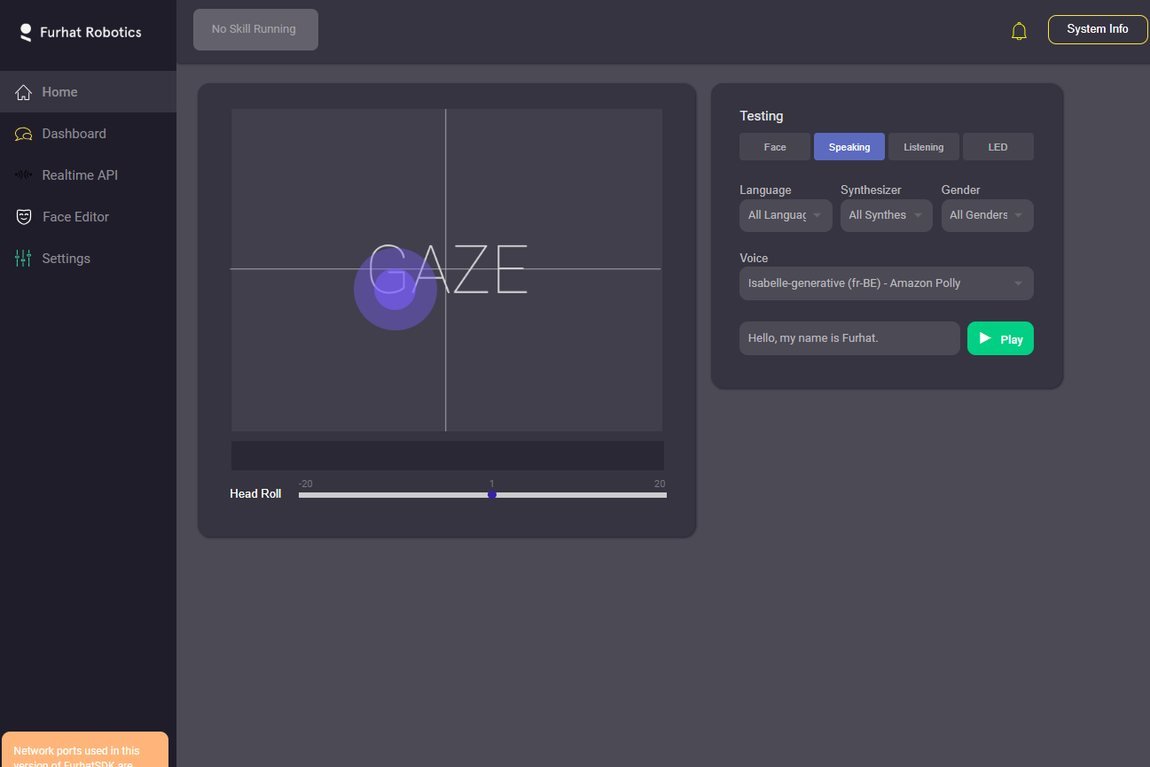
The language rule (learned the hard way). The voice’s language must match your text’s language. Our virtual robot started with a French voice — “Isabelle-generative (fr-BE)”, Figure 15 — and English text produced complete silence, with no error anywhere. The same voice spoke immediately when given its own French sample line. Modern “generative” voices are locked to their language.
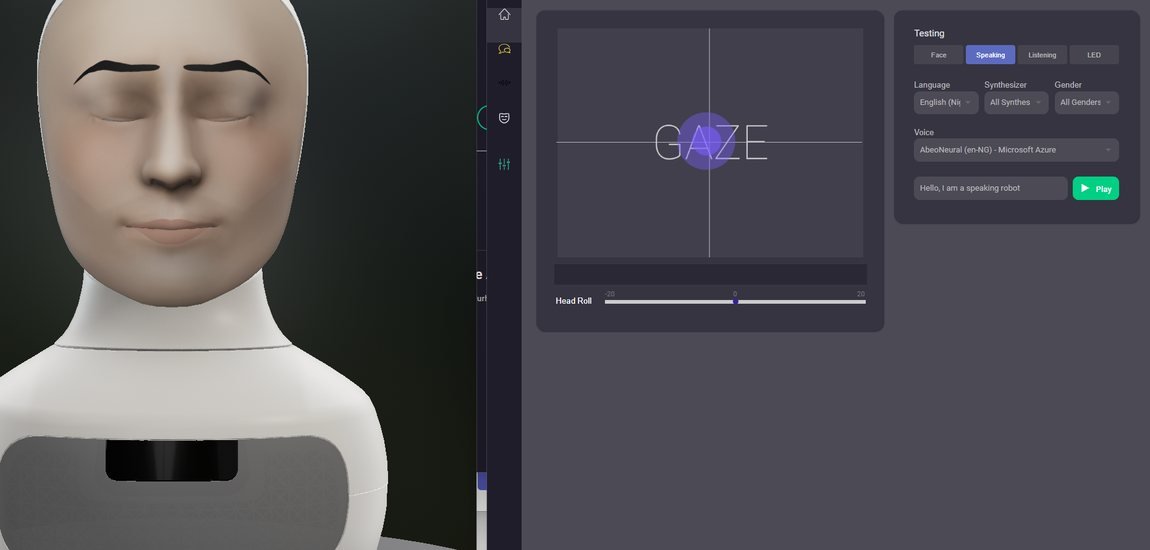
Fix: set Language to English and pick an English voice. We used English (Nigeria) → AbeoNeural (en-NG), Microsoft Azure (Figure 16); the sample line changes to “Hello, I am a speaking robot” when the voice and language match. Press Play — the face window speaks.
Step B7 — Listening tab: prove the robot can hear you
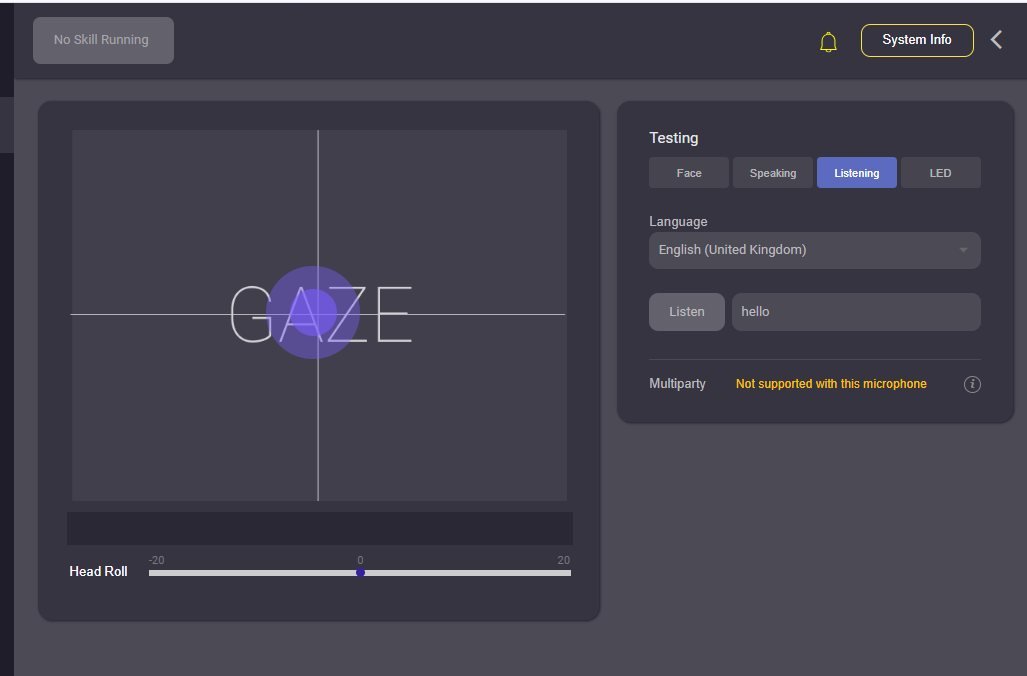
- Open the Listening tab (Figure 17). The recognition Language here was English (United Kingdom).
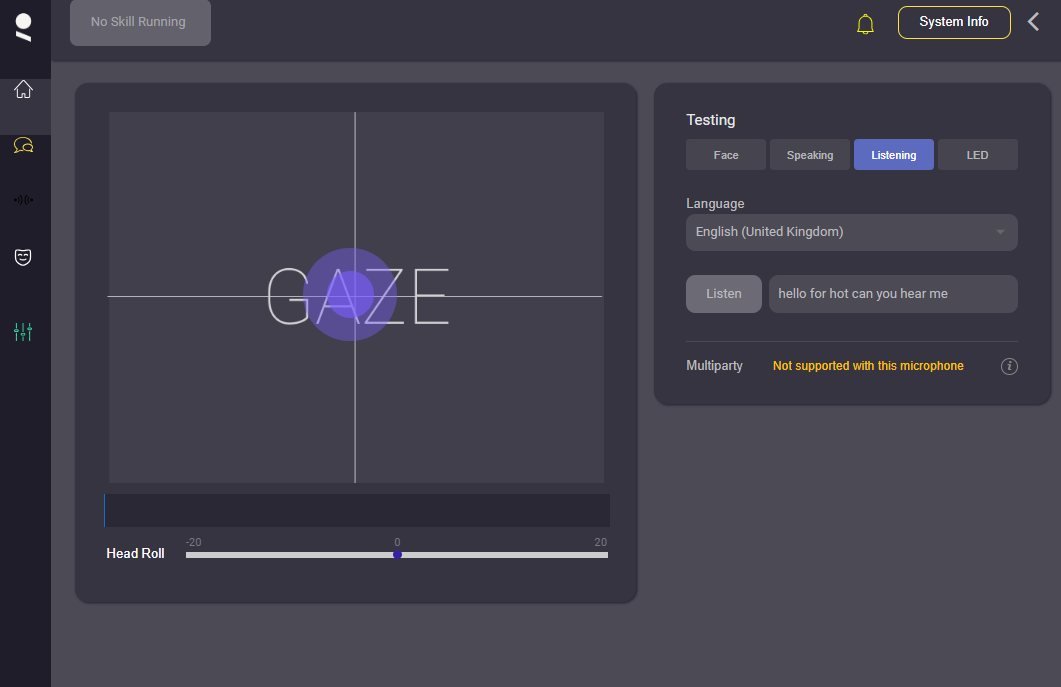
- Click Listen, then immediately say one clear sentence into your laptop microphone, e.g. “Hello Furhat, can you hear me?”
- What it heard appears in the box next to the Listen button (Figure 18). Two honest notes from our session: the note “Multiparty — Not supported with this microphone” is normal (one speaker at a time), and recognition is not perfect — it heard “Furhat” as “for hot”. Accent and language choice affect accuracy.
- Understand what this test is: it only transcribes. It will never answer you — answering needs a brain, which is the chatbot script in Part E.
Step B8 — Check the Realtime API page (virtual)
- Open Realtime API in the left menu of the virtual interface.
- On the virtual robot you should see “Premium Active: You have access to all WebSocket features” and Access control set to Enabled with authentication for the local network (Figure 19 — cropped for this guide so no key is visible).
- This page is where the authentication key for scripts lives (with GENERATE KEY and SAVE buttons). Scripts connecting from your own computer on localhost are allowed without the key — you will see that in Part D. Remember this page; the physical robot’s version of it is the plot twist in the Challenges.

Part C — Python and the starter code
Goal: the starter scripts sit in a folder on the laptop, Python is installed, and the two libraries the scripts need (furhat-realtime-api and openai) are installed.
Step C1 — Get the starter folder onto the laptop
- Get
furhat-realtime-api-starter.zipfrom the lab and save it in Downloads. - Right-click the zip → Extract All. Windows creates a folder inside a folder (
furhat-realtime-api-starter\furhat-realtime-api-starter) — that double folder is normal. Work in the inner one; it holds01_hello_world.py,02_chatbot.py,03_follow_me.py,requirements.txtand.env.example.
Step C2 — Open a terminal inside the folder
- Open the inner starter folder in File Explorer.
- Click the address bar, type
cmd, and press Enter. A black terminal window opens, already inside the folder. (Every command in this guide is typed in a terminal like this, in this folder.)
Step C3 — Check for Python; install it if missing
- Run:
python --version - If it prints a version like Python 3.x, skip to Step C4. On our lab laptop it printed “Python was not found; run without arguments to install from the Microsoft Store…” (Figure 20) — the laptop had only a placeholder, no real Python. Install it:
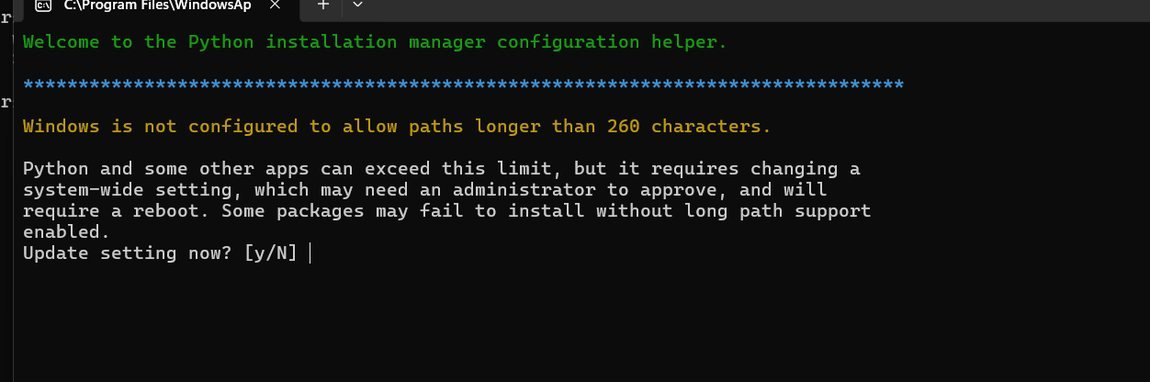
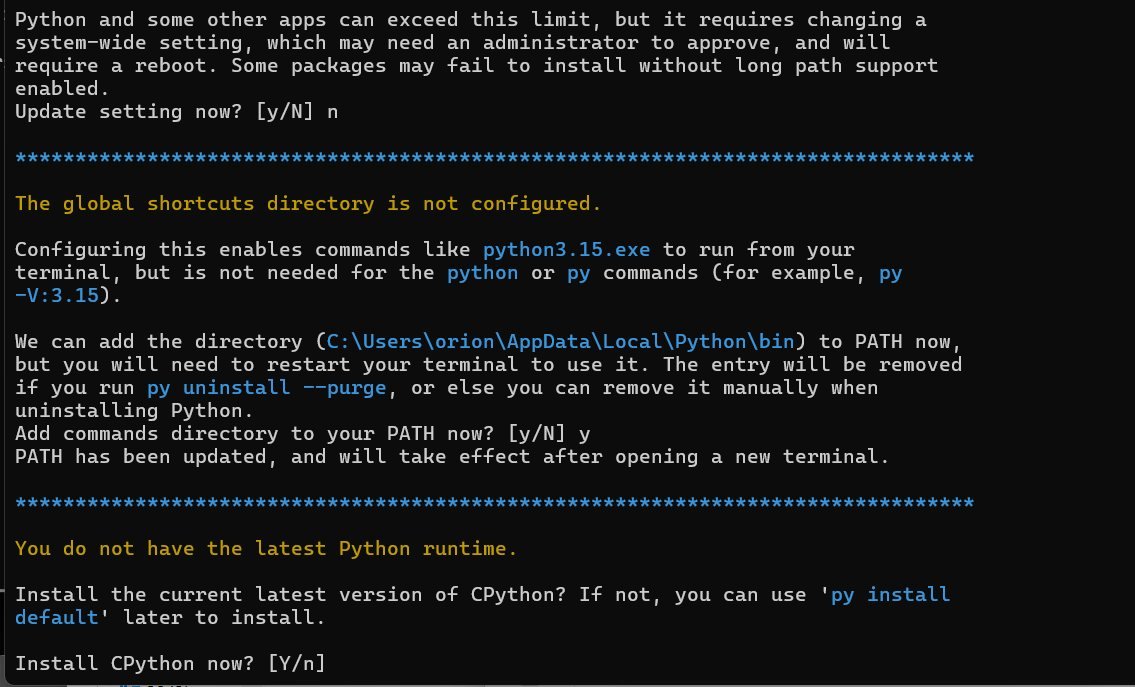
- Go to python.org → Downloads and run the Windows installer. The current installer uses the Python Install Manager, which asks three questions (Figures 21–22):
- “Windows is not configured to allow paths longer than 260 characters. Update setting now?” → answer n. (Nothing in this project has paths anywhere near that long, and changing it needs an administrator and a reboot.)
- “Add commands directory to your PATH now?” → answer y. (This is what lets the terminal find Python afterwards. It takes effect in new terminals only.)
- “Install CPython now?” → press Enter (yes). When it ends with “View online help?” → answer N.

Step C4 — Install the libraries (new terminal!)
- Close the old terminal and open a new one in the starter folder (Step C2) — PATH changes only apply to new terminals.
- Run:
python --versionand confirm it prints your Python 3 version. - Run:
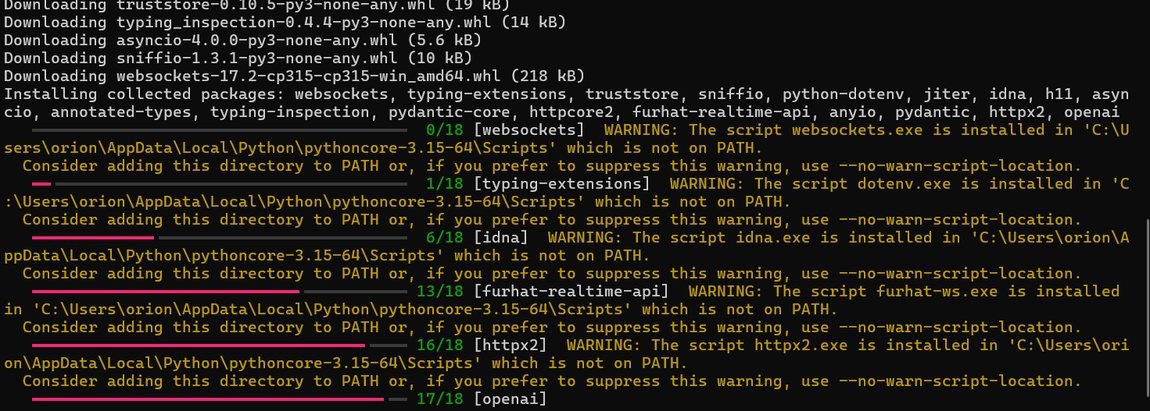
python -m pip install -r requirements.txt - pip downloads and installs the packages, including furhat-realtime-api and openai (18 packages in our session — Figure 23). The yellow warnings saying a script “is installed in …\Scripts which is not on PATH” are harmless: you will always run the scripts as
python <script>.py, never by those shortcut names.
Part D — Script 01: hello world (your first code-driven robot)
Run this against the Virtual Furhat. Make sure Furhat Studio is open and the Virtual Furhat is running, with the face window visible.
Step D1 — Run the script
python 01_hello_world.pyExpected output (Figure 24):
Connecting to Furhat at 127.0.0.1 ...
[Furhat Realtime API] Connected on 127.0.0.1 with scope 'localhost'
Connected!
127.0.0.1 means “this same computer” — the script is talking to the Virtual Furhat inside Studio. Note that no password or key was needed: connections from the same machine (localhost) are trusted, which matches what the API page said in Step B8.

Step D2 — What the script does, in order
- Connects to the robot.
- Says “Hello! I am Furhat…” out loud.
- Turns its LED blue and says so, then nods (“I can nod too”).
- Says “Say something, and I will repeat it back to you”, then listens once.
- If it heard you, it repeats your words back (“You said: …”) and the terminal prints
Furhat heard: .... If it heard nothing, it says “I did not hear anything. Check your microphone.” - Turns the LED white, says “Goodbye!”, and disconnects. The terminal ends with
Disconnected.and no error text (Figure 25).

Step D3 — The timing rule for listening. On our first run, the script heard nothing — the terminal never printed “Furhat heard:”, and the robot said it did not hear anything. The microphone was fine (Step B7 had already proved it). The real cause is timing: the script opens one short listening window right after its cue line. If you are still reading the terminal when it opens, the window closes before you speak.
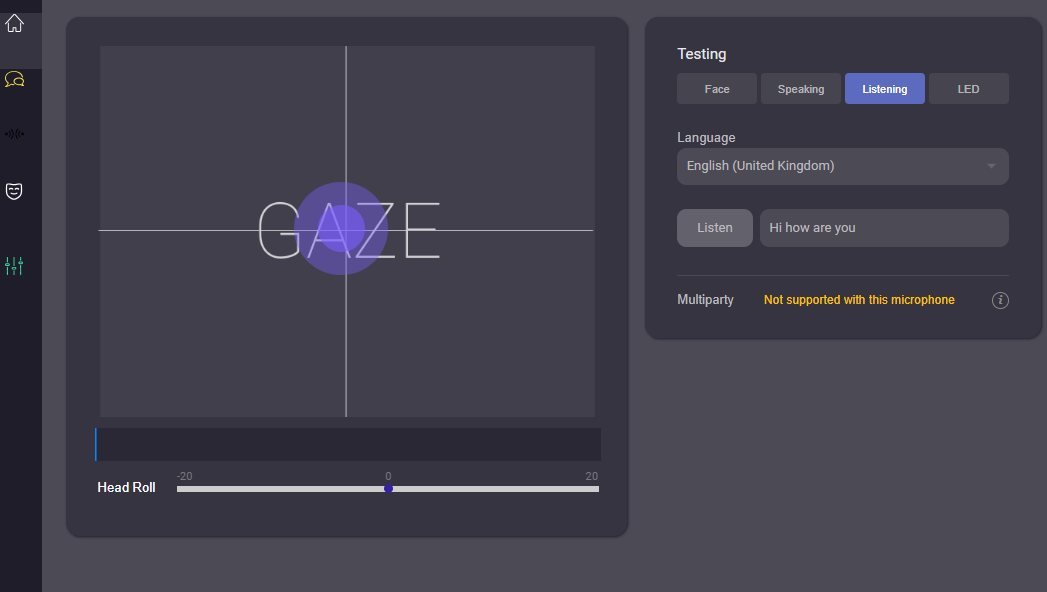
Fix: run it again and speak the instant the robot finishes “Say something, and I will repeat it back to you” — one clear sentence, close to the laptop. Success sounds like the robot repeating you, e.g. “You said: Hi how are you” — and the words also land in the interface’s Listening box (Figure 26). With that, Script 01 is fully verified: connect ✓, speak ✓, listen ✓, repeat ✓, clean disconnect ✓.
Part E — OpenAI and Script 02: a real conversation
Script 02 turns the robot into a chatbot: you talk, OpenAI thinks, the robot answers — in a loop, remembering the conversation, until you say “goodbye”. It needs an OpenAI API key in a small settings file called .env.
Step E1 — Create your OpenAI API key
- Go to platform.openai.com and log in (a ChatGPT login works).
- Open API keys (left menu) → Create new secret key. Name it something clear, e.g. “furhat”.
- Copy the key immediately. It starts with
sk-and is shown only once — the site can never display it again. If you lose it, you delete it and create another.
Key safety — the lesson this guide’s session learned twice. An API key is money: anyone who has it can spend your credit. Never paste a key into a chat, an email, or a screenshot, and never show your .env file on screen for a photo. In our session a key was pasted into a chat, and later a screenshot showed a whole key — both keys had to be treated as exposed: deleted on the platform and replaced. Keys live in exactly one place: the .env file on your own laptop, typed or pasted there and nowhere else.
Step E2 — Add API credit (the step everyone forgets)
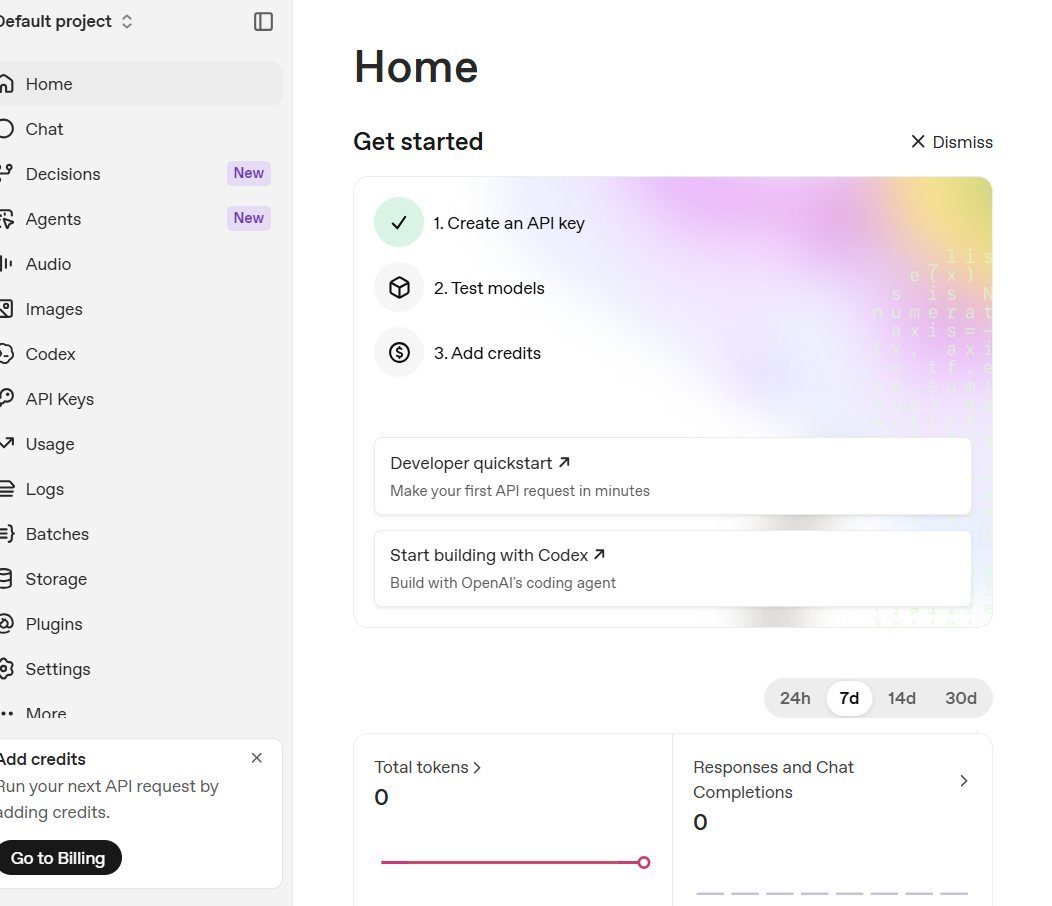
- On the platform, check the Get started list on the Home page (Figure 27). Step 1 (create a key) will be ticked; step 3, Add credits, is the one that matters now. A fresh API account has a balance of $0, and with $0 the model simply never answers — there is no friendly error in the robot’s voice, just silence.
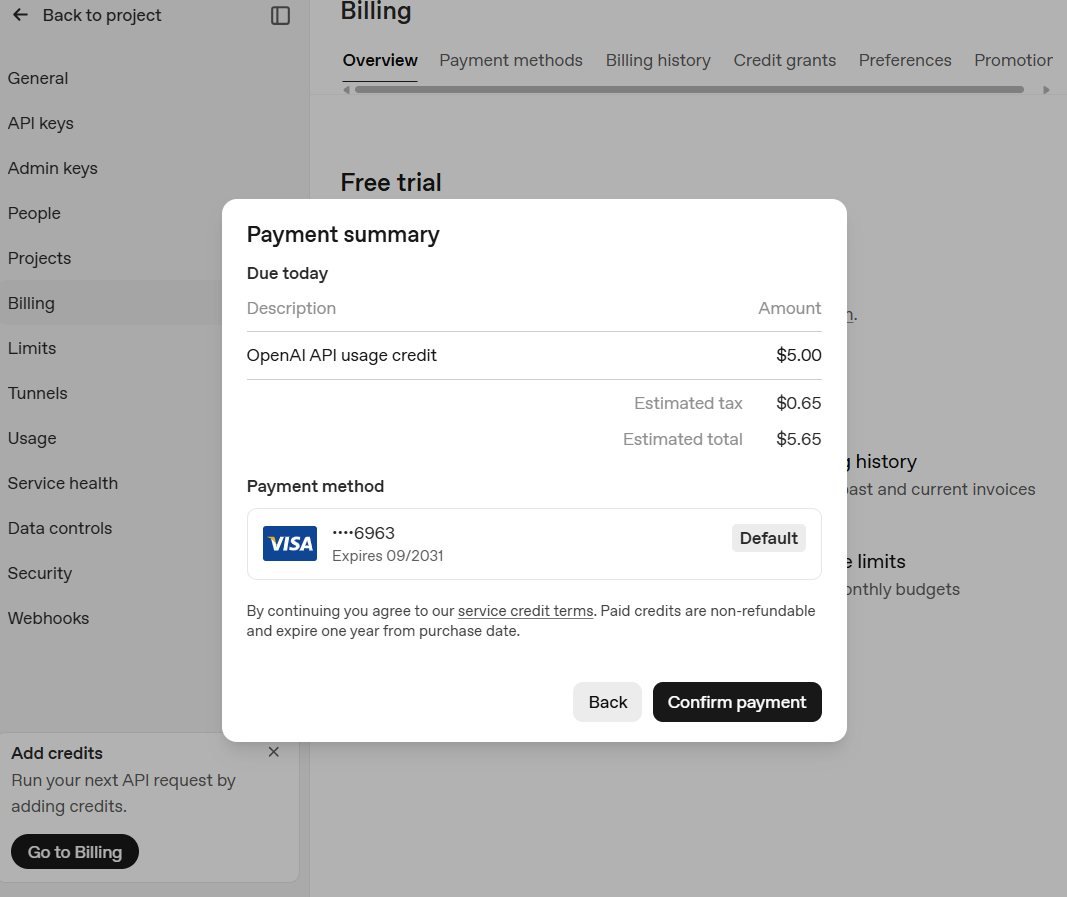
- Click Go to Billing (or Billing in the left menu), add a payment method, and buy a small amount of credit — $5 is plenty (our receipt: $5.00 credit + $0.65 tax = $5.65, Figure 28).
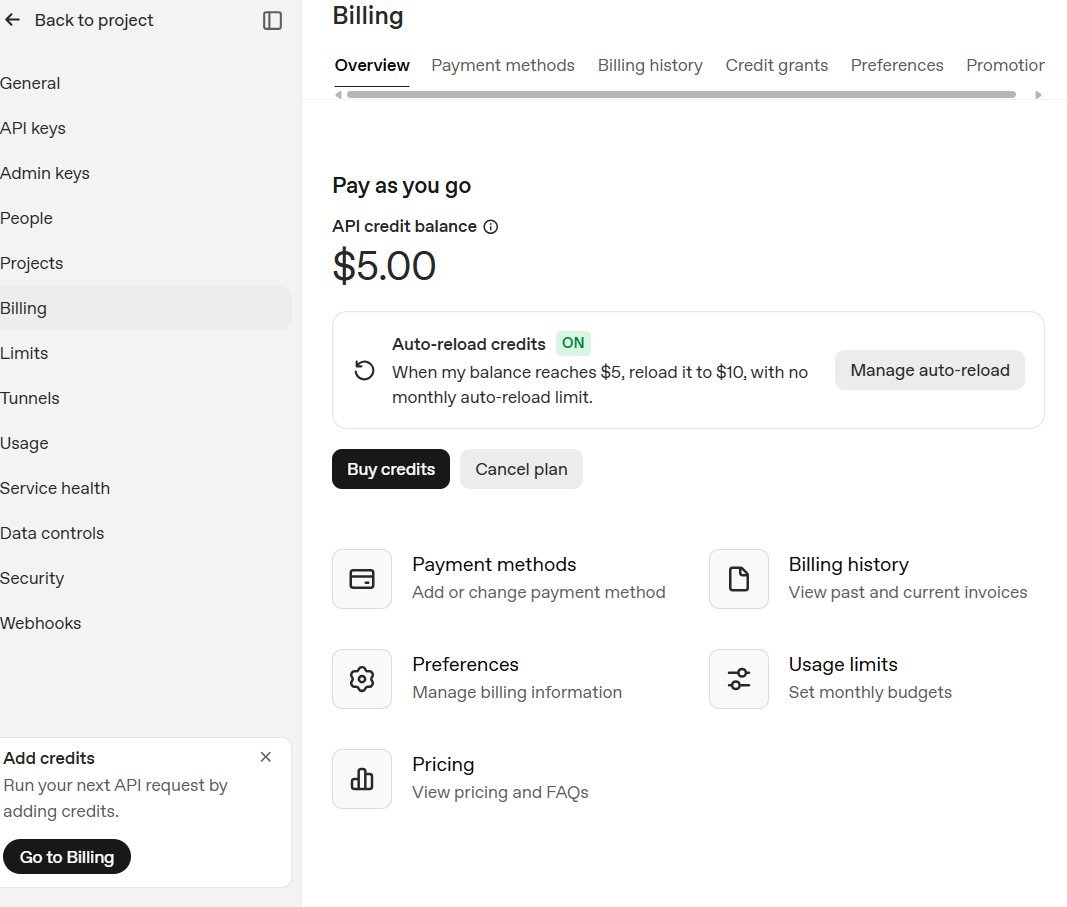
- The Billing page then shows API credit balance $5.00 (Figure 29). Note the Auto-reload setting on that page: ours was switched ON (top up to $10 whenever the balance falls to $5, with no monthly limit). The mini model this guide uses costs pennies, but set a monthly limit under “Manage auto-reload” if you prefer not to be surprised.
Step E3 — Put the key in the .env file
- In the terminal (starter folder), run:
copy .env.example .envthennotepad .env - Fill in the file so it looks like this shape (your key will differ — obviously, do not copy this example):
OPENAI_API_KEY=sk-proj-...your own key...
FURHAT_HOST=127.0.0.1
FURHAT_AUTH_KEY=- Format rules: the key starts immediately after the
=— no space, no quotes, and the key must be one unbroken line. If Notepad wraps it visually, that is fine; to check there is no real break, use Format → Word Wrap off and confirm one long line. FURHAT_HOST=127.0.0.1targets the Virtual Furhat. The auth key line stays empty for localhost.- Save and close Notepad.
Step E4 — Talk to it
python 02_chatbot.py- The robot greets you: “Hi, what would you like to talk about?” (verified in our session — the greeting means the key authenticated and the script is connected).
- Answer it, ask questions, have a few rounds. The terminal shows each line as
You: ...andFurhat: .... - Say “goodbye” to end cleanly.
Honest status note. In the October 15 session the greeting was verified, and the reason the robot did not answer at first was found and fixed ($0 credit, Step E2). The session then moved to the physical robot before a full question-and-answer exchange was re-run, so the complete reply loop is the one item this guide marks “confirm on your run”: with credit in place, ask it one question after the greeting. If it greets but stays silent, check the credit balance first (Figure 27), then look at the terminal line after your You: ... line — the platform’s error will be printed there.
Part F — Script 03: follow me
03_follow_me.py is the script written during the session for the “make it follow me” request: instead of following blindly, Furhat uses its face tracking to attend to the closest person and keeps its head and gaze on them as they move.
- What it does: connects, prints the robot’s voice status as a health check, sets a green LED and nods once (so you can see it is live even in silence), then attends the closest user; every 2 seconds it re-checks and only re-aims when the closest person changes. Ctrl+C stops it.
- Run it:
python 03_follow_me.py— against the Virtual Furhat as-is; walk around in front of the “camera” by using the GAZE panel’s simulated users. - Status (Oct 15, 2026): written and syntax-checked against the real
furhat-realtime-apilibrary, not yet run on either robot when this guide was written. It is ready to run on the virtual robot today; on the physical robot it is waiting on the license item in the Challenges.
Challenges we faced — and what actually fixed them
Every problem below really happened in the October 15 session, in roughly this order. Symptom first, then the cause, then the fix or the honest status.
| Challenge | Cause | Fix / status |
|---|---|---|
| 1. “Error. Cannot find the specified voice” — the physical robot said this twice when asked to Speak its IP address. | The voice the physical robot is configured to use is missing or invalid, so anything that makes it speak its menu text fails. The IP itself was never the problem. | Worked around, fix still open. We got the address visually (face screens, hosted network, .local name) — none of which need speech. The real fix is choosing a valid voice in the web interface (Speaking tab / voice settings); it is on the Next steps list. |
| 2. The laptop kept leaving the robot’s Wi-Fi, and the interface stopped loading. | Windows auto-connect prefers networks with internet; the robot’s hosted network has none. | Fixed. Turn off auto-connect for rival networks (Figure 7), and permanently: put the robot on the lab Wi-Fi and stop the hosted network (Steps A6–A7). |
| 3. “This site can’t be reached” for the hosted address (Figure 8). | Same root cause as Challenge 2 — the laptop had already switched networks, so the hosted address no longer existed from its point of view. | Fixed by Challenge 2’s fix. Rule of thumb: this error is about which Wi-Fi you are on, not about the robot. |
| 4. Clicking Nod “did nothing”. | The browser is only a remote control; gestures play in the separate 3D face window, which was hidden behind the browser. | Fixed. Keep the face window visible beside the browser (Figure 13). |
| 5. The speak test was completely silent, with no error. | The selected voice was French (fr-BE) and the text was English. Generative voices are language-locked, and the failure is silent. | Fixed. Match voice language to text language (Step B6). English (Nigeria) AbeoNeural worked. |
| 6. A page sat on grey “loading” cards and never finished. | First-load slowness in the web interface (we hit it on a system page). | Fixed itself / refresh is safe. Wait ~30 seconds; if still stuck, press F5. The browser is only a view — refreshing it cannot harm the running robot. |
| 7. Mask/Character dropdowns looked empty. | They were still loading. | Fixed by waiting. They populate as adult / Alex (Figure 14). Do not troubleshoot an empty dropdown in the first seconds. |
| 8. Script 01 heard nothing and said “I did not hear anything”. | Timing: the script’s single listening window opened and closed before the user spoke. The microphone and recogniser were proven healthy by the Listening tab test. | Fixed. Speak the instant the cue line ends (Step D3). Also expect small mishearings — “Furhat” was heard as “for hot” (Figure 18). |
| 9. The chatbot greeted, then never answered. | The OpenAI account had $0 API credit. The greeting is the script’s own line; the thinking is billed per call and was failing. | Fixed. Add credit (Step E2, Figures 27–29). Diagnostic habit: balance first, terminal error second. |
| 10. API keys got exposed — twice. One pasted into a chat; one shown in full in a screenshot of the .env file. | Treating a key like ordinary text. It is not — it is a password that spends money. | Fixed by rotation. Exposed keys were deleted on the platform and replaced; the new key lives only in .env. This guide shows no key and no token anywhere — including deliberately excluding two screenshots. |
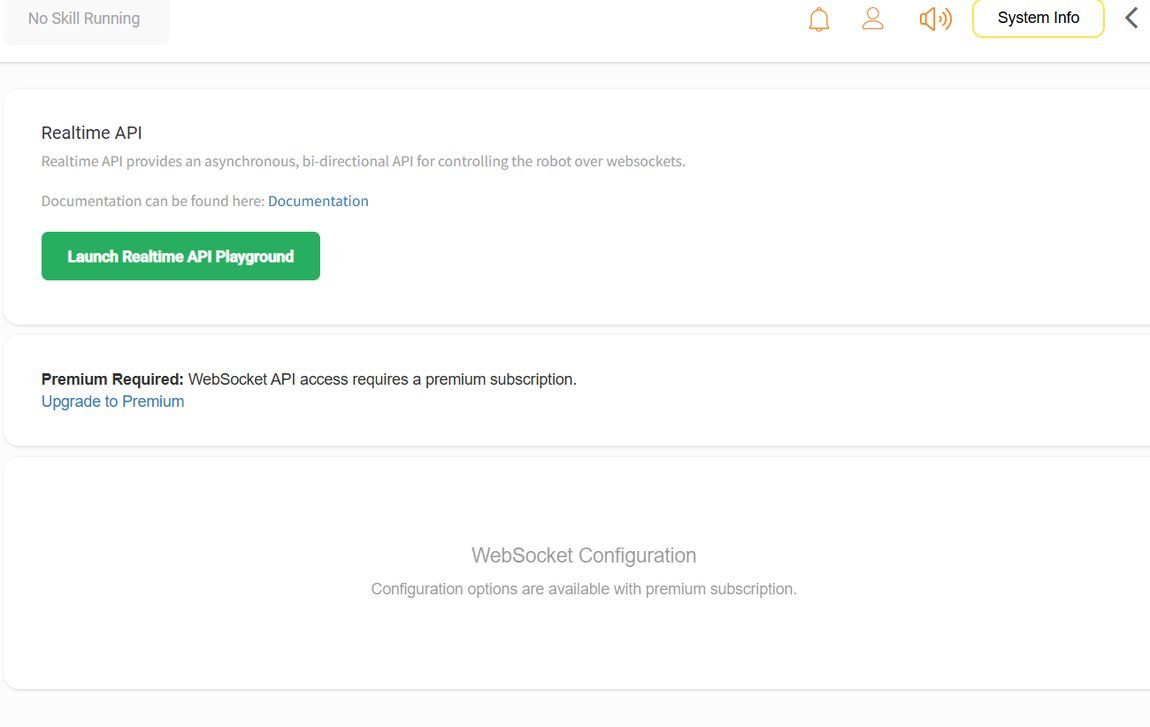
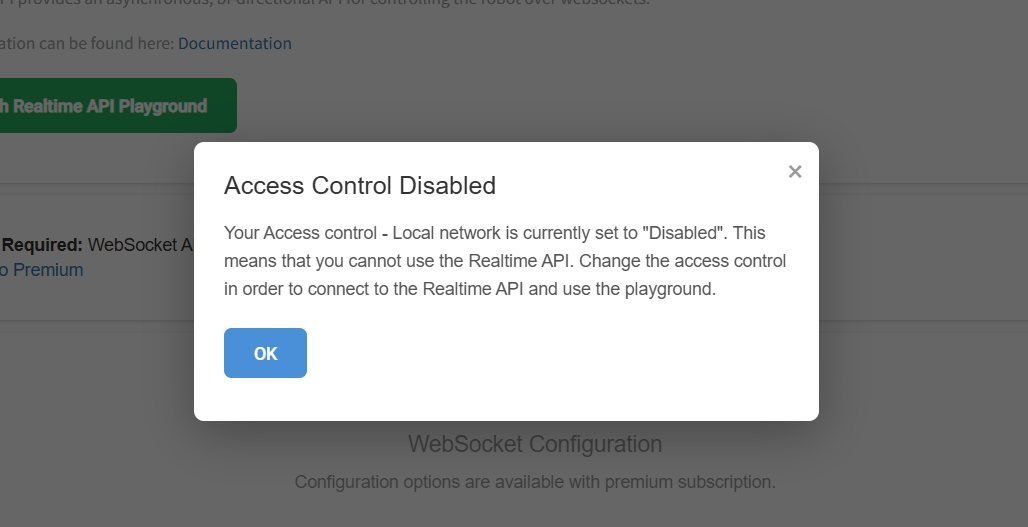
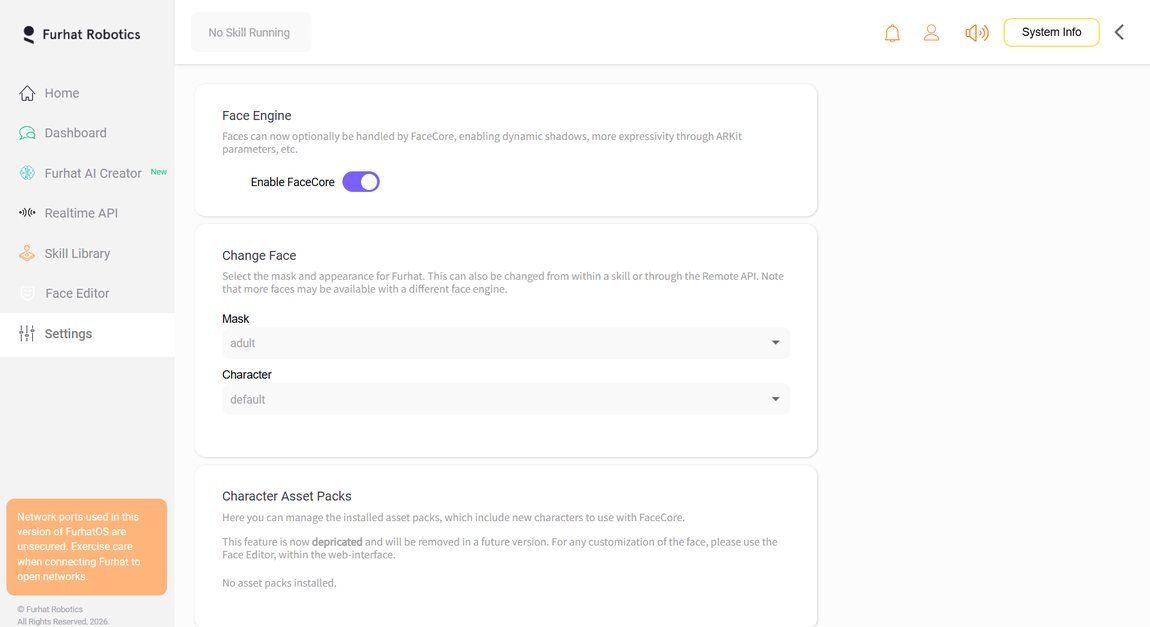
| 11. THE BIG ONE — the physical robot refuses all scripts. Its Realtime API page says “Premium Required” and its own popup says its access control is Disabled. (Figures 30–32.) | Realtime API access is licensed per robot. The Virtual Furhat has Premium active and access enabled; furhat-677 has neither, and its web interface exposes no switch for it (the Settings page contains only face and projector controls, Figure 32). | Open — and not a coding problem. The connection test was run anyway and was refused, which settled it. Premium + access must be enabled on this robot through the Furhat account the robot is registered to. Nothing about our scripts changes when that happens — only the host line. See Next steps. Do not buy the upgrade on a personal card — it belongs to the lab’s account. |
Next steps
- Confirm the chatbot’s full reply loop (2 minutes, do this first). With credit in place, run
python 02_chatbot.pyon the Virtual Furhat and hold a three-exchange conversation ending with “goodbye”. That closes the last unverified item from the session. - Run Script 03 on the Virtual Furhat.
python 03_follow_me.py, and test attending using the GAZE panel. - Get the physical robot licensed. Ask the lab’s Furhat account administrator (in our case: raise it with Dr. Shane Saunderson) or Furhat directly — an onboarding call with Oscar Klock of Furhat Robotics is available from October 26, 2026. The exact ask: enable Realtime API Premium on robot furhat-677, and set Access control – Local network to “Enabled with authentication”.
- The day that lands, run everything on the real robot — unchanged. In
.envsetFURHAT_HOST=furhat-677.localandFURHAT_AUTH_KEY=to your Furhat API token (from your Developer Zone profile — pasted into the file only). Then run 01 → 02 → 03 in order. The physical robot’s real camera and microphone array make 03’s follow-me test the real thing. - Fix the physical robot’s voice. In its web interface, select a valid voice (Speaking tab / voice settings) and re-test “Speak IP address” from the face menu — Challenge 1 should clear.
- Finish the key hygiene. Delete any OpenAI key that was ever pasted or screenshotted (platform → API keys), keep exactly one live key, in
.envonly. Consider rotating the Furhat token too (GENERATE KEY + SAVE on the virtual API page). Set a monthly cap on OpenAI auto-reload. - Before any script session on the physical robot: confirm “No Skill Running” at the top of its interface, and stop anything running from the Skill Library first (Step A8).
Quick reference
| Thing | Value |
|---|---|
| Physical robot web interface (hosted network) | http://192.168.137.1 |
| Physical robot web interface (lab Wi-Fi) | http://furhat-677.local |
| Virtual Furhat web interface | http://localhost:8080 (only while Virtual Furhat runs in Furhat Studio) |
| Script host — virtual robot | FURHAT_HOST=127.0.0.1, no auth key needed |
| Script host — physical robot | FURHAT_HOST=furhat-677.local + FURHAT_AUTH_KEY=<your Furhat token> (after licensing, Next steps 3–4) |
| Open a terminal in a folder | File Explorer → click address bar → type cmd → Enter |
| Install the libraries | python -m pip install -r requirements.txt |
| Run the scripts | python 01_hello_world.py · python 02_chatbot.py · python 03_follow_me.py (Ctrl+C stops 03) |
| Chatbot won’t answer? | Check OpenAI credit balance first; then read the terminal line after You: ... |
| Robot won’t speak? | Check the voice’s language matches your text (Step B6); on the physical robot, see Challenge 1 |
| Robot heard nothing? | Speak the instant the cue line ends (Step D3); prove the mic with the Listening tab (Step B7) |
Guide prepared for the RAP Lab (Research on Artificial Persons), McMaster University, from the live setup session of October 15, 2026 (robot: furhat-677; Virtual Furhat version 2.9.3; Python 3.15; furhat-realtime-api 0.1.3). All screenshots are from that session and are labelled in order. Two screenshots from the session are deliberately not reproduced anywhere in this guide: the Furhat API token screen and the .env file, because both display live credentials. The hosted-network screenshot that shows the robot’s Wi-Fi password on its face is likewise described in words only.