Build a word recognition experiment step by step
PsychoPy lets you present material to participants, collect their answers, and record response times. This tutorial walks you through a small word recognition task using Builder, its visual experiment editor. By the end, you will have a working experiment and a CSV file containing your test responses.
The example follows the Builder approach demonstrated in PsychoPy Easy Introduction Part 1. The six practice items below are supplied for this tutorial. Button positions can vary between versions; the uploaded video uses PsychoPy 2024.1.4, while the supplied download screenshot shows 2026.2.4.
How this guide is organised
This guide has two parts. Part 1 teaches PsychoPy with a small practice task. Part 2 sets up and tests the real Study 1 code for the RAP Lab robot study.
| Part | Sections | What you get |
| Part 1: Learn PsychoPy | Steps 1–12, Troubleshooting, Optional: the same task in Coder | A working six-trial word task and a feel for Builder and Coder |
| Part 2: Run the Study 1 code | Sections A–H | The Study 1 task tested on your PC, ready for the remaining lab setup |
Where you are now:
- ☒ Installed PsychoPy 2026.2.4 (Step 1)
- ☒ Learned the Builder and Coder windows (Step 3)
- ☒ Downloaded and extracted the Study 1 code (Section A)
- ☒ Opened study1_task.py in Coder (Section B)
- ☒ Confirmed pylsl is installed (Section C)
- ☒ Started a test run with the dummy robot and got through practice, the robot hello and the main-game breaks (Sections D and E)
- ☐ Finish the test run and check the data files (Sections E and F)
- ☐ Complete the jobs before the first real participant (Section H)
What you will build
Participants see a real English word or a made-up string of letters. They press the right arrow for a word and the left arrow for a nonword. The experiment shows instructions once, presents six trials, and ends with a thank-you screen.
| Term | Meaning |
| Routine | One section of the experiment, such as instructions or a trial. |
| Component | An element within a routine, such as text or a keyboard response. |
| Flow | The order of the routines, shown along the bottom of Builder. |
| Loop | Repeats a routine using the rows of an input spreadsheet. |
| Trial | One presentation of an item and the participant response to it. |
Step 1 Download and install PsychoPy
- Open https://psychopy.org/download.html in your browser.
- Select the Windows tab if you are using Windows.
- Click the blue PsychoPy Standalone button under Standalone Stable on the left. In the supplied screenshot, it reads PsychoPy Standalone 2026.2.4.
- Open the downloaded installer and follow its prompts.
- Open PsychoPy from the Start menu and select Builder using the View or Views menu if needed.
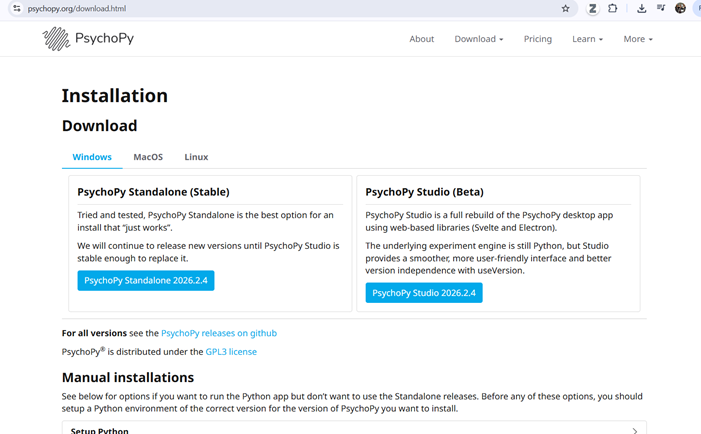
Figure 1. Download page supplied by the user. For this Windows tutorial, select the Standalone Stable download on the left.
Use the stable Standalone application for this tutorial. The download page also offers PsychoPy Studio Beta, which has a different interface. If you are on macOS or Linux, select the appropriate operating system tab and follow that platform’s installation instructions.
Step 2 Create and save your project
- Create a folder on your computer called MyFirstExperiment.
- In Builder, choose File > New if you need a blank experiment.
- Choose File > Save As and save the experiment as word_task.psyexp inside MyFirstExperiment.
The .psyexp file stores your Builder design. Keep your conditions spreadsheet in the same folder so the experiment can find it easily.
Step 3 Find your way around Builder
The main workspace contains routines and their timelines. Components on the right let you add text, images, keyboard responses, and other elements. The Flow panel at the bottom controls the sequence. You will create three routines named instructions, trial, and goodbye, in that order. Only trial belongs inside the loop.
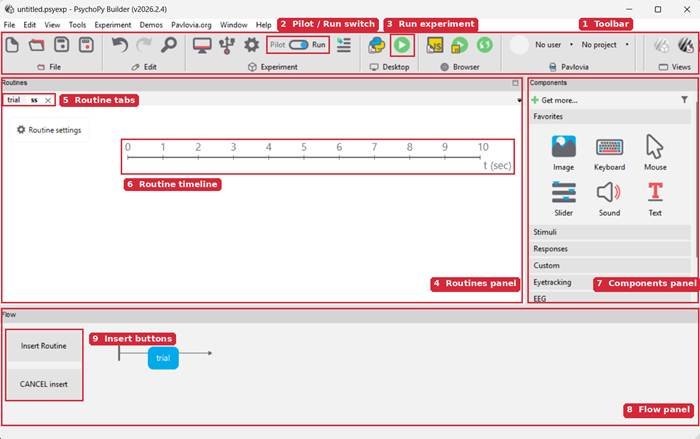
Figure 2. The PsychoPy Builder window (v2026.2.4) with its main areas labelled.
| Label | Area | What it does |
| 1 | Toolbar | File, edit, experiment settings, run and Pavlovia controls. |
| 2 | Pilot / Run switch | Pilot mode for testing; Run mode for real data collection. |
| 3 | Run experiment | Green play button that launches the experiment on your desktop. |
| 4 | Routines panel | Shows the routine you are editing and its components. |
| 5 | Routine tabs | One tab per routine; click a tab to edit that routine. |
| 6 | Routine timeline | Time in seconds; each component appears as a bar along it. |
| 7 | Components panel | Text, Keyboard, Image and other elements you add to a routine. |
| 8 | Flow panel | The order in which routines and loops run. |
| 9 | Insert buttons | Insert Routine and Insert Loop place items on the Flow. |
The Views group at the far right of the toolbar switches between PsychoPy’s three windows. The greyed-out icon is the view you are already in.
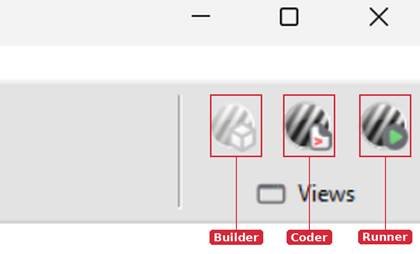
Figure 3. The Views group. Builder is the visual editor used in this tutorial; Coder is the Python script editor; Runner lists and runs experiments.
Clicking the Coder icon opens a separate window for writing experiments as Python scripts. You will not need it for this tutorial, but it helps to recognise it if it opens by accident.
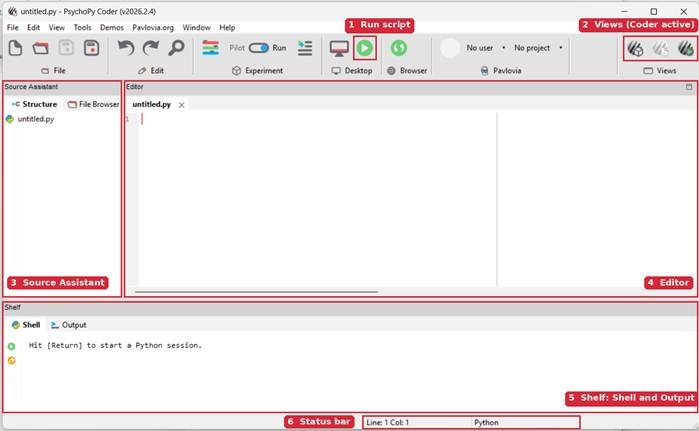
Figure 4. The PsychoPy Coder window (v2026.2.4) with its main areas labelled.
| Label | Area | What it does |
| 1 | Run script | Green play button that runs the open script on your desktop. |
| 2 | Views (Coder active) | Switches between Builder, Coder and Runner; the greyed icon is Coder. |
| 3 | Source Assistant | Structure tab outlines the script; File Browser tab shows your files. |
| 4 | Editor | Where you write and edit Python code, one tab per file. |
| 5 | Shelf: Shell and Output | Shell runs Python commands directly; Output shows messages and errors. |
| 6 | Status bar | Shows the cursor’s line and column and the file’s language. |
Step 4 Create the instructions screen
- Create a routine using Experiment > New Routine, or the new-routine control available in your version. Name it instructions.
- Use Insert Routine in the Flow panel to place instructions before trial.
- Select instructions, then add a Text component from the Components panel.
| Setting | Value |
| Name | instruction_text |
| Start | 0 |
| Stop or duration | Leave blank |
| Text | Use the instructions below |
Enter this in the Text field:
Welcome!
You will see a word or a made-up string of letters.
Press the RIGHT arrow if it is a real English word.
Press the LEFT arrow if it is not a real English word.
Respond as quickly and accurately as you can.
Press SPACE to begin.
Click OK. Leaving the stop value blank allows the text to remain until the routine ends.
Step 5 Make Space start the task
Add a Keyboard component to instructions and enter these settings:
| Setting | Value |
| Name | start_key |
| Start | 0 |
| Stop or duration | Leave blank |
| Allowed keys | [‘space’] |
| Force end of Routine | Checked |
Click OK. An accepted Space press now ends the instructions routine and advances to trial. Component names must be unique and must not contain spaces.
Step 6 Prepare the trial spreadsheet
Open Excel or another spreadsheet editor. Starting in cell A1, enter the following two columns exactly. The headers become variable names used by PsychoPy.
| stimulus | correct_key |
| cat | right |
| blif | left |
| house | right |
| nusp | left |
| tree | right |
| zerp | left |
Save the spreadsheet as conditions.xlsx inside MyFirstExperiment, then close it. Each row is one trial. Enter left and right as plain text without quotation marks. Avoid spaces in the headers.
Step 7 Display the item on each trial
Select the trial routine. If it does not exist, create it and insert it after instructions. Add a Text component with these settings:
| Setting | Value |
| Name | stimulus_text |
| Start | 0 |
| Stop or duration | Leave blank |
| Text | $stimulus |
| Text update setting | Set every repeat |
Click OK. The dollar sign tells PsychoPy to use the value from the stimulus spreadsheet column. Set every repeat updates that value at the start of each trial. Leaving the stop value blank keeps the item visible until the participant responds.
Step 8 Record answers and response times
Add a Keyboard component to trial. Enter these settings:
| Setting | Value |
| Name | answer_key |
| Start | 0 |
| Stop or duration | Leave blank |
| Allowed keys | [‘left’, ‘right’] |
| Force end of Routine | Checked |
| Data tab Store | First key |
| Data tab Store correct | Checked |
| Data tab Correct answer | $correct_key |
Keep Discard previous and Sync timing with screen enabled if those options are shown. Click OK. The keyboard starts with the text, records the answer and response time, and ends the trial when an accepted key is pressed. The correct answer is taken from the current spreadsheet row.
Step 9 Repeat the trial with a loop
- Click Insert Loop in the Flow panel.
- Place its start immediately before trial and its end immediately after trial.
- Enter the loop settings below, then click OK.
| Setting | Value |
| Name | trials |
| Loop type | Random |
| nReps or repetitions | 1 |
| Conditions | Browse to conditions.xlsx |
| Selected rows | Leave blank |
| Is trials | Checked if shown |
One repetition means one pass through all six spreadsheet rows, so you get six trials. Random shuffles their order. Check that instructions is outside the loop; otherwise, the instructions will repeat too.
Step 10 Add a closing screen
Create a routine named goodbye and insert it after the trial loop. Add a Text component:
| Setting | Value |
| Name | goodbye_text |
| Start | 0 |
| Stop type | Duration in seconds |
| Duration | 3 |
| Text | Thank you! You have completed the experiment. |
This screen appears for three seconds, then the experiment ends.
Step 11 Run a test
- Save the experiment.
- If your version has a Pilot and Run switch, select Run for this test to check the normal data output.
- Click the desktop Run experiment button, usually shown as a green play icon.
- If a participant information dialog appears, enter test01 as the participant ID and click OK.
- Press Space at the instructions screen, then answer all six items with the arrow keys.
- Wait for the closing screen to finish.
A successful test shows instructions once, six items, and the goodbye screen once. For this first run, deliberately answer one item incorrectly so you can check the correctness column afterwards.
Step 12 Read your results
Look inside the experiment folder for the data folder. Open the test run’s CSV file in Excel. Exact filenames and extra columns can vary with the version and experiment settings.
| Column | Meaning |
| stimulus | The item shown on that trial. |
| correct_key | The expected response. |
| answer_key.keys | The key the participant pressed. |
| answer_key.corr | 1 means correct; 0 means incorrect. |
| answer_key.rt | Response time in seconds. |
A response time of 0.650 seconds is 650 milliseconds. This interval is measured from the start of keyboard checking. In this task, the keyboard and text both start at time zero. Check that there are six trial records, that words expect right, and that nonwords expect left.
Troubleshooting
| Problem | What to check |
| The same item appears repeatedly | Set the stimulus text update option to Set every repeat. |
| stimulus is not defined | Check the column header, Conditions file, and loop placement. |
| An arrow key does not advance the task | Enable Force end of Routine and check the allowed keys. |
| Instructions repeat before every item | Place instructions outside the trials loop. |
| The item disappears before a response | Clear the text stop or duration field. |
| Every response is marked wrong | Check $correct_key and the spreadsheet entries left and right. |
| The spreadsheet cannot be found | Keep conditions.xlsx with the experiment and select it again in the loop. |
Where to go next
Once the six-trial task runs correctly and saves its results, practise changing the instructions, adding more spreadsheet rows, or replacing the text with images. Change one feature at a time and check the results after each change. This practice task teaches the structure of an experiment; a research study will need its own task design, stimuli, timing, and validation.
Optional: the same task in Coder
The script below runs the same six-trial task from Coder, without Builder. It uses the same conditions.xlsx file and saves the same data columns.
- Open Coder from the Views group (Figure 3).
- Paste the script into the Editor and save it as word_task_coder.py inside MyFirstExperiment, next to conditions.xlsx.
- Click the green Run script button. Press Escape at any time to stop early.
import os
from psychopy import visual, core, data, gui
from psychopy.hardware import keyboard
# Participant ID dialog
info = {‘participant’: ‘test01’}
dlg = gui.DlgFromDict(info, title=’Word task’)
if not dlg.OK:
core.quit()
# Work from the script’s folder so conditions.xlsx is found
os.chdir(os.path.dirname(os.path.abspath(__file__)))
os.makedirs(‘data’, exist_ok=True)
filename = os.path.join(‘data’, f”{info[‘participant’]}_word_task_{data.getDateStr()}”)
exp = data.ExperimentHandler(name=’word_task’, extraInfo=info, dataFileName=filename)
# Window, keyboard and one reusable text stimulus
win = visual.Window(fullscr=True, color=’grey’, units=’height’)
kb = keyboard.Keyboard()
text = visual.TextStim(win, text=”, height=0.05, wrapWidth=1.2, color=’white’)
def show(message):
text.text = message
text.draw()
win.flip()
# Instructions: wait for Space
show(“Welcome!\n\n”
“You will see a word or a made-up string of letters.\n\n”
“Press the RIGHT arrow if it is a real English word.\n”
“Press the LEFT arrow if it is not a real English word.\n\n”
“Respond as quickly and accurately as you can.\n\n”
“Press SPACE to begin.”)
kb.clearEvents()
kb.waitKeys(keyList=[‘space’], waitRelease=False)
# Trial loop: six rows, random order, one repetition
trials = data.TrialHandler(trialList=data.importConditions(‘conditions.xlsx’),
nReps=1, method=’random’, name=’trials’)
exp.addLoop(trials)
for trial in trials:
text.text = trial[‘stimulus’]
text.draw()
win.callOnFlip(kb.clock.reset) # response time starts when the word appears
win.callOnFlip(kb.clearEvents)
win.flip()
key = kb.waitKeys(keyList=[‘left’, ‘right’, ‘escape’], waitRelease=False)[0]
if key.name == ‘escape’:
break
trials.addData(‘answer_key.keys’, key.name)
trials.addData(‘answer_key.corr’, int(key.name == trial[‘correct_key’]))
trials.addData(‘answer_key.rt’, key.rt)
exp.nextEntry()
# Goodbye screen for 3 seconds
show(“Thank you! You have completed the experiment.”)
core.wait(3)
# Save the CSV and close
exp.saveAsWideText(filename + ‘.csv’, delim=’,’)
exp.abort() # stops PsychoPy saving a second copy on exit
win.close()
core.quit()
The CSV lands in the data folder with the columns from Step 12: stimulus, correct_key, answer_key.keys, answer_key.corr and answer_key.rt. Response time here is measured from the moment the word appears on screen.
Part 2: Run the Study 1 code
Part 2 takes the Study 1 code from download to a full test run. Work through Sections A–H in order. Every test uses the dummy robot, so no robot, EEG cap or ring is needed yet.
| Section | Job | Done when |
| A | Get the code folder | The folder in Figure 5 is on your PC |
| B | Open the task in Coder | study1_task.py is open in an Editor tab |
| C | Check pylsl is installed | pylsl shows a version number (Figure 7) |
| D | Start the task | The Study 1 dialog is filled in as in Figure 8 |
| E | Run the test session | You reach “The game is over” and press S to close |
| F | Check the data files | Five files starting P001_dummy_S1_ are in the data folder |
| G | Fix common problems | Use when something unexpected happens |
| H | Prepare for real participants | Every box in the H checklist is ticked |
A. Get the code folder
The Study 1 code arrives as study1_code.zip. Extract it to C:\Study1 and keep every file together in one folder; the scripts load each other and the stimuli by location. Open study1_task.py from this folder in Coder rather than pasting code into a new file.
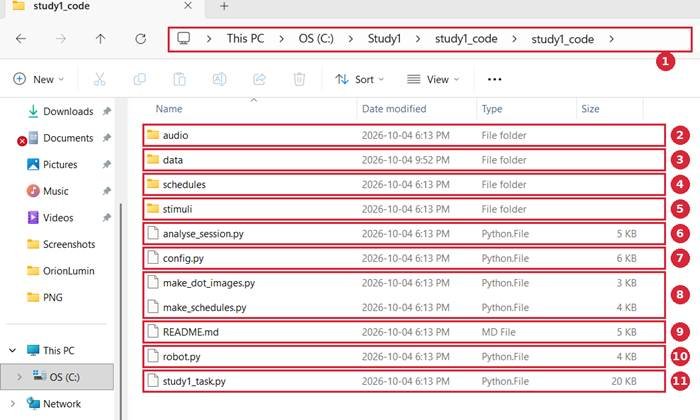
Figure 5. The extracted Study 1 code folder in File Explorer.
| Label | Item | What it is for |
| 1 | Folder path | Where the code lives: C:\Study1\study1_code\study1_code. Windows added a second study1_code folder when extracting; that is fine. |
| 2 | audio | Put the five robot recordings here: hello, left, right, break and goodbye (.wav). |
| 3 | data | The task saves each session’s trials, practice, trust, markers and bonus files here. |
| 4 | schedules | The four error schedules and the practice list. Already made. |
| 5 | stimuli | The 200 main and 10 practice dot pictures. Already made. |
| 6 | analyse_session.py | After a session, reads the LabRecorder .xdf file. Run it in a normal Python install, not in PsychoPy. |
| 7 | config.py | All settings: timings, keys, marker codes, robot addresses. Edit this file, not the others. |
| 8 | make_dot_images.py, make_schedules.py | Remake the pictures and schedules. Only needed if the design changes. |
| 9 | README.md | Setup steps, key list and checks before the first participant. |
| 10 | robot.py | Controls Furhat, NAO or a dummy robot for testing. |
| 11 | study1_task.py | The experiment. Open this in Coder and press Run. |
Running analyse_session.py inside PsychoPy gives the error “No module named ‘mne’”. PsychoPy does not include the analysis packages, so run the task in PsychoPy and the analysis in a separate Python install with mne and pyxdf.
B. Open the task in Coder
To open the experiment, choose File > Open in Coder, browse to the code folder and select study1_task.py, then click Open.
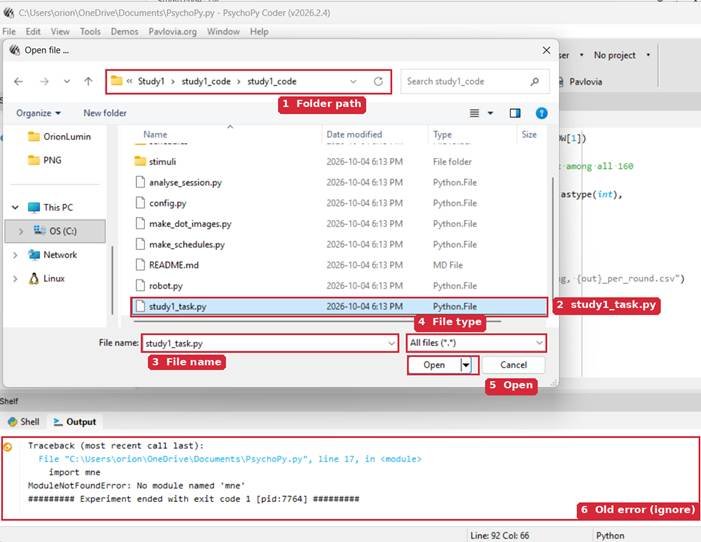
Figure 6. Opening study1_task.py from the Study 1 code folder in Coder.
| Label | Item | What to check |
| 1 | Folder path | Shows Study1 > study1_code > study1_code, the folder from Figure 5. |
| 2 | study1_task.py | Click this file once to select it. |
| 3 | File name | Should read study1_task.py. |
| 4 | File type | All files (.) lists every file; leave as is. |
| 5 | Open | Opens the script in a new Editor tab. Then press the green Run button. |
| 6 | Old error (ignore) | Left over from running the wrong file earlier. It disappears on the next run. |
C. Check pylsl is installed
Before the first run, check that pylsl is installed. The task uses it to send markers to LabRecorder. Choose Tools > Plugin/packages manager, open the Packages tab and search for pylsl.
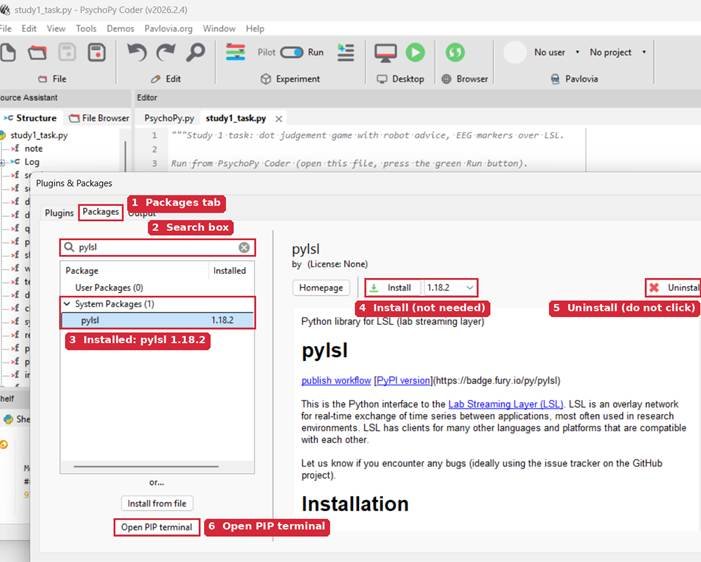
Figure 7. The Plugins & Packages window with pylsl already installed.
| Label | Item | What to do |
| 1 | Packages tab | Click this tab, not Plugins. |
| 2 | Search box | Type pylsl. |
| 3 | Installed: pylsl 1.18.2 | Listed under System Packages with a version number, so it is already installed. Nothing more to do. |
| 4 | Install | Only needed if the Installed column is empty. |
| 5 | Uninstall | Do not click; the task needs pylsl. |
| 6 | Open PIP terminal | Alternative way to install packages by typing commands. Not needed here. |
D. Start the task
Press the green Run button. A Study 1 dialog opens first. For a first test with no robot or EEG connected, use the settings shown below.
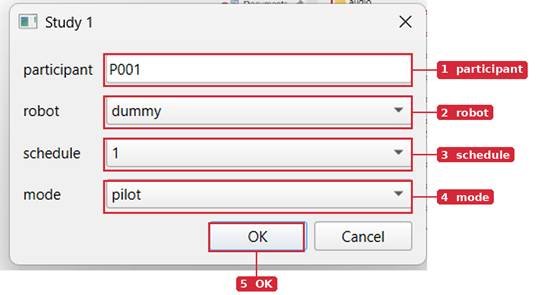
Figure 8. The Study 1 start dialog set up for a test run.
| Label | Field | Test run | Real participant |
| 1 | participant | P001 | The next ID on today’s sheet: P001, P002, … |
| 2 | robot | dummy (no hardware needed) | furhat or nao, as on today’s sheet |
| 3 | schedule | 1 | Rotate 1 to 4: P001 → 1, P002 → 2, P003 → 3, P004 → 4, P005 → 1 |
| 4 | mode | pilot (windowed, 15 s rest, 5 rounds per block) | run (full screen, full length) |
| 5 | OK | Starts the task | Starts the task |
Leaving robot on furhat or nao during a test makes the script try to reach the real robot, and it stops with a connection error.
E. Run the test session
A pilot test takes about 8 minutes. The participant’s screen only shows neutral text, so the key to press is printed in Coder’s Output tab on lines starting with >>> EXPERIMENTER. Keep the Output tab visible beside the task window, and click inside the task window before pressing a key.
| # | What you see | What is happening | Press |
| 1 | Study 1 dialog | Session settings (Figure 8) | OK |
| 2 | Please wait for the researcher. | Real session: start LabRecorder now. Test: skip | S |
| 3 | A white + | Rest with eyes open: 15 s in pilot, 2 min in a real session | Nothing |
| 4 | Tone, then a blank screen | Rest with eyes closed: 5 s in pilot, 1 min real | Nothing |
| 5 | Please wait for the researcher. | Rest finished | S |
| 6 | Practice instructions | Real session: read the Step 4 script aloud | Space |
| 7 | +, dots, Left or Right?, then Correct or Wrong | 10 practice rounds. The dots flash for only 0.5 s | Left or Right |
| 8 | Practice done. Please wait for the researcher. | Score appears in the Output tab | S to go on, R to repeat |
| 9 | Please wait for the researcher. | Real session: read the main-game script and uncover the robot | H (robot hello) |
| 10 | Please wait for the researcher. | Questions about the game | S |
| 11 | The main game is about to begin. | Space | |
| 12 | In a moment, please take one deep breath… | Sync moment for the ring | Space |
| 13 | Breathe in deeply and hold it, 5 to 1 | Marker 90 is sent; no key needed | Nothing |
| 14 | Part 1 of 4 | Space | |
| 15 | Five rounds (see below) | Pilot: 5 rounds per part. Real: 40 | Left or Right, twice per round |
| 16 | Please answer the question on the tablet. | Real session: trust rating 0–100 on the tablet | S |
| 17 | Take a short rest, countdown | 5 s in pilot, 60 s real | Nothing |
| 18 | Please wait for the researcher. | Real session: check EEG and ring signals | S |
| 19 | Parts 2, 3 and 4 | Repeat rows 14–18. After Part 4 there is no rest | |
| 20 | Deep-breath sync again | End sync moment | Space, then nothing |
| 21 | The game is over. Thank you! | Real session: stop LabRecorder and the ring app first | G (robot goodbye) |
| 22 | Please wait for the researcher. | Correct answers and bonus appear in the Output tab | S closes the task |
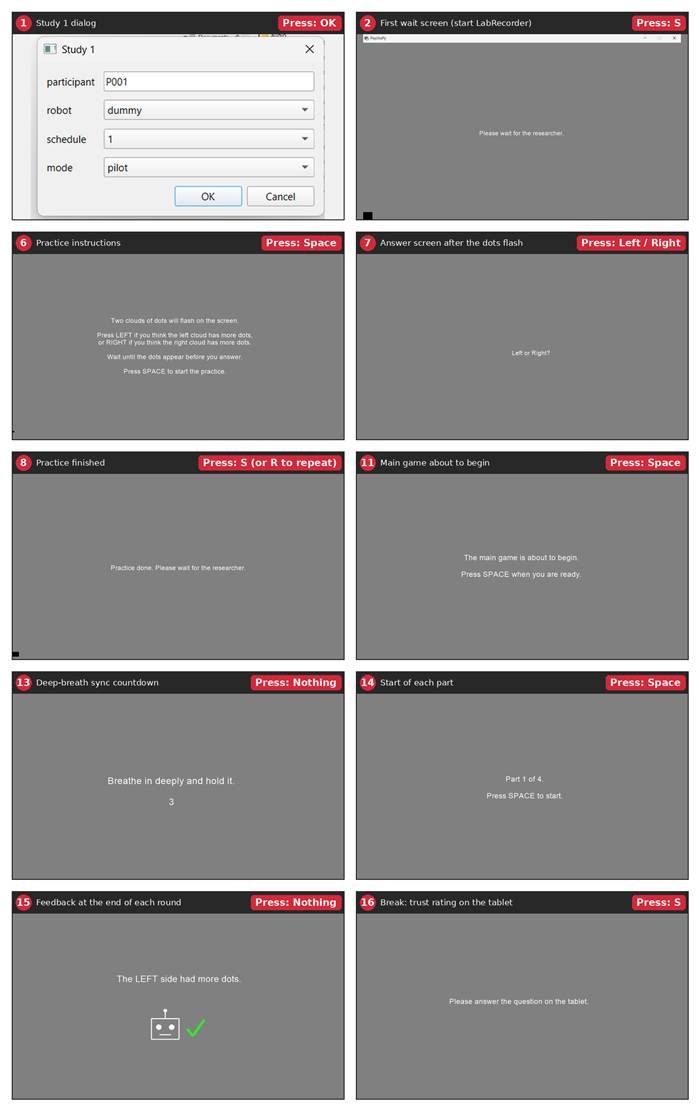
Figure 9. The screens from a test run. Each red number matches a row in the table above, and the red tag shows the key to press.
Each main round runs in this order:
- A + for 1 second.
- The dots flash for 0.5 seconds, then “Left or Right?” stays up. Answer within 3 seconds of the dots.
- “Your first choice: LEFT” (or RIGHT). The robot looks at the screen, turns to the participant and gives its advice. With the dummy robot, the advice prints in the Output tab, for example [robot] says: right.
- “Final choice: Left or Right?” The participant keeps their answer or switches to the robot’s.
- Feedback: which side had more dots, and a small robot picture with a green tick (robot right, marker 50) or red cross (robot wrong, marker 51). The corner square flashes white for the light sensor.
- A pause of 2.5–3.5 seconds, then the next round.
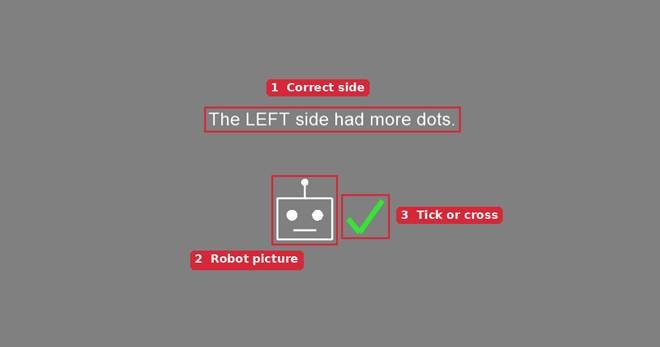
Figure 10. The feedback screen at the end of a round.
| Label | Item | Meaning |
| 1 | Correct side | Which side really had more dots |
| 2 | Robot picture | Shows the result is about the robot’s advice |
| 3 | Tick or cross | Green tick: the robot was right (marker 50). Red cross: the robot was wrong (marker 51) |
The robot is never wrong in rounds 1–5, so Part 1 of a pilot shows only ticks. With schedule 1, these pilot rounds show a red cross:
| Part | Robot wrong on round |
| 1 | None |
| 2 | 1 and 5 |
| 3 | 3 and 4 (two in a row) |
| 4 | 3 |
Press P at any time to pause after the current round; S resumes. Escape stops the task, and everything recorded so far is already saved.
Several screens look identical, so the screen alone does not tell you where you are. The break screen “Please answer the question on the tablet.” appears four times, once after each part, and “Please wait for the researcher.” appears many times. To find your place, read the newest >>> EXPERIMENTER line in the Output tab. After each part it names the block, for example Block 2 done. If the block number goes up each time you see the break screen, the task is working. After Block 4 the next screen is the final breathing countdown, not another part.
At any break screen the key is S.
F. Check the data files
A finished pilot leaves five CSV files in the data folder, each starting with the participant, robot and schedule, for example P001_dummy_S1_20261004_2215. The test passes if the trials file has 20 rows (4 parts × 5 rounds); a real session gives 160.
| File ends with | Contains |
| _trials.csv | One row per main round: first and final choice, response times, whether each was correct, the robot’s advice, and whether the participant switched to it |
| _practice.csv | One row per practice round |
| _trust.csv | One row per part. Ratings are blank when trust is collected on the tablet |
| _markers.csv | Every marker sent to LabRecorder, with its time. A backup in case the .xdf file has a problem |
| _summary.csv | Rounds played, correct final answers and the bonus ($0.05 each) |
G. Fix common problems
These are the problems met while setting up and testing the code.
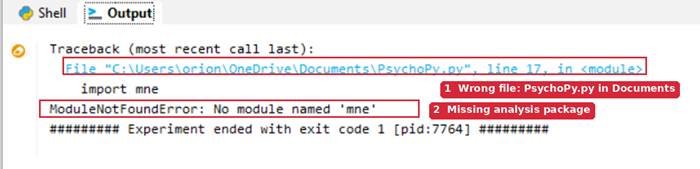
Figure 11. The first error met in testing. Label 1 shows the wrong file was run (PsychoPy.py in Documents); label 2 shows the missing analysis package. The fix is the first row of the table below.
| What you see | Why | Fix |
| No module named ‘mne’ | You ran analyse_session.py, the after-session analysis script | Open study1_task.py instead. Run analysis later in a normal Python install (pip install mne pyxdf pandas matplotlib) |
| Window title shows Documents\PsychoPy.py | Code was pasted into a new file away from the other files | Open study1_task.py from the code folder with File > Open (Section B). Keep all files together |
| Can’t find study1_code.zip | The file wasn’t downloaded from the chat | Download it, then right-click > Extract All to C:\Study1 |
| Folder is study1_code\study1_code | Windows added an extra folder when extracting | Nothing to fix; the code works there |
| Requirement already satisfied | pylsl was already installed | Nothing to fix; close the window |
| Connection error when the task starts | robot is set to furhat or nao, but no robot is connected | Choose dummy in the dialog for tests |
| A key does nothing | The task window lost keyboard focus, or the task is waiting for a different key | Click inside the task window, then check the newest >>> EXPERIMENTER line for the key. After practice, the next key is H, not S |
| The tablet break screen keeps coming back | It appears after every part, four times in total | Normal. Check the Output tab: Block 1 done, Block 2 done, and so on. Press S each time |
| S does nothing on a break screen, and the block number in Output does not change | The keypress is not reaching the task | Click directly on the grey screen, wait a second, press S with Caps Lock off. If still stuck, press Escape: data so far is saved (Section F) |
| Only “Left or Right?” appears, no dots | The dots flash for 0.5 s and are easy to miss | Normal. If you never see dots, check the Output tab for an image error |
| Too slow | No answer within 3 s of the dots | Answer faster, or change FIRST_RESP_TIMEOUT in config.py |
| Black square in the bottom-left corner | Photodiode patch for the light-sensor timing check | Leave it, or set PHOTODIODE_PATCH = False in config.py |
| Warnings about missing audio files | The robot recordings don’t exist yet | Expected until you record them (Section H) |
| No red cross in Part 1 | The robot is never wrong in rounds 1–5 | By design. The first error in a pilot is Part 2, round 1 |
| Not sure what happened | Send a screenshot of the last 10 lines of the Output tab; it shows exactly where the task is waiting |
H. Prepare for real participants
The test run shows the code works. Before the first participant:
- ☐ Record the five robot lines (hello, left, right, break, goodbye) as .wav files in the audio folder. For NAO, also copy them to /home/nao/study1_audio on the robot
- ☐ Edit every line marked EDIT in config.py: robot and PC IP addresses, robot gaze positions, EEG channel order, dots display time, and marker codes matched to the Study 1 Protocol doc (only 30, 50, 51 and 90 come from the run guide)
- ☐ Install furhat-remote-api (Furhat) or qi (NAO) through Tools > Plugin/packages manager > Packages. NAO needs NAOqi 2.9; older versions need a Python 2 bridge (see README)
- ☐ Run a pilot with the real robot and check its gaze and voice volume
- ☐ Do the whole study on yourself in run mode with LabRecorder recording, then run analyse_session.py on the .xdf file. Expect 160 feedback markers and 2 sync markers
- ☐ Measure timing: the photodiode on the corner square for screen and radio delay (set RADIO_DELAY in config.py), and the lag between marker 30 and the robot starting to speak
- ☐ Decide where trust is rated: tablet (default) or on screen (TRUST_ON_SCREEN = True)
For a real session, fill in the dialog with the participant ID from today’s sheet, the real robot, the next schedule in rotation (P001 → 1, P002 → 2, P003 → 3, P004 → 4, P005 → 1) and run mode.
References
- PsychoPy Easy Introduction Part 1. Video supplied by the user. https://youtu.be/tTq6IfESVZs
- PsychoPy installation guide. https://psychopy.org/download.html
- PsychoPy Keyboard component documentation. https://psychopy.org/builder/components/KeyboardComponent.html
- PsychoPy Flow and loops documentation. https://psychopy.org/builder/flow.html
- PsychoPy Builder tutorial on trial variables and responses. https://psychopy.org/tutorials/experiments/stroop.html