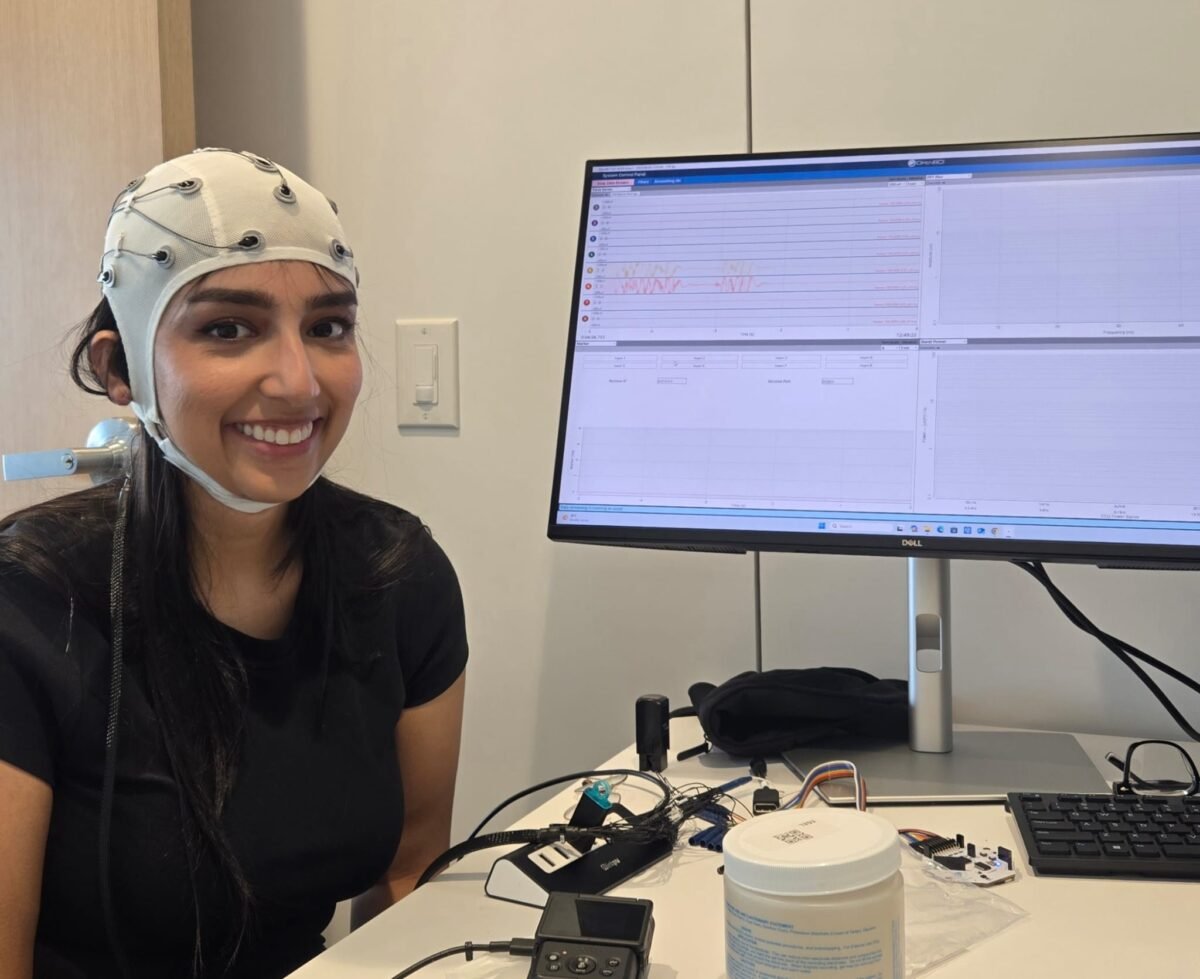
Ok, finally I documenting my first, second and third experience trying to use the EEG. It wasn’t a success but I learnt a lot and this is me trying to document that experience – what work and what failed. When you are faced with a railed channels it almost always mean one thing: the electrode is not truly touching the skin, this is usually because hair, oil or too little gel is in the way, or because REF or GND has poor contact. The board and software are rarely the problem, but it can b frustrating at times
This article walks through how to tell which problem you have, then gives a step-by-step method for getting a clean signal through hair.
The short version: snug cap, REF and GND done first (ideally REF on an earlobe), hair parted, skin cleaned, gel worked down to the scalp with a circling motion, and one minute for each electrode to settle.
What “railed” actually means
Railed means the amplifier has hit its maximum. The brain’s signal is tiny, millionths of a volt. When an electrode is not touching skin properly, it picks up a huge, unstable voltage instead, and the amplifier is pushed to the top or bottom of its range. Like a speaker turned up so loud it only crackles, the channel shows nothing useful. Please do note if you do not connect add the gel to the REF and GNY every channel will rail. I struggled with this 3x till I figured it out. REF is the measuring stick every channel is compared against. With no gel it barely touches the skin, so it picks up a large, unstable voltage. Every channel is measured as “electrode minus REF”, so that unstable voltage lands on all channels at once. Even perfectly gelled O1 and O2 will look railed.
Without gel on GND, GND can’t send its noise-cancelling signal into the body, so the electrical hum from the room isn’t cancelled. That adds big noise to every channel, and it can also push them to rail.
The technical reason is impedance: how hard it is for electricity to flow from the scalp into the electrode. Hair, dry skin, oil and air gaps all raise it. Gel lowers it, but only if the gel reaches the skin.
How to read the numbers in the GUI
Each channel in the Time Series panel shows two readouts on the right:
| Readout | Bad | Good |
| Railed status | Railed or a high Railed % (red or orange) | Not Railed |
| Signal size (µVrms) | Hundreds or thousands | Roughly 5 to 50 µVrms |
| Line on the plot | Flat at the edge, or wild, jagged swings | A calm, wavy line |
A channel that reads 0.00 µVrms with a perfectly flat line is not railed: nothing is plugged into that pin, or the channel is switched off.
Diagnose first
Ask two questions before touching the gel: is every channel railed, and does the signal cut in and out? The answers tell you where to look.
Railing on every channel at once is almost never about hair. It is REF, GND or a software setting. Railing on just one channel is that electrode’s contact with the scalp.
Before the participant arrives
Half of a good connection is decided before the cap goes on.
Supplies to have within reach
- ☐ Electrode gel made for EEG caps (watery going in, firms up in air). Not ultrasound gel, not hair gel, not thick paste.
- ☐ Blunt-tip syringe (comes with the cap), filled before you start
- ☐ Alcohol wipes or rubbing alcohol with cotton swabs
- ☐ Cotton swabs or a blunt wooden stick for parting hair
- ☐ Measuring tape for head size
- ☐ Earlobe clip electrode or a stick-on electrode, if you plan to put REF on the ear
- ☐ Tissues, a towel, a comb, water for the participant
- ☐ Fully charged battery for the Cyton
What to tell the participant in advance
Ask them to come with clean, dry hair and no products: no oil, hair cream, gel, spray or dry shampoo. Products coat the scalp and block the signal. Washing the night before or the morning of is ideal.
Tight braids, weaves, locs and very thick hair make contact much harder. That is not a reason to exclude anyone, but plan more time, and consider placing only the electrodes you need (for the alpha test: O1, O2, REF and GND).
Set up the room
- Run the laptop on battery, not plugged into the wall. Chargers add electrical hum.
- Keep phones, chargers and power bars at least a metre from the participant and the board.
- Seat the participant in a comfortable chair with head support, so they don’t tense their neck.
- Keep the room cool. Sweat makes the signal drift.
- Put the board where the cables can reach without pulling.
Fitting the cap
A loose cap is the main cause of signals that cut in and out: electrodes lift off the scalp every time the person moves.
- Check the size. Measure around the widest part of the head, just above the eyebrows and ears. The cap should match that size. A cap that is too big will never sit tight, however you adjust it.
- Position the front. The front edge sits about two finger-widths above the eyebrows. Fp1 and Fp2 should land on the forehead.
- Centre it. The line of electrodes Fz, Cz and Pz should run straight from the bridge of the nose to the back of the head, not tilted to one side.
- Check Cz. Cz should sit halfway between the nose bridge and the bump at the back of the skull, and halfway between the two ears.
- Fasten the chin strap firmly. Snug enough that the cap does not shift when the person nods, but not painful. Ask them.
- Smooth it down. Run your hands over the cap so every electrode holder presses against the head with no bulges.
Do REF and GND first
If REF or GND has poor contact, every channel rails at once, however well the other electrodes are gelled. So these two get done first and done best.
| Electrode | Its job | Plain version | Connects to |
| REF | The point every channel is measured against | The measuring stick | SRB pins (both boards, joined by the Y-splitter) |
| GND | Cancels the electrical hum the body picks up | The noise-canceller | BIAS pin on the Cyton only |
The strongest fix: move REF to the earlobe
On the cap, REF sits on top of the head, in the thickest hair. It is the hardest electrode to get right, and it is the one that ruins everything when it fails.
Moving it to a hairless spot removes that risk:
- Clean the earlobe (or the bony bump behind the ear, the mastoid) with an alcohol wipe and let it dry.
- Attach an ear clip electrode with a little gel, or a stick-on electrode on the mastoid.
- Connect that electrode to the single end of the Y-splitter, in place of the cap’s REF lead.
- Leave the cap’s own REF electrode unconnected (no gel needed there).
This is a standard choice in EEG research, so it does not weaken your data. Note in your session notes which reference you used, because it changes the signals slightly and should stay the same for every participant in a study.
If REF stays on the cap
Give it the full technique from the next section, and check it twice. GND sits on the forehead area, where there is little or no hair, so it is usually easier. Still clean the skin and gel it properly.
Getting gel through the hair to the scalp
Gel on top of hair does nothing; the gel has to form an unbroken bridge from the metal electrode down to the skin. This is the step most people get wrong, and it is why adding more gel often changes nothing.
Gel must reach the skin, not sit on the hair
On the left, the gel never gets past the hair, so there is no electrical path to the skin. On the right, the hair is pushed aside and the gel fills the hole all the way from the metal to the skin.
Picture each electrode holder as a small tube. The metal is at the top, the scalp at the bottom, and hair is in between. Your job is to clear a path down the tube and fill it with gel.
Step by step, for each electrode
- Look through the hole. Shine a phone light into the electrode holder if needed. You want to see hair or scalp at the bottom.
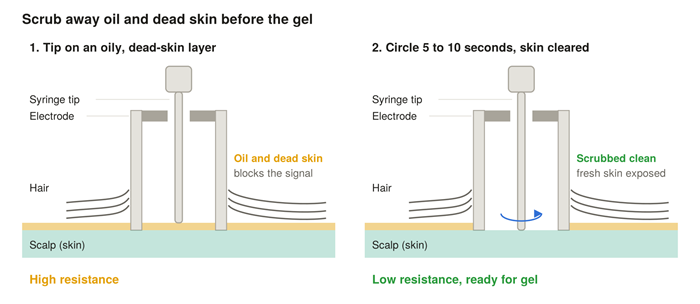
- Part the hair. Put the blunt syringe tip (or a wooden stick or cotton swab) into the hole and push the hair to the sides, with a gentle back-and-forth or circling motion, until you can see or feel scalp. The tip should touch skin.
- Step 2: parting the hair through the electrode hole
- Scrub the skin lightly. Keep the tip on the scalp and make small circles for 5 to 10 seconds. This moves away dead skin and oil, which are a big part of the resistance. Firm, not painful; ask the participant.
- Step 3: scrubbing the skin under the electrode
- Inject while circling. Squeeze the gel slowly while the tip stays on the scalp and keeps circling. This drives gel down into the gap instead of leaving it on top of the hair.
- Fill the tube, then lift as you go. Keep squeezing as you slowly raise the tip, so the gel fills the hole from the skin up to the metal. Stop when the gel just reaches the electrode.
- Don’t overfill. Gel that spreads out under the cap can join two neighbouring electrodes. They then show identical signals, which is called a gel bridge.
- Press the holder down gently so the electrode sits close to the scalp.
- Watch the channel and wait up to a minute (next section) before deciding it needs more work.
If the channel still rails
- Go back in with the syringe tip and circle again on the scalp. The gel has usually not reached skin, or an air bubble is in the way.
- Add a small amount of gel only after re-circling.
- Check that the electrode holder has not moved off the scalp because the cap shifted.
- Swap the HPTA cable onto a different pin to rule out a bad cable (see the hardware section).
Thick, curly or long hair
- Spend more time on step 2. Working the hair aside in small circles is usually more effective than pushing straight down.
- Some labs gently move hair aside through each hole before putting any gel in at all, across all electrodes, then do the gel pass.
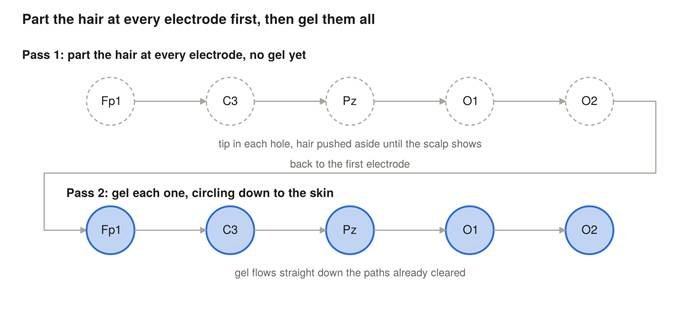
- The two-pass method: part all, then gel all
- Use only the electrodes you need. Four perfect electrodes beat nineteen poor ones.
Checking each channel in the GUI
Check every electrode as you gel it, not all at the end, so you know exactly which one needs more work.
- Start the data stream before gelling, with the Time Series panel open and Vertical Scale at 200 µV.
- Gel REF and GND first. Many channels may calm down at once when they make contact.
- Gel one recording electrode, then watch its channel for up to a minute. Gel takes time to soak in, and a railed channel often settles on its own after 30 to 60 seconds.
- Move on only when the channel reads Not Railed and roughly 5 to 50 µVrms.
- Railed vs ready: what one channel looks like
The impedance check (if your GUI version has it)
Recent versions of the GUI can measure impedance directly, using the Ω button beside each channel in Time Series (or the Cyton Signal widget). It shows a number in kΩ for that electrode.
- Lower is better. As a rough guide, under about 20 kΩ is good for a gel cap.
- Very high values (around 100 kΩ or more) mean the electrode is not really touching skin.
- In short, read the impedance number in three zones. Under about 20 kΩ means good contact, so you are ready to record. Between about 20 and 100 kΩ means weak contact: go back in with the syringe tip, re-circle the gel and wait a minute. Around 100 kΩ or more means no real contact: part the hair, scrub the skin and gel again. Lower is always better, and these are rough guides for a gel cap, since exact readings vary between GUI versions.
- Check one channel at a time, and switch the check off before recording. It sends a tiny test current that disturbs the signal.
The exact readings vary between GUI versions, so treat the numbers as a guide. A channel that is Not Railed with a calm, small signal is good enough to record.
The finger test for the whole rig
If you can’t tell whether the problem is the person or the equipment, take the cap off and touch the REF and GND electrodes with one finger and a recording electrode with another, with a little gel on your fingertips. If that channel goes calm, the boards, cables and software are fine, and the problem is contact with the scalp.
Software settings that cause railing
A wrong setting can make perfectly gelled electrodes look railed. Check these once before every session.
| Setting | Where | Should be | What goes wrong if not |
| Channel count | System Control Panel, before starting | 16 with the Daisy, 8 without | Half the channels missing or mislabelled |
| SRB2 | Hardware Settings | On for every channel you use | The channel ignores REF and rails |
| Bias | Hardware Settings | Included for every channel you use | More hum on that channel |
| Unused channels | Hardware Settings or the channel number buttons | Off | Empty pins show as railed and clutter the screen |
| Notch filter | Filters | 60 Hz in Canada (or 50 + 60) | A thick band of hum on every channel |
| Bandpass filter | Filters | 1 to 50 Hz | Slow drift or high-frequency fuzz |
Filters only clean the display and saved data. They cannot fix a railed channel, because the amplifier was already maxed out before the filter was applied. Fix the contact, not the filter.
Hardware checks
Cables and connectors are the next most common cause after scalp contact. Always switch the Cyton off before changing any connection.
- ☐ Every HPTA cable is pushed all the way onto its pin, with the silver latch facing up.
- ☐ Each cap lead is firmly joined to its HPTA cable. A half-seated connector causes on-and-off dropouts.
- ☐ The Y-splitter sits firmly on the SRB pins of both boards (when the Daisy is attached).
- ☐ REF connects to the single end of the Y-splitter.
- ☐ GND connects to the Cyton’s bottom BIAS pin; the Daisy’s BIAS stays empty.
- ☐ Every cable is on the bottom row of pins (N1P to N8P), not the top row.
- ☐ Cables are not stretched or pulling on the cap when the participant moves.
- ☐ The battery is charged. A low battery can cause odd behaviour and dropped data.
- ☐ The dongle switch is on GPIO6 and the dongle is close to the board.
Finding a bad cable
If one channel rails no matter how well you gel, swap its cable with a channel that works. If the problem moves to the new channel, the cable is faulty. If it stays, the electrode or the pin is the problem.
Troubleshooting table
| What you see | Most likely cause | Fix |
| Every channel railed | REF or GND not touching skin, or not plugged in | Re-gel REF and GND; check SRB and BIAS cables; move REF to the earlobe |
| Every channel railed, even with REF on the ear | SRB2 off, or wrong channel count | Turn SRB2 on in Hardware Settings; select 16 channels with the Daisy |
| One channel railed | That electrode’s gel hasn’t reached the scalp | Part hair, scrub, re-circle the gel; wait a minute |
| One channel railed after re-gelling | Faulty cable or connector | Swap cables with a working channel |
| Signal cuts in and out | Loose cap or half-seated connector | Tighten chin strap; push cables fully onto pins |
| Gets worse when the person moves | Cables pulling or cap shifting | Tidy and slacken cables; tighten cap |
| Every channel noisy together, not railed | Electrical hum | Notch at 60 Hz; laptop on battery; move chargers away |
| Two channels look identical | Gel bridge between neighbours | Wipe away spread gel; re-gel with less |
| Slow, wandering drift | Sweat or drying gel | Cooler room; bandpass 1 to 50 Hz; top up gel |
| Flat line at 0.00 µVrms | Nothing connected, or channel off | Check the cable, or switch the channel off |
| Fine at first, railed later | Gel drying out | Add a little gel and re-circle |
Recording-day checklist
- ☐ Participant told: clean, dry hair, no products
- ☐ Battery charged; laptop on battery; chargers away
- ☐ Cables connected with the board off; latches up; Y-splitter on both SRB pins
- ☐ GUI: correct channel count, SRB2 and Bias on, unused channels off, notch 60 Hz, bandpass 1 to 50 Hz
- ☐ Cap sized, centred, two fingers above the brows, chin strap firm
- ☐ Data stream running before gelling
- ☐ REF (ideally earlobe) and GND cleaned, gelled, checked
- ☐ Each electrode: part hair, scrub, gel while circling, wait a minute, Not Railed at 5 to 50 µVrms
- ☐ Final look: all channels calm; participant relaxed, jaw loose
- ☐ Note in the session log which reference was used
Videos and further reading
Seeing the technique helps. Search YouTube for:
- “EEG electrode cap gel application”
- “how to apply EEG gel with long hair”
- “OpenBCI electrode cap setup”
Lab and manufacturer channels (Brain Products, EasyCap, university EEG labs) often show the parting and circling technique in close-up. Their caps work the same way as the OpenBCI cap.