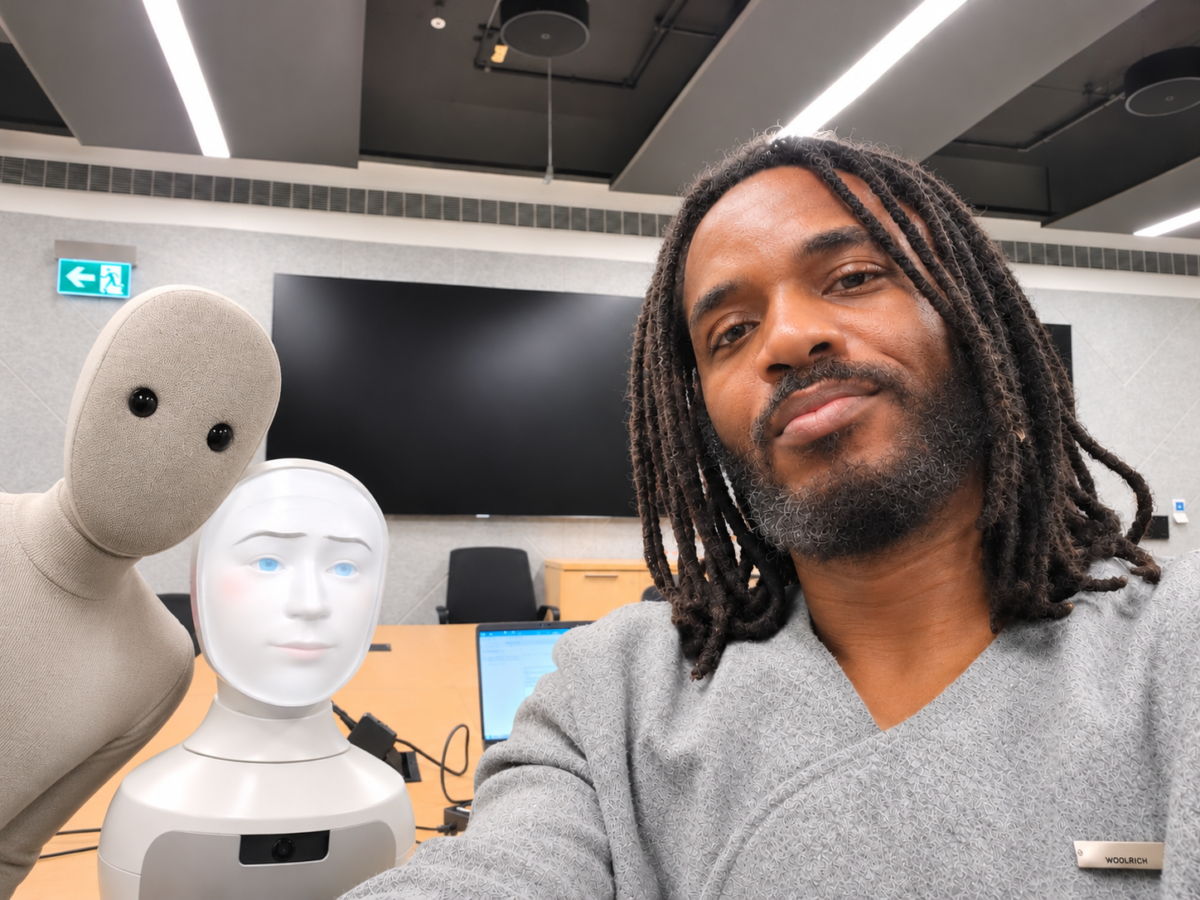
NeuroIS lab protocol · tested Nov 15–16, 2026
By Chinonso Anyaehie, PhD researcher in Information Systems working on NeuroIS and human-robot interaction.
A beginner’s guide to the setup we built in the lab: PsychoPy runs the task, the Furhat robot speaks, the OpenBCI EEG records brain activity, and LabRecorder saves all of it into one file with every event timed to a few milliseconds.
Versions used: PsychoPy 2026.2.5 · pylsl 1.18.6 · furhat-realtime-api 0.1.3 · OpenBCI GUI v6.0.0-beta.1 · Windows lab PC
Contents
- Part 00: What we’re building and why
- Part 01: What you need
- Part 02: Install PsychoPy and add-ons
- Part 03: Study folder and marker helper
- Part 04: Dry run without robot or EEG
- Part 05: Get Furhat ready
- Part 06: First Furhat test
- Part 07: The full task script
- Part 08: Stream the EEG
- Part 09: Record with LabRecorder
- Part 10: Check the recording
- Part 11: Common problems and fixes
- Part 12: Session-day checklist
- Part 13: What’s next
Part 00: What we’re building and why
Four programs work together. Each one has a single job.
- PsychoPy: Shows the task screens, tells Furhat what to say, and sends a label every time something happens. (stream: PsychoPyMarkers)
- Furhat: Speaks the line, then reports the exact moment its voice starts and stops. (reported through PsychoPy)
- OpenBCI GUI: Reads the EEG cap (16 channels) and broadcasts the brain signal. (stream: obci_eeg1)
- LabRecorder: Listens to both broadcasts and saves them together in one
.xdffile. (sub-P001_…_run-002_eeg.xdf)
The radio analogy
Think of each device as a radio station. The EEG station broadcasts brain waves. The PsychoPy station broadcasts short announcements such as “puzzle started” or “Furhat began speaking”. LabRecorder is a tape recorder that tunes in to every station at once and saves them onto one tape.
The thing that makes this work is LSL (Lab Streaming Layer), a free tool that stamps every sample and every announcement with the time on one shared clock. Each device has its own internal clock, and those clocks drift apart by fractions of a second. LSL removes that problem. LSL only carries the signals. If LabRecorder isn’t recording, everything streams past and nothing is saved.
Why the timing matters
The study compares a calm robot line (“Take your time.”) with a pressuring one (“Hurry, only 10 seconds left!”). The brain’s response to a spoken line starts within a few hundred milliseconds of hearing it. So the analysis has to start from the moment Furhat’s voice actually starts, which we call ROBOT_SPEAK_START.
That moment is not the moment the script sends the command. In our tests Furhat started speaking 0.28 to 0.49 seconds after the command on the first try, and 0.05 seconds after it on the final run. The delay changes from line to line, so we record the real start every time instead of guessing it.
Words you’ll see
- Marker: A short label with a time stamp, like
T2_START_HIGH. It marks when something happened. - Stream: One continuous broadcast on LSL. We have two:
obci_eeg1(EEG) andPsychoPyMarkers(markers). - .xdf: The file LabRecorder saves. It holds every stream you ticked, on one clock.
- Script: A small Python program (a
.pyfile). PsychoPy’s Coder window runs it. - Package: An add-on that gives Python a new ability, such as talking to Furhat.
- Synthetic EEG: Fake brain waves made by the OpenBCI GUI, so you can test everything without putting on a cap.
- Epoch: A short slice of EEG cut around a marker, for example 1 second before to 2 seconds after Furhat speaks.
Part 01: What you need
| Item | What we used | Notes |
|---|---|---|
| Computer | Windows lab PC | In our test, PsychoPy, OpenBCI GUI and LabRecorder all ran on this one PC. |
| PsychoPy | Standalone version 2026.2.5 | Installed at C:\Program Files\PsychoPy. |
| pylsl | 1.18.6 | Lets Python talk to LSL. It came with PsychoPy. |
| furhat-realtime-api | 0.1.3 | Lets Python control Furhat. You install it in Part 02. |
| Furhat robot | Unit F677 | On the lab network at furhat-677.local. |
| EEG | OpenBCI Cyton + Daisy (16 channels) | For testing, the GUI’s Synthetic mode stands in for the cap. |
| OpenBCI GUI | v6.0.0-beta.1 | Sends the EEG out over LSL. |
| LabRecorder | Already on the lab PC | Part of the Lab Streaming Layer project. Saves the .xdf. |
Every script appears in full below, ready to copy.
Part 02: Install PsychoPy and the add-ons
Step 2.1. Install the standalone PsychoPy for Windows, then open it. The first window you see is Builder, PsychoPy’s drag-and-drop editor.
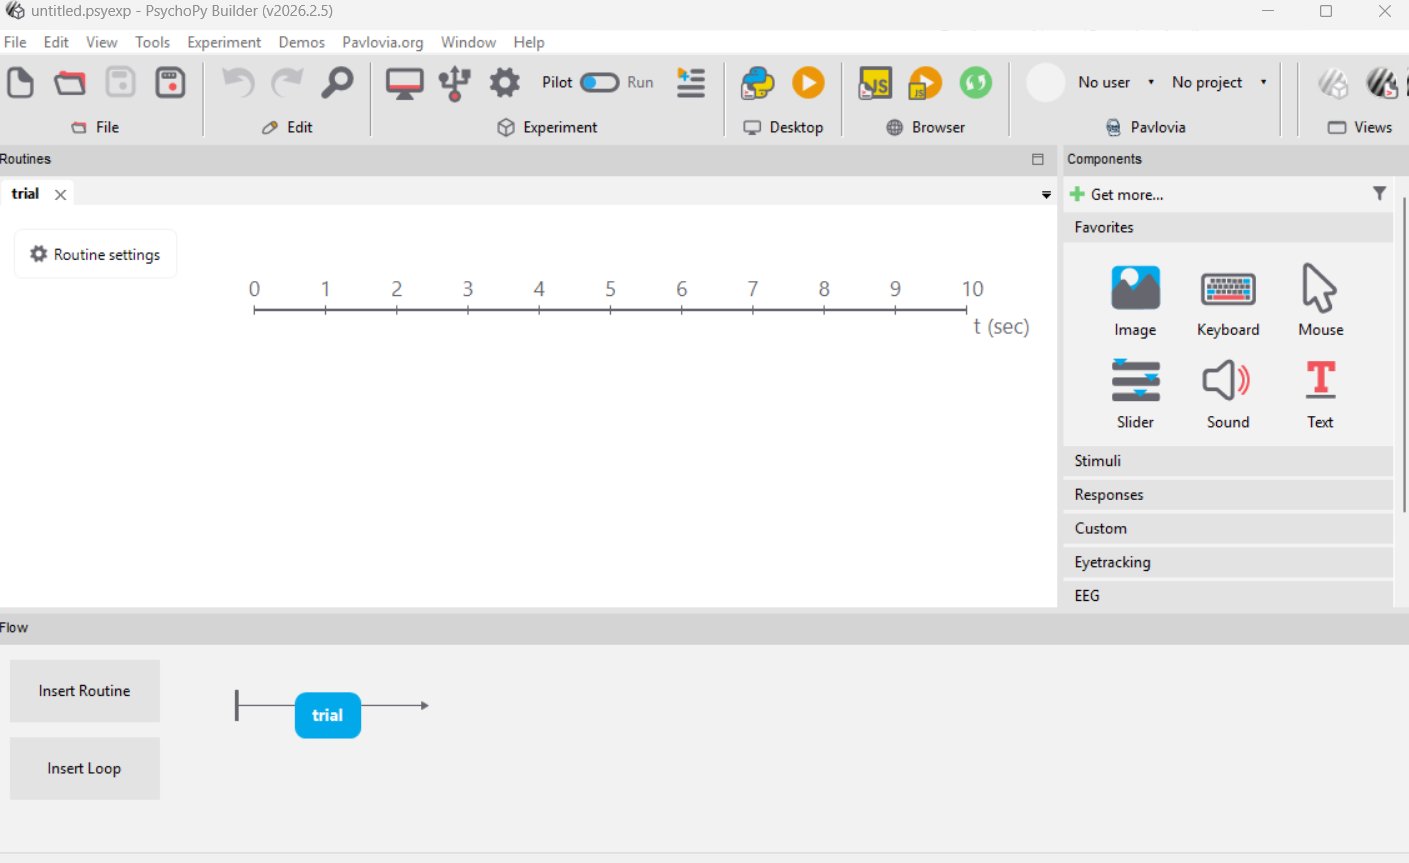
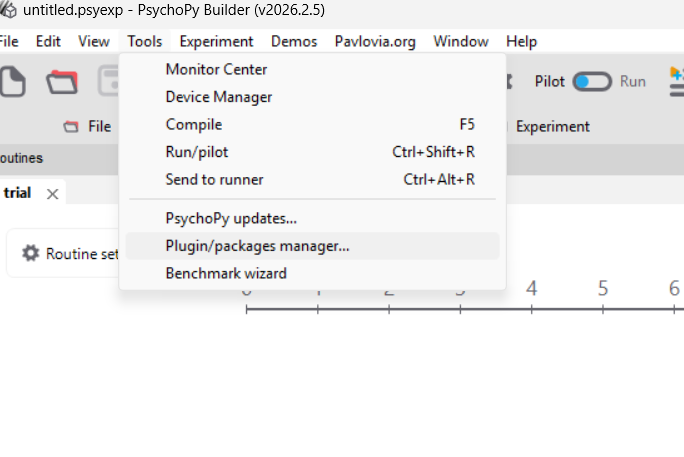
Step 2.2. Open Tools > Plugin/packages manager…
Step 2.3. Click the Packages tab and type pylsl in the search box. It is listed under System Packages with version 1.18.6, which means it is already installed.
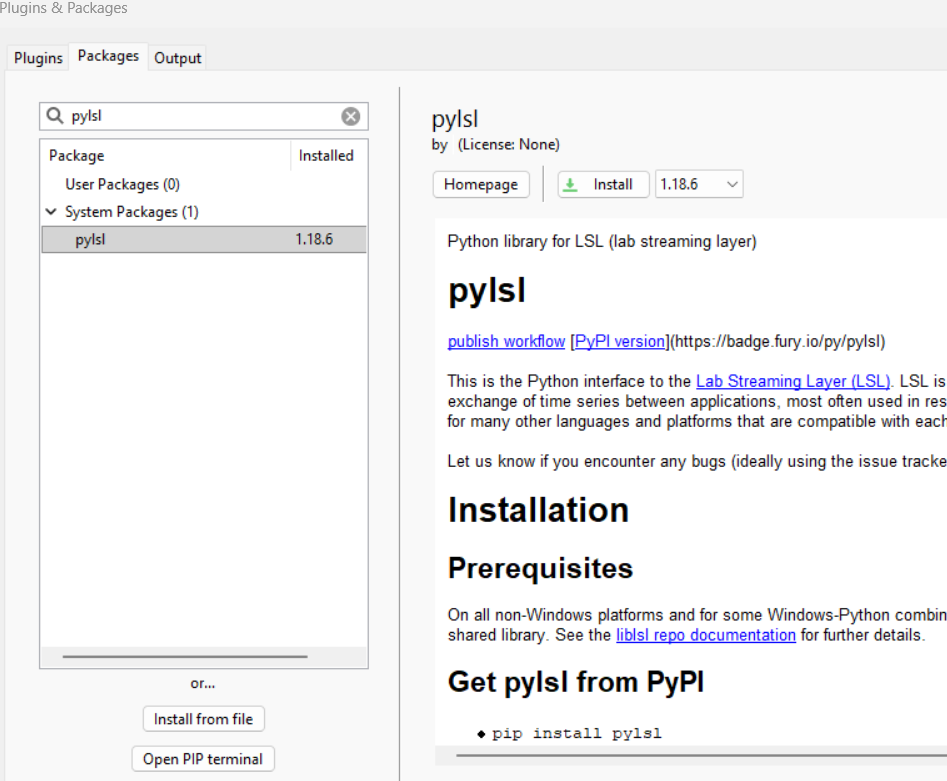
If you click Install anyway, the Output tab says “Requirement already satisfied”. That is fine.
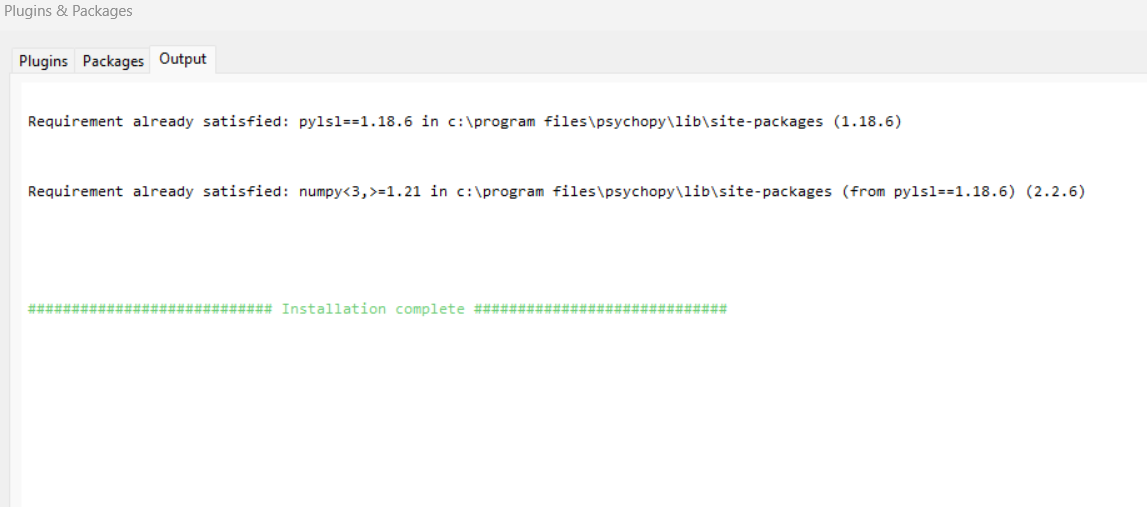
Step 2.4. The search box can’t find the Furhat package. Click Open PIP terminal at the bottom of the Packages tab instead.
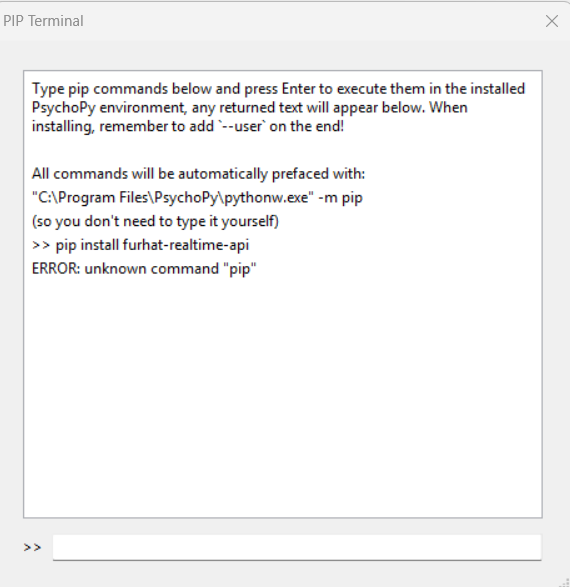
Step 2.5. In the PIP terminal, type this line and press Enter:
install furhat-realtime-api --userDon’t type “pip”. The terminal adds
pipby itself. Typingpip install …givesERROR: unknown command "pip".
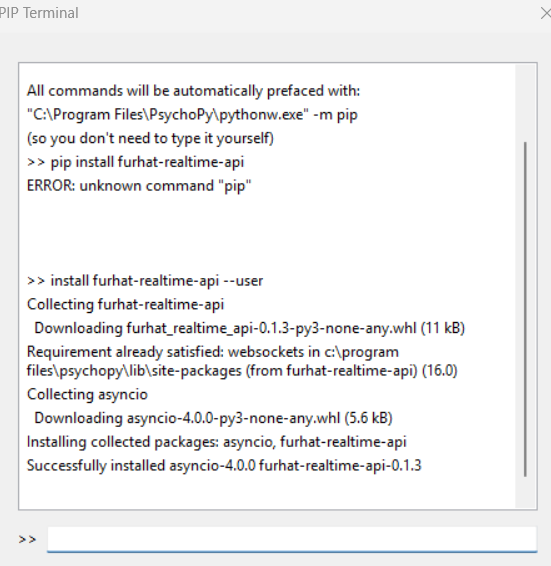
It also installs a package called asyncio 4.0.0. That one is an empty placeholder and does no harm.
Step 2.6. While the terminal is open, install the tool you’ll use in Part 10 to check recordings:
install pyxdf --userStep 2.7. Close PsychoPy and open it again, so it picks up the new packages.
Part 03: Make the study folder and the marker helper
Step 3.1. In Windows File Explorer, turn on file extensions: View > Show > File name extensions. Without this, a file can secretly end in .txt and Python won’t find it.
Step 3.2. Make a folder called C:\NeuroIS\furhat-study. Every script for this study goes in here, side by side.
Step 3.3. Open the Coder window. In Builder, go to the View menu and click Show coder.
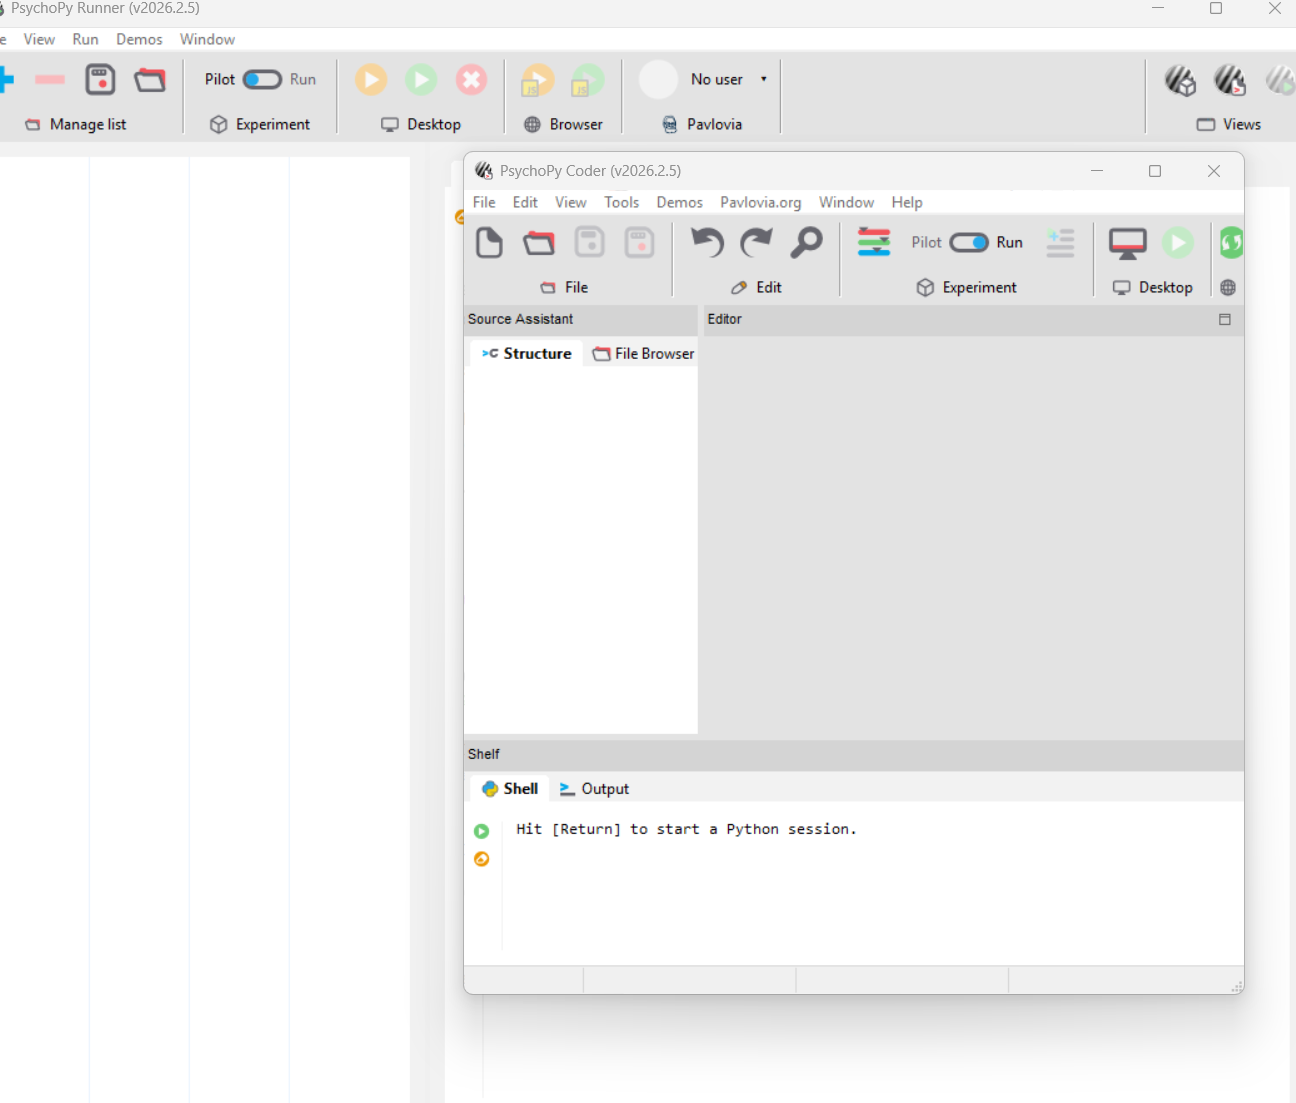
Step 3.4. Click File > New. The Editor turns white and you can type in it. (While it is grey, nothing can be pasted.)
Step 3.5. Copy the code below and paste it into the Editor.
"""One marker sender for every study: PsychoPy, robots, anything.

Each call to mark("T2_START_HIGH") does two things at the same instant:
  1. sends the label to a Lab Streaming Layer (LSL) marker stream, so
     LabRecorder saves it next to the EEG on one shared clock;
  2. writes it to sub-P001_tasklog.csv, which preprocess_physio.py reads.

Use in PsychoPy:
    from markers import MarkerLog
    log = MarkerLog("P001")
    win.callOnFlip(log.mark, "T2_START_HIGH")   # marker at the moment the screen appears
    win.flip()
    ...
    log.close()
"""
from pathlib import Path

try:
    from pylsl import StreamInfo, StreamOutlet, local_clock
except ImportError:            # still log to CSV if pylsl is missing, but say so
    StreamOutlet = None
    import time
    local_clock = time.perf_counter


class MarkerLog:
    def __init__(self, pid, folder=".", stream_name="PsychoPyMarkers", suffix="tasklog"):
        self.path = Path(folder) / f"sub-{pid}_{suffix}.csv"
        self.file = open(self.path, "a", encoding="utf-8")
        if self.file.tell() == 0:
            self.file.write("marker,time_s\n")
        self.outlet = None
        if StreamOutlet is not None:
            info = StreamInfo(stream_name, "Markers", 1, 0, "string", f"{stream_name}-{pid}")
            self.outlet = StreamOutlet(info)
        else:
            print("pylsl not installed: markers go to the CSV only (pip install pylsl)")

    def mark(self, label):
        t = local_clock()
        if self.outlet is not None:
            self.outlet.push_sample([label], t)
        self.file.write(f"{label},{t:.4f}\n")
        self.file.flush()           # a crash never loses markers already sent
        return t

    def close(self):
        self.file.close()
Step 3.6. Click File > Save As, go to C:\NeuroIS\furhat-study and save it as markers.py.
What this file does. It is a helper that the other scripts use. Each time a script calls
log.mark("T2_START_HIGH"), the helper does two things at the same instant: it broadcasts the label on LSL as thePsychoPyMarkersstream, and it writes the label and time into a backup file such assub-P001_tasklog.csv. You never run this file by itself.
Part 04: Dry run without the robot or the EEG
This test shows the task screens and writes markers, with Furhat’s lines shown as text. It proves PsychoPy and the marker helper work before anything else is involved.
Step 4.1. In Coder, click File > New, paste the code below, and save it as test_markers.py in the same folder.
from psychopy import visual, core, event
from markers import MarkerLog

win = visual.Window(fullscr=False, size=(1000, 700))
log = MarkerLog("P001")

def show(text, label=None, secs=3):
    stim = visual.TextStim(win, text=text, height=0.08)
    stim.draw()
    if label:
        win.callOnFlip(log.mark, label)
    win.flip()
    core.wait(secs)

log.mark("SYNC_START")
for n, cond in enumerate(["LOW", "HIGH"], start=1):
    log.mark(f"T{n}_BASE_START")
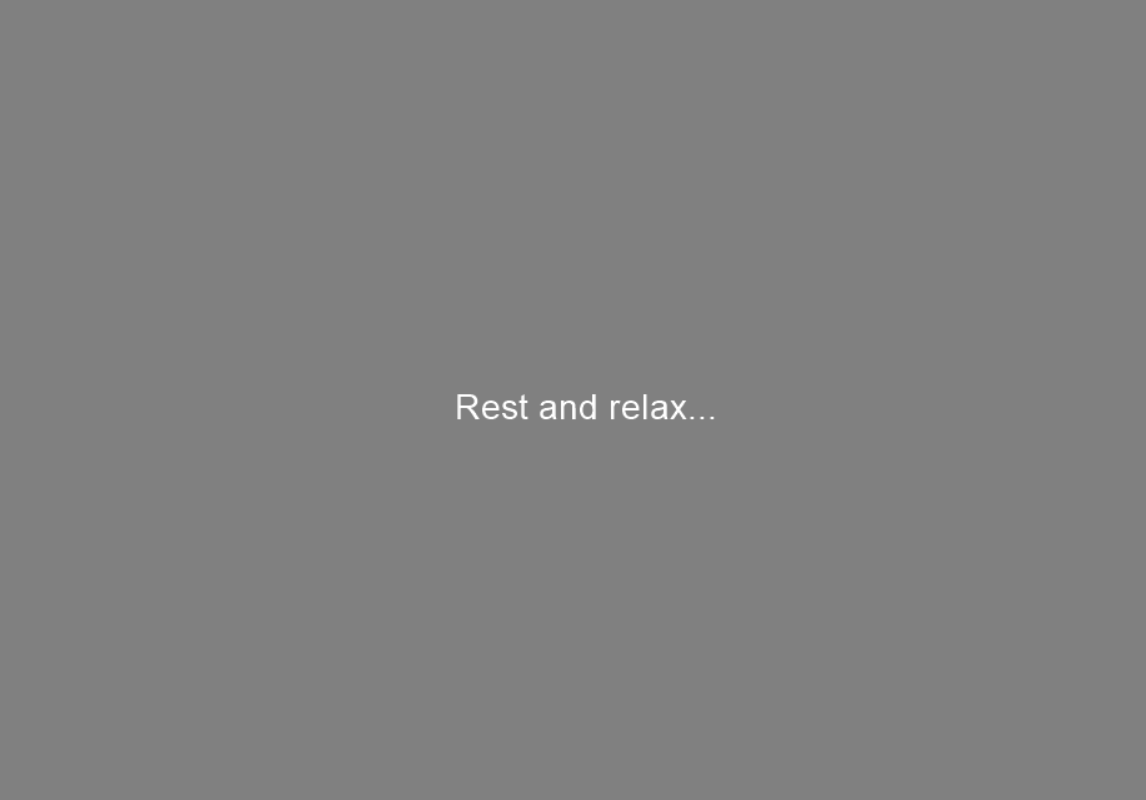
    show("Rest and relax...", secs=5)
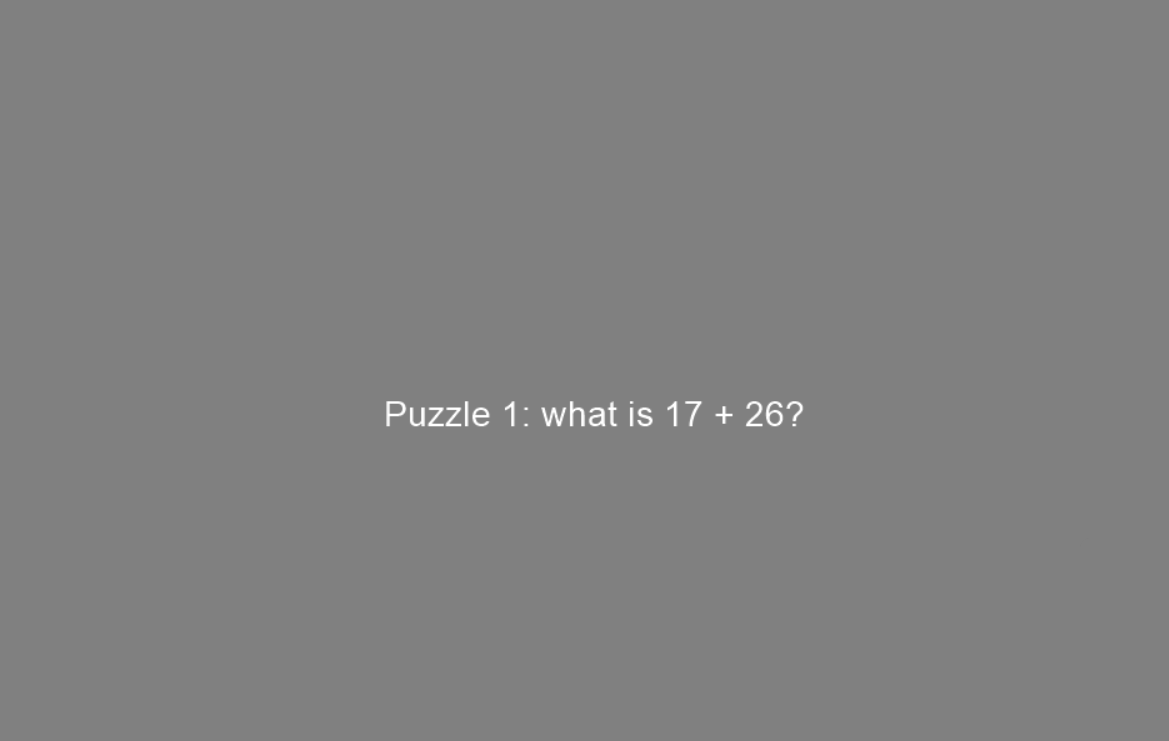
    show(f"Puzzle {n}: what is 17 + 26?", f"T{n}_START_{cond}")
    if cond == "HIGH":
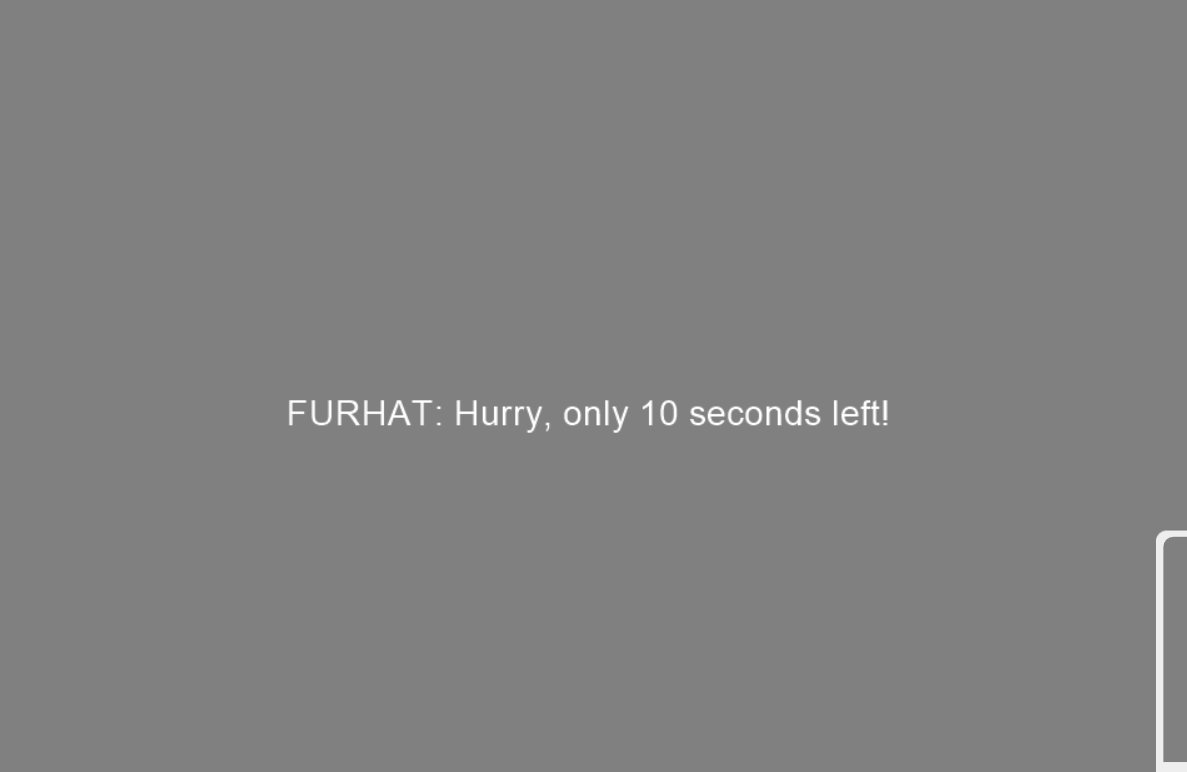
        show("FURHAT: Hurry, only 10 seconds left!", "ROBOT_SAY_HURRY", secs=3)
    else:
        show("FURHAT: Take your time.", "ROBOT_SAY_CALM", secs=3)
    log.mark(f"T{n}_END")
log.mark("SYNC_END")
log.close()
win.close()
core.quit()
Step 4.2. Make sure the test_markers.py tab is the one selected in the Editor, then click the green Run (play) button.
Step 4.3. A grey window shows a rest screen, a puzzle and a “FURHAT:” line, twice. It takes about 22 seconds and closes by itself.
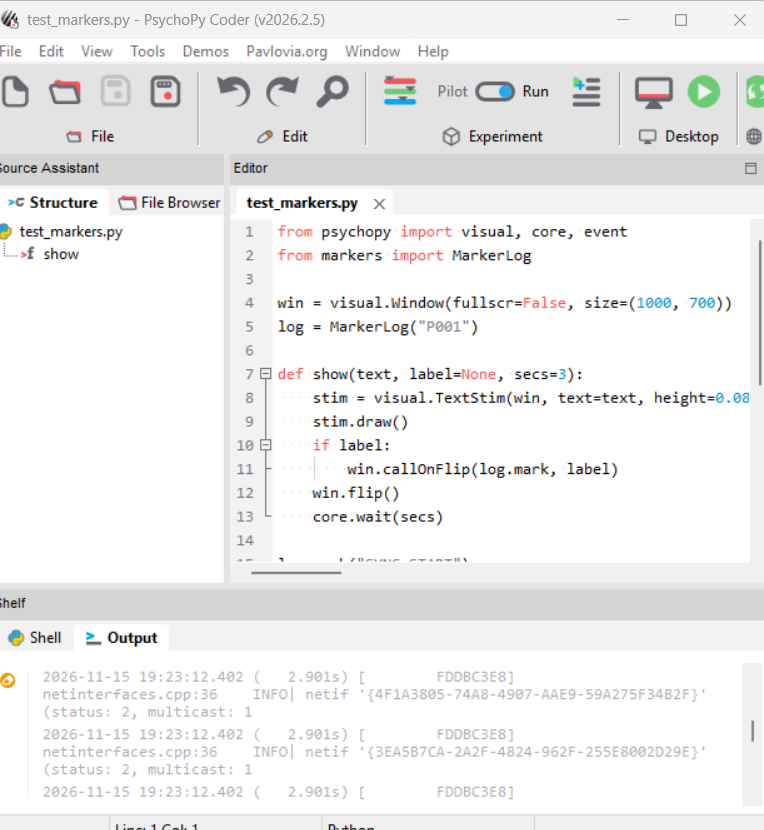
Step 4.4. The Output panel fills with lines mentioning netinterfaces and INFO. Those are normal messages from LSL finding the network, not errors.
Step 4.5. Open sub-P001_tasklog.csv from the study folder. You should see 10 markers, from SYNC_START to SYNC_END.
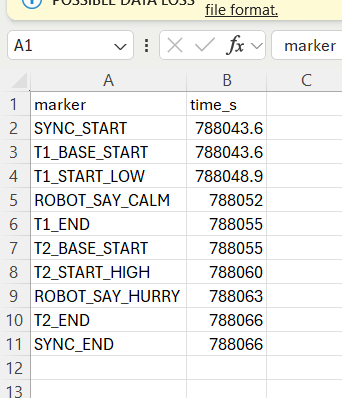
Step 4.6. Close Excel without saving. Saving from Excel would cut off the decimals, and an open file blocks the next run.
Part 05: Get Furhat ready
Step 5.1. Switch Furhat on. Make sure the lab PC is on the same network as the robot.
Step 5.2. On the lab PC, open a web browser and go to http://furhat-677.local/. This is the robot’s own control page.
Step 5.3. The green bar at the top says Running Skill – Furhat AI Creator. Click its red square to stop it.
Why. A running skill is another program controlling the robot. If it keeps running, it can talk and listen on top of your script.
Step 5.4. In the left menu, click Realtime API. Under Access control – Local network, choose Enabled without authentication and click SAVE.
Step 5.5. Leave Access control – Anywhere on Disabled. That keeps the robot unreachable from the internet.
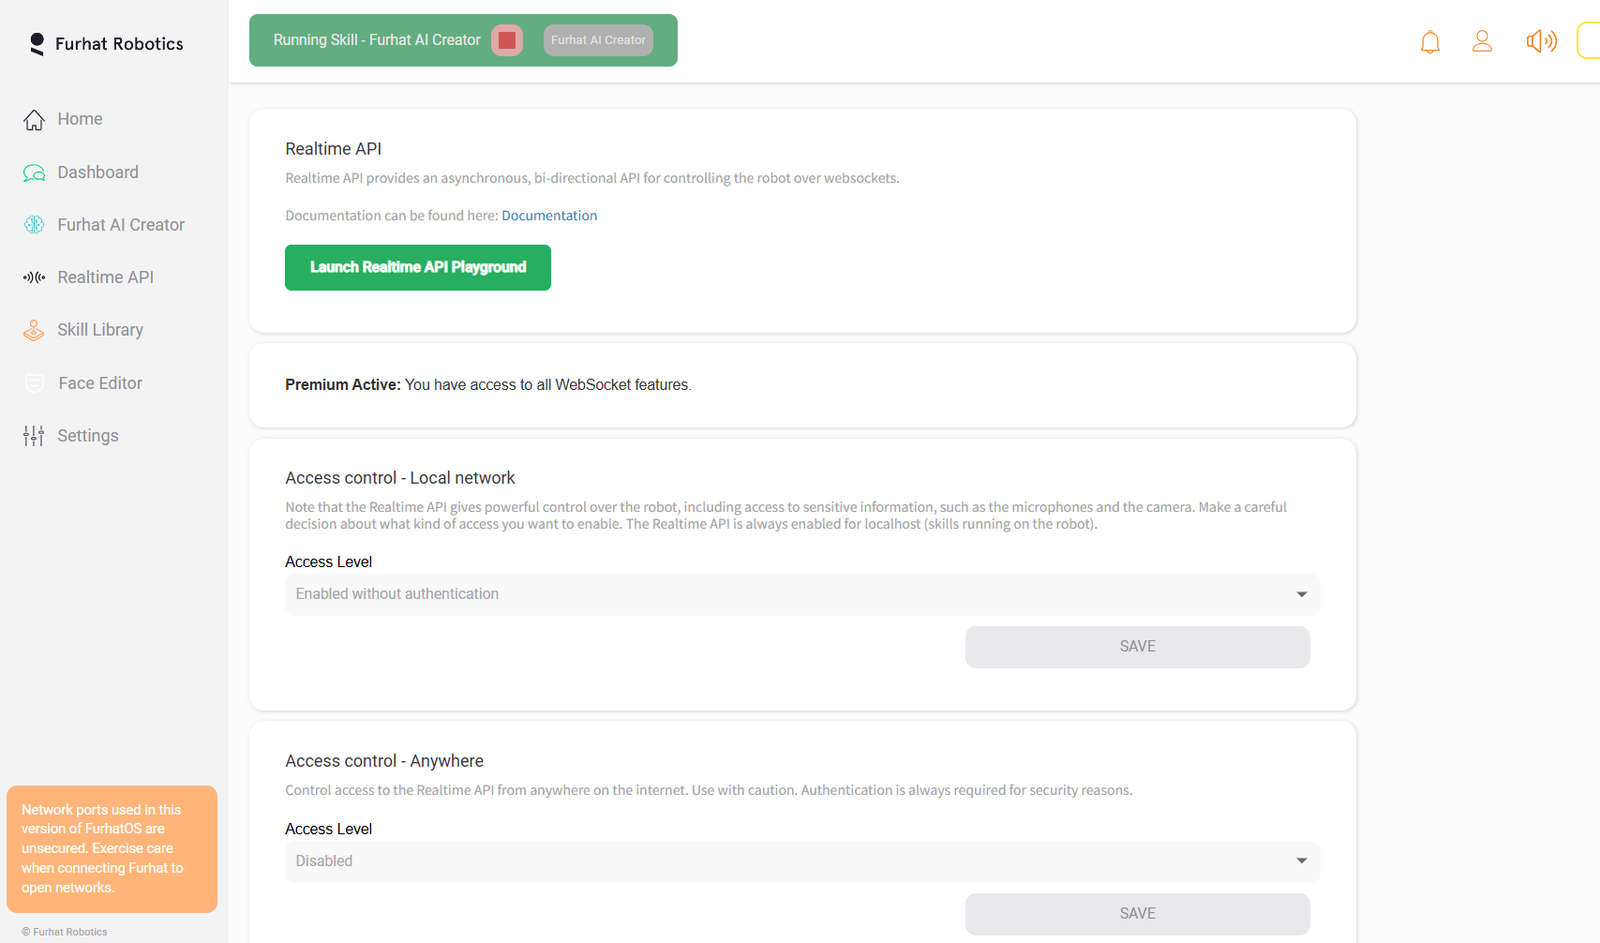
Good to know. With this setting, anyone on the lab network can control the robot without a password. Switch it back off when the lab isn’t running studies.
Part 06: First Furhat test from PsychoPy
Step 6.1. In Coder, click File > New, paste the code below, and save it as test_furhat.py in the study folder.
"""Step 3b: PsychoPy talks to Furhat and records when it really speaks."""
import asyncio
from furhat_realtime_api import AsyncFurhatClient, Events
from markers import MarkerLog

ROBOT = "furhat-677.local"   # Furhat's address on the lab network

async def main():
    log = MarkerLog("TEST", stream_name="RobotMarkers", suffix="robotlog")
    furhat = AsyncFurhatClient(ROBOT, None)
    await furhat.connect()
    print("Connected to Furhat")

    async def start(e): log.mark("ROBOT_SPEAK_START_" + e.get("request_id", "X"))
    async def end(e):   log.mark("ROBOT_SPEAK_END_" + e.get("request_id", "X"))
    furhat.add_handler(Events.response_speak_start, start)
    furhat.add_handler(Events.response_speak_end, end)

    for tag, text in [("TEST1", "Hello, I am testing my markers."),
                      ("TEST2", "That is the end of the test.")]:
        log.mark("ROBOT_SAY_SENT_" + tag)
        await furhat.send_event_and_wait(
            {"type": "request.speak.text", "text": text, "abort": False,
             "monitor_words": False, "request_id": tag},
            "response.speak.end", timeout=30.0)
    await asyncio.sleep(1)
    log.close()
    print("Done. Markers saved in", log.path)

asyncio.run(main())
Step 6.2. Click the green Run button. The Output panel says Connected to Furhat, the robot says two sentences, and then the script prints Done.
Step 6.3. Open the new sub-TEST_robotlog.csv. It shows when each line was sent and when the voice really started and ended.
| Line | Sent → voice started | Voice lasted |
|---|---|---|
| “Hello, I am testing my markers.” | 0.49 s | 1.92 s |
| “That is the end of the test.” | 0.28 s | 1.36 s |
This is the first proof that the delay between “send” and “speak” is real and changes from line to line.
A quirk we found. Furhat ignores the label we give each line and reports its own long code instead, so the markers came out as
ROBOT_SPEAK_START_d770ee5f-…. The full task script in Part 07 fixes this by remembering which line it just sent.
Part 07: The full task script
This is the real study flow, shortened to two trials: a calm trial (LOW) and a hurry trial (HIGH).
Step 7.1. In Coder, click File > New, paste the code below, and save it as furhat_study_test.py in the study folder.
import asyncio
from psychopy import visual, core, event
from furhat_realtime_api import AsyncFurhatClient, Events
from markers import MarkerLog

ROBOT = "furhat-677.local"   # Furhat's address on the lab network
PID = "P001"                 # participant ID
LINES = {"LOW": "Take your time.", "HIGH": "Hurry, only 10 seconds left!"}


async def wait(secs):
    """Wait without freezing the window. ESC quits."""
    clock = core.Clock()
    while clock.getTime() < secs:
        if event.getKeys(keyList=["escape"]):
            raise KeyboardInterrupt
        await asyncio.sleep(0.02)


async def main():
    win = visual.Window(fullscr=False, size=(1000, 700))
    log = MarkerLog(PID)
    furhat = AsyncFurhatClient(ROBOT, None)
    await furhat.connect()
    current = {"tag": "NONE"}   # which line Furhat is saying right now

    async def speak_start(e): log.mark("ROBOT_SPEAK_START_" + current["tag"])
    async def speak_end(e):   log.mark("ROBOT_SPEAK_END_" + current["tag"])
    furhat.add_handler(Events.response_speak_start, speak_start)
    furhat.add_handler(Events.response_speak_end, speak_end)

    def show(text, label=None):
        visual.TextStim(win, text=text, height=0.07).draw()
        if label:
            win.callOnFlip(log.mark, label)   # marker at the moment the screen appears
        win.flip()

    # Pause so LabRecorder can find the marker stream first
    show("In LabRecorder: Update, tick obci_eeg1 and PsychoPyMarkers, Start.\n\nThen press SPACE here.")
    event.clearEvents()
    while not event.getKeys(keyList=["space"]):
        await asyncio.sleep(0.02)

    log.mark("SYNC_START")
    for n, cond in enumerate(["LOW", "HIGH"], start=1):
        show("Rest and relax...", f"T{n}_BASE_START")
        await wait(5)
        show(f"Puzzle {n}: what is 17 + 26?", f"T{n}_START_{cond}")
        await wait(3)
        tag = f"T{n}_{cond}"
        current["tag"] = tag
        log.mark("ROBOT_SAY_SENT_" + tag)
        await furhat.send_event_and_wait(
            {"type": "request.speak.text", "text": LINES[cond], "abort": False,
             "monitor_words": False, "request_id": tag},
            "response.speak.end", timeout=30.0)
        await wait(3)
        log.mark(f"T{n}_END")
    log.mark("SYNC_END")
    show("Done. Click Stop in LabRecorder.")
    await wait(2)
    log.close()
    win.close()
    print("Done. Markers saved in", log.path)


asyncio.run(main())
core.quit()
Step 7.2. For each new participant, change the PID = "P001" line and save. P001 is a made-up example.
Step 7.3. Run it once on its own, without EEG or LabRecorder. A grey window waits for you. Click on it and press Space.
Step 7.4. You’ll see rest, puzzle, then Furhat says “Take your time.” Then the same again with “Hurry, only 10 seconds left!” It takes about 25 seconds. Esc stops it early.
How it works, in plain words. The script shows a screen and sends a marker at the exact moment the screen appears. When it’s time for Furhat, it sends the line and waits until Furhat says it has finished. Meanwhile it listens for Furhat’s “voice started” and “voice ended” reports and turns each one into a marker. The
asyncparts let it wait for the robot without freezing the screen.
The 14 markers it writes
| Marker | Means |
|---|---|
SYNC_START | You pressed Space. The task begins. |
T1_BASE_START | Trial 1 rest screen appears (5 s baseline). |
T1_START_LOW | Trial 1 puzzle appears. LOW = calm condition. |
ROBOT_SAY_SENT_T1_LOW | Script sends “Take your time.” to Furhat. |
ROBOT_SPEAK_START_T1_LOW | Furhat’s voice actually starts. Analysis time zero. |
ROBOT_SPEAK_END_T1_LOW | Furhat’s voice stops. |
T1_END | Trial 1 ends, 3 s after the voice. |
T2_… (7 markers) | The same for trial 2, with HIGH and “Hurry, only 10 seconds left!” |
SYNC_END | The task is over. |
Part 08: Stream the EEG from the OpenBCI GUI
Step 8.1. Open the OpenBCI GUI. Under Data Source, pick one:
- SYNTHETIC (algorithmic) for practice. It makes fake brain waves. This is what we tested with.
- CYTON (live) for a real participant with the Cyton + Daisy cap. We haven’t run this through the full setup yet. Choose the dongle’s port and 16 channels.
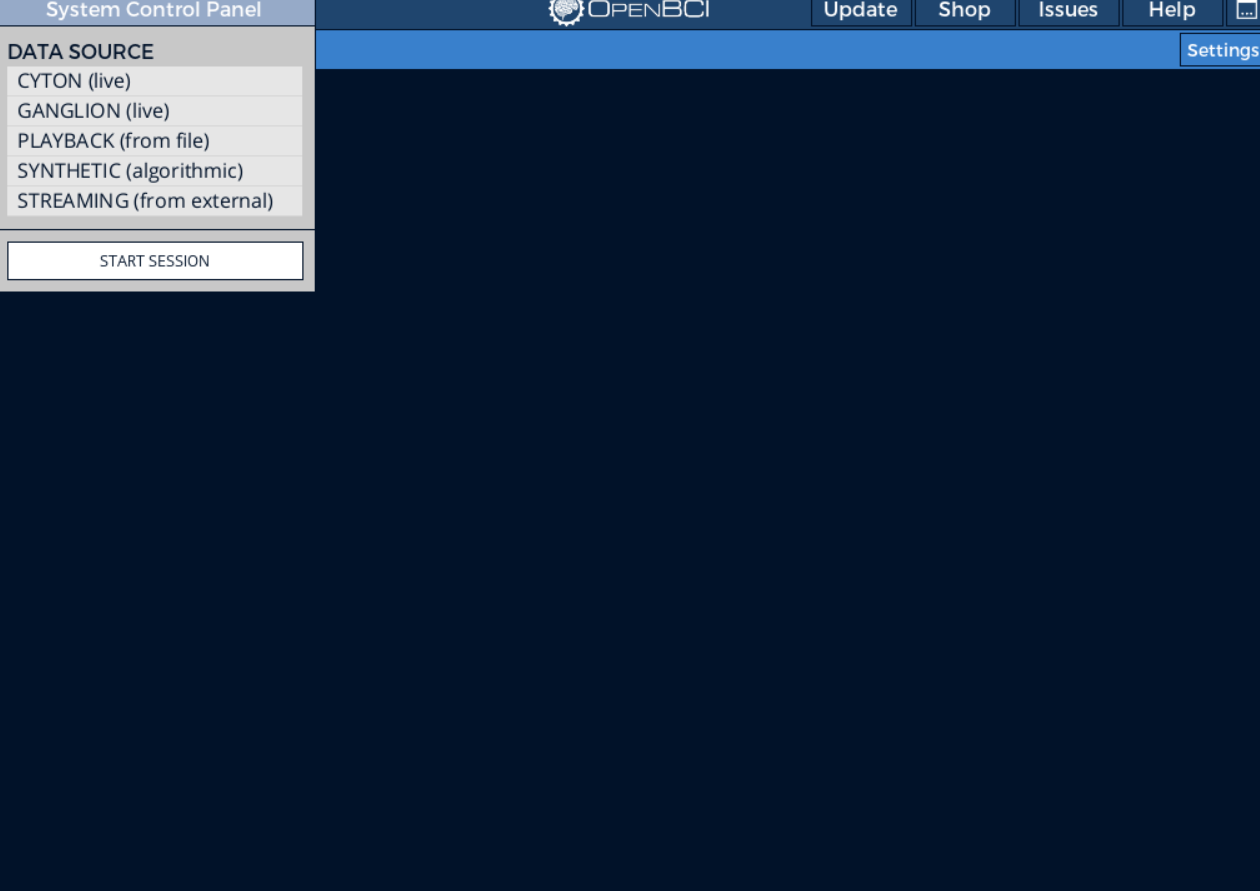
Step 8.2. Set the channel count to 16, then click START SESSION.
Step 8.3. Click Start Data Stream at the top left. Wavy lines start moving on all 16 channels.
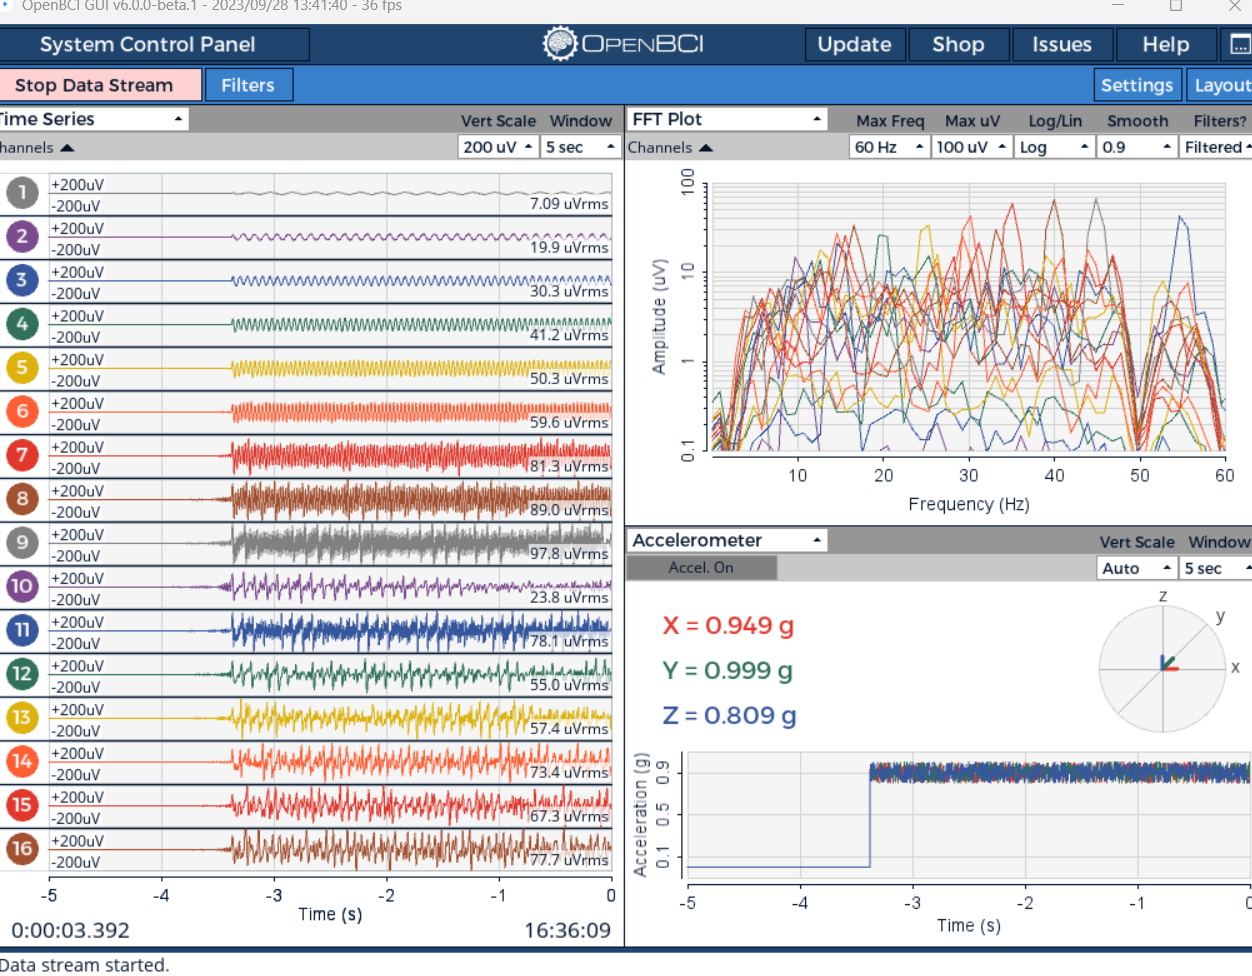
Step 8.4. At the bottom right, click the small arrow next to Accelerometer and choose Networking. The panel opens set to UDP.
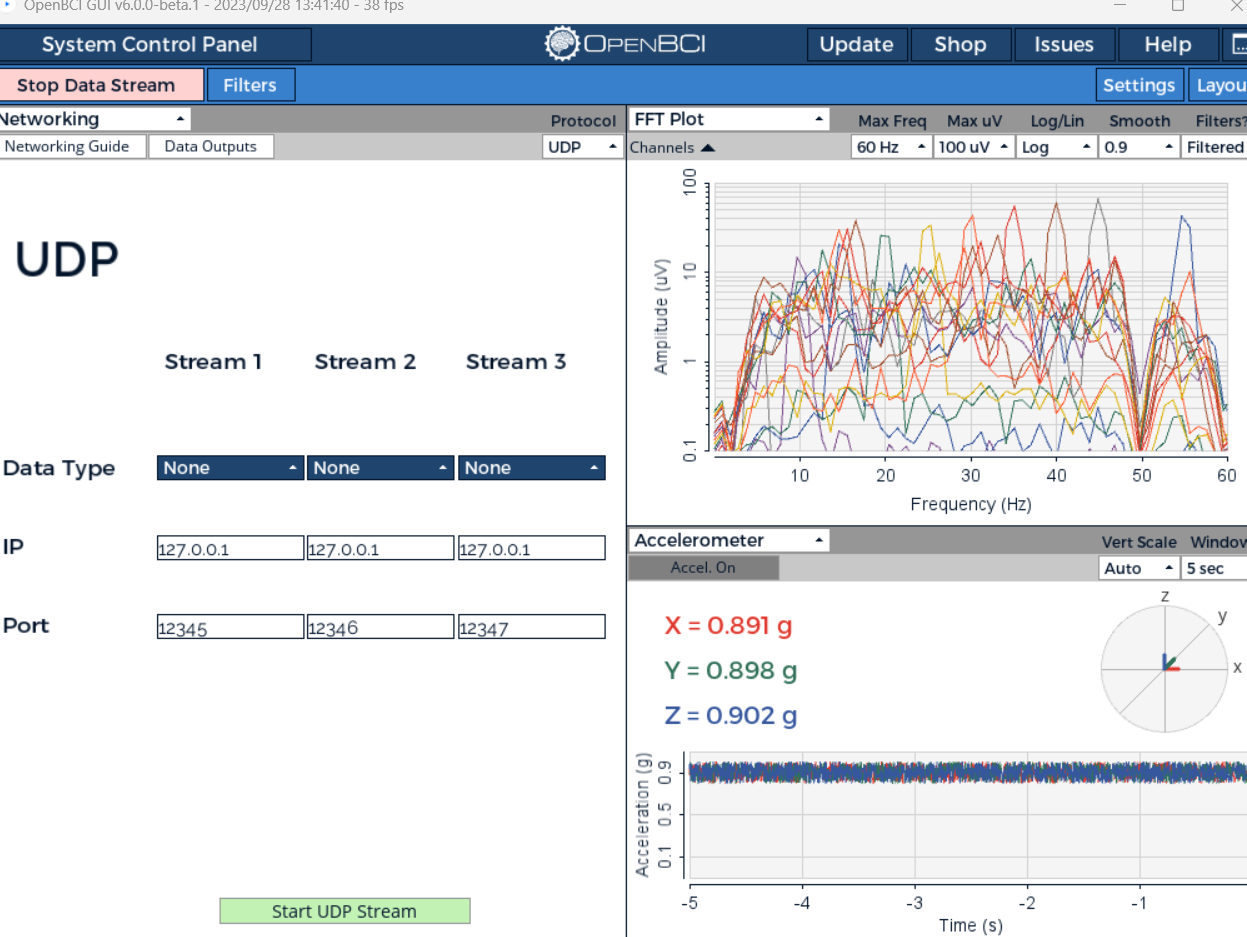
Step 8.5. Click the UDP dropdown next to Protocol and choose LSL.
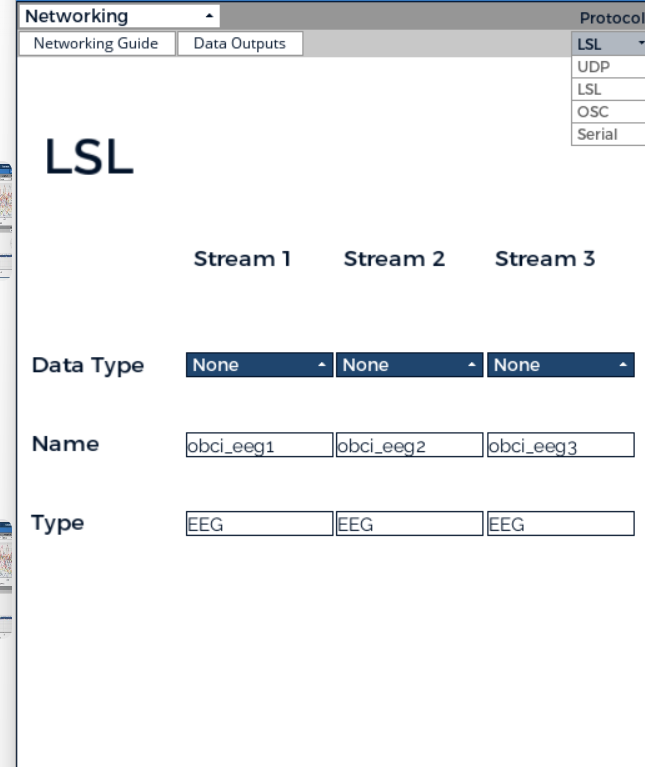
Step 8.6. Under Stream 1, set Data Type to TimeSeriesRaw. Check that the Name is obci_eeg1 and the Type is EEG. Leave Streams 2 and 3 on None.
Why raw?. TimeSeriesRaw sends the EEG exactly as it comes in. The filtered option applies the GUI’s on-screen filters, which you can’t undo later or describe precisely in a paper. Recording raw lets you choose and report your own filters during analysis.
Step 8.7. Click the green Start LSL Stream button. It turns pink and reads Stop LSL Stream, which means the EEG is on air.
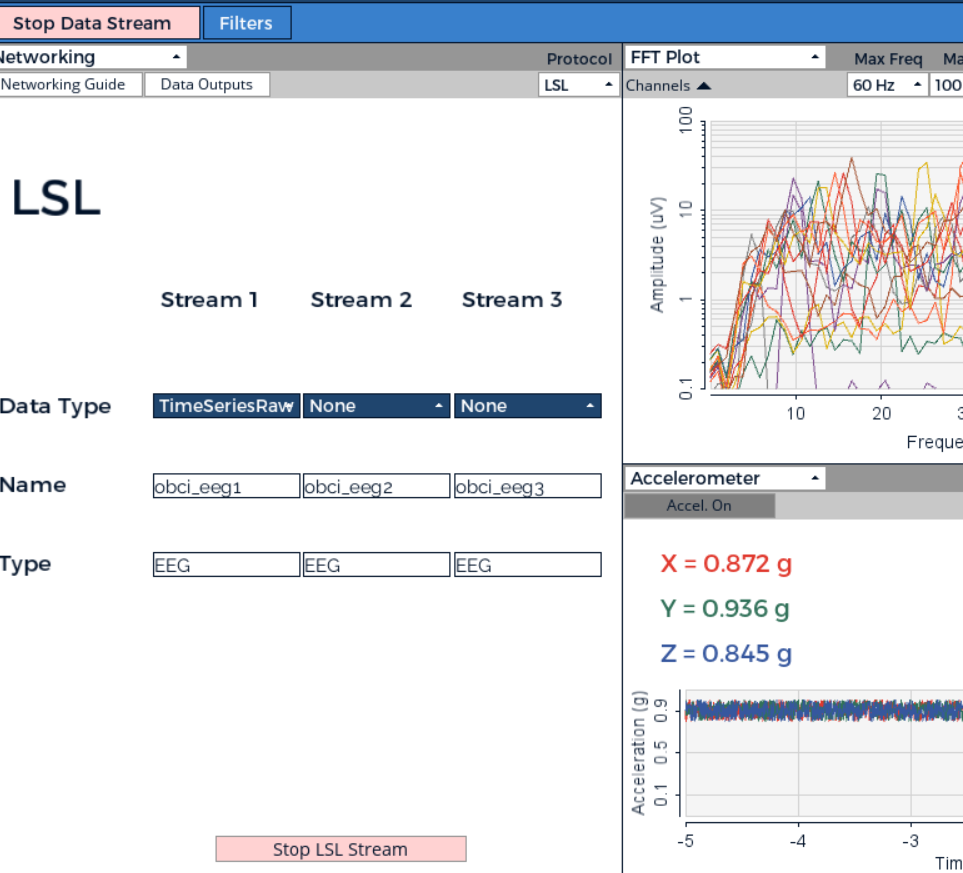
Leave it running. Keep the OpenBCI GUI open with the waves moving for the whole recording. Don’t click Stop Data Stream until LabRecorder has stopped.
Part 09: Record everything with LabRecorder
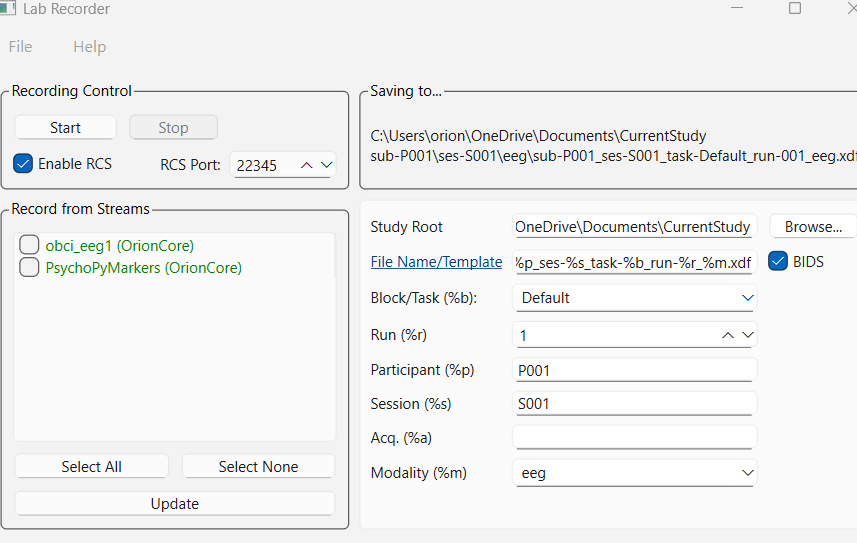
Step 9.1. Open LabRecorder. Next to Study Root, click Browse… and pick this study’s own data folder, for example C:\NeuroIS\data\furhat-pace.
One folder per study, off OneDrive. Give every study its own folder (a NAO trust study would use
C:\NeuroIS\data\nao-trust). Our screenshots still show a OneDrive folder; avoid that, because syncing large EEG files while recording can slow the PC down. Inside the folder, LabRecorder sorts files by participant, session and run on its own.
Step 9.2. Fill in Participant (P001), Session (S001) and Block/Task (type puzzle instead of Default). Keep BIDS ticked.
Step 9.3. Set Run. Each recording of the same participant and session gets the next number. We used 2 because run 1 already existed; the same number would clash with the old file.
Step 9.4. Click Update. The EEG stream obci_eeg1 appears. PsychoPyMarkers is missing for now, which is normal.
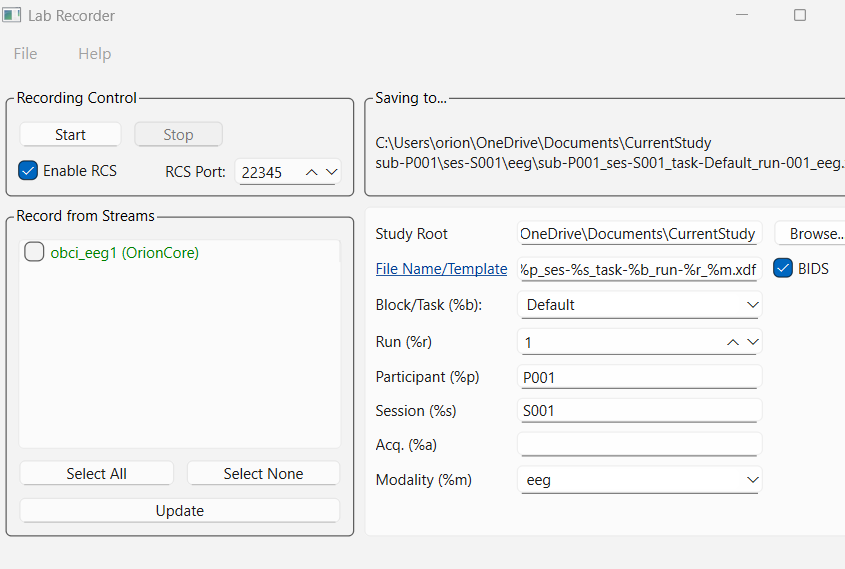
Step 9.5. In Coder, run furhat_study_test.py. Wait for the grey window that asks you to press Space. Don’t press it yet.
Why the wait. The PsychoPyMarkers stream only exists while the script is running. The script pauses at this screen so LabRecorder can find the stream before any marker is sent.
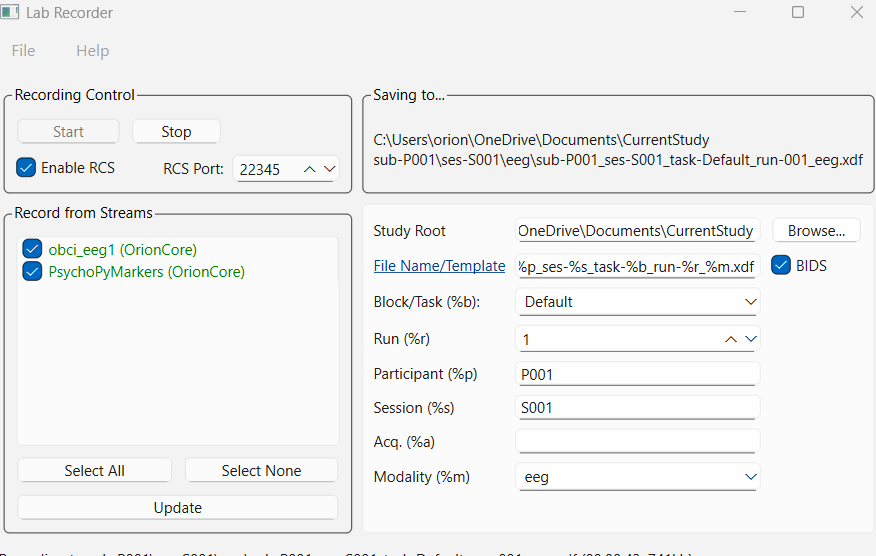
Step 9.6. Back in LabRecorder, click Update again. PsychoPyMarkers now appears. Tick both boxes.
Step 9.7. Click Start in LabRecorder. The Start button greys out, and the status line at the bottom shows a time counting up and a file size that keeps growing.
Step 9.8. Click on the grey PsychoPy window and press Space. Watch and listen for about 25 seconds.
Step 9.9. When the screen says Done, click Stop in LabRecorder. Now you may stop the LSL stream in the OpenBCI GUI.
The file lands at a path like this (the “Saving to…” box shows it before you start):
C:\NeuroIS\data\furhat-pace\sub-P001\ses-S001\eeg\sub-P001_ses-S001_task-puzzle_run-002_eeg.xdfThe order, in one line. EEG streaming → script waiting at Space → LabRecorder Update, tick both, Start → press Space → Done → Stop.
Part 10: Check the recording
A recording that looks fine on screen can still be missing a stream. Our first attempt saved the EEG but no markers. This check takes a minute.
Step 10.1. In Coder, click File > New, paste the code below, and save it as check_xdf.py.
"""Check a LabRecorder .xdf file: is the EEG there, are the markers there?

Run it from PsychoPy Coder after a recording. Change FILE to your file.
Needs pyxdf once:  PsychoPy > Tools > Plugin/packages manager >
Packages > Open PIP terminal, then type:  install pyxdf --user
"""
import numpy as np
import pyxdf

FILE = r"C:\NeuroIS\data\furhat-pace\sub-P001\ses-S001\eeg\sub-P001_ses-S001_task-puzzle_run-002_eeg.xdf"

streams, header = pyxdf.load_xdf(FILE)
eeg_start = eeg_end = None
for s in streams:
    name = s["info"]["name"][0]
    times = s["time_stamps"]
    print(f"\nStream: {name}")
    if len(times) == 0:
        print("  EMPTY: nothing was recorded in this stream")
        continue
    if s["info"]["type"][0] == "Markers":
        print(f"  {len(times)} markers:")
        for value, t in zip(s["time_series"], times):
            print(f"    {t:12.3f}  {value[0]}")
    else:
        rate = float(s["info"]["nominal_srate"][0])
        gap = np.max(np.diff(times))
        eeg_start, eeg_end = times[0], times[-1]
        print(f"  channels: {s['info']['channel_count'][0]}")
        print(f"  sampling rate: {rate:g} Hz")
        print(f"  length: {times[-1] - times[0]:.1f} s")
        print(f"  biggest gap between samples: {gap * 1000:.0f} ms"
              + ("  (OK)" if gap < 5 / rate else "  (CHECK: data dropped)"))

for s in streams:
    if s["info"]["type"][0] == "Markers" and eeg_start is not None and len(s["time_stamps"]):
        inside = (s["time_stamps"][0] >= eeg_start) and (s["time_stamps"][-1] <= eeg_end)
        print("\nEEG covers every marker:", "YES" if inside else "NO, recording started late or stopped early")
Step 10.2. Change the FILE = r"…" line to your new file. Tip: in File Explorer, right-click the file and choose Copy as path, then paste it between the quotes. Keep the r in front.
Step 10.3. Click Run and read the Output panel.
What a good result looks like
This is the output for our successful run-002 recording, made with synthetic EEG on Nov 16:
Stream: PsychoPyMarkers
  14 markers:
      865975.973  SYNC_START
      865975.996  T1_BASE_START
      865981.027  T1_START_LOW
      865984.036  ROBOT_SAY_SENT_T1_LOW
      865984.090  ROBOT_SPEAK_START_T1_LOW
      865984.883  ROBOT_SPEAK_END_T1_LOW
      865987.890  T1_END
      865987.912  T2_BASE_START
      865992.936  T2_START_HIGH
      865995.948  ROBOT_SAY_SENT_T2_HIGH
      865995.994  ROBOT_SPEAK_START_T2_HIGH
      865998.062  ROBOT_SPEAK_END_T2_HIGH
      866001.074  T2_END
      866001.074  SYNC_END

Stream: obci_eeg1
  channels: 16
  sampling rate: 250 Hz
  length: 33.5 s
  biggest gap between samples: 4 ms  (OK)

EEG covers every marker: YES| Check | Good result | Run-002 |
|---|---|---|
| EEG channels | 16 (Cyton + Daisy) | 16 |
| Sampling rate | 250 Hz | 250 Hz |
| Biggest gap between samples | About 4 ms (one sample every 4 ms at 250 Hz) | 4 ms |
| Markers | All 14, in order | 14 |
| EEG covers every marker | YES | YES |
| Robot labels | T1_LOW, T2_HIGH, no long codes | correct |
Run-002 drawn to scale

Furhat’s voice started 0.05 seconds after the command on both lines this time. “Take your time.” lasted 0.8 s and “Hurry, only 10 seconds left!” lasted 2.1 s. The EEG starts before the first marker and ends after the last, so nothing was cut off.
Part 11: Common problems and fixes
Most of these happened during our own setup.
| What you see | Why | Fix |
|---|---|---|
| Furhat package not found in the package search | The search doesn’t list every package. | Use Open PIP terminal (step 2.4). |
ERROR: unknown command "pip" | The PIP terminal adds “pip” itself. | Type install furhat-realtime-api --user. |
| Can’t find “Coder” in the View menu | It’s labelled differently. | Click View > Show coder. |
| The Editor is grey and won’t take a paste | No file is open. | Click File > New first. |
IndentationError after pasting | The code went into the Shell at the bottom. | Paste into the Editor (the big area) after File > New. |
No module named 'markers', or the helper is called markers.txt | Windows hid the real extension, or the helper is in another folder. | Turn on file extensions, rename to markers.py, keep it beside the script. |
| You click Run and nothing visible happens | markers.py was the selected tab. It’s only a helper. | Select the script’s tab (test_markers.py or furhat_study_test.py) and Run. |
PermissionError … 'sub-P001_tasklog.csv' | The CSV is open in Excel, which locks it. | Close Excel without saving, then run again. |
| Times in Excel look rounded (788043.6) | Excel’s display only. | The file is fine. Don’t save from Excel. |
| The task log has old rows above new ones | The helper adds to the same file each time you reuse a participant ID. | Use a new ID for each real participant; delete test logs before a study starts. |
| Script can’t connect to Furhat | Realtime API off, a skill still running, or PC on another network. | Repeat Part 05. |
Robot markers end in long codes like d770ee5f-… | Furhat replaces our line labels with its own codes. | Use furhat_study_test.py, which tracks the line itself. |
| PsychoPyMarkers missing in LabRecorder | The stream only exists while the script runs. | Run the script, wait at the Space screen, click Update. |
The .xdf has EEG but no markers | PsychoPyMarkers wasn’t ticked. | Tick both streams before Start, then check with check_xdf.py. |
| Some markers missing at the start | Space was pressed before LabRecorder’s Start. | Start LabRecorder first, then press Space. |
| New recording would overwrite an old one | Same Run number. | Raise the Run number for each recording. |
Part 12: Session-day checklist
Print this list or copy it into your lab notebook, and tick each item as you go.
Before the participant
- ☐ Furhat on; at
furhat-677.localthe running skill is stopped and Realtime API (local network) is enabled - ☐ Participant ID set in
furhat_study_test.pyand saved - ☐ No CSV from the study folder open in Excel
- ☐ OpenBCI GUI: CYTON (live), 16 channels, START SESSION, Start Data Stream, signals look clean
- ☐ Networking: LSL, TimeSeriesRaw,
obci_eeg1, Start LSL Stream - ☐ LabRecorder: Study Root, Participant, Session, Task and Run filled in
Recording
- ☐ Run
furhat_study_test.py; wait at the Space screen - ☐ LabRecorder: Update; tick
obci_eeg1andPsychoPyMarkers - ☐ Click Start in LabRecorder; time and file size counting up
- ☐ Press Space in the PsychoPy window
- ☐ On “Done”, click Stop in LabRecorder
After
- ☐ Run
check_xdf.pyon the new file: 16 channels, 14 markers, YES - ☐ Raise the Run number before any further recording
- ☐ Stop LSL Stream and Data Stream in the OpenBCI GUI
- ☐ Back up the study’s data folder
- ☐ Switch Furhat’s Realtime API off if no more studies today
Part 13: What’s next
- Epoching. Cut the EEG into slices around each
ROBOT_SPEAK_STARTmarker and compare the calm (LOW) and hurry (HIGH) lines. This is the first real analysis step. - Real headset run. Repeat Parts 08 to 10 with CYTON (live) and the cap on a volunteer.
- Check the voice timing once with a microphone. Record the room audio alongside a run to confirm that
ROBOT_SPEAK_STARTlines up with the sound. - BIOPAC ring. Tap Mark event in the ring app on the iPad at
SYNC_STARTandSYNC_END, so its data can be lined up with the EEG afterwards. A real ring export is needed to finish this. - Builder version. Rebuild the task in PsychoPy Builder using a Code component, so it can be edited without writing Python.
Written from the lab setup sessions of Nov 15–16, 2026. Participant P001 is fictitious, and the EEG in every recording shown here is synthetic.